I will admit that I had a hard time coming up with a name for this page. 3D Printing on fabric, 3d printing on tulle, flexible cosplay armor (and more names that would make this search engine optimization). I however picked flexible dragon scales. It most closely resembles what I tried to make, and I like the name.
I was inspired by this video that 3D printing on fabric is possible. At the time I would not do anything with it, but a year and a halve later, I was discussing things with a enthusiastic larper, and this technique came up. He was interested, and I was reminded that I was as well. I decided that I wanted to give this a try. Armed with the basic knowledge how to do this, and a 3D printer, I went on to try this.
Flat round scales
I bought a piece of tulle mesh, and went to try it. The first piece was a piece that would resemble overlapping round scales. The only thing I wanted to learn from this is whether the 3D print would attach to the tulle, and boy did it. The gap between the scales is a bit too small for it to be flexible, but other than that it did work. Onward to more dragonny scales.

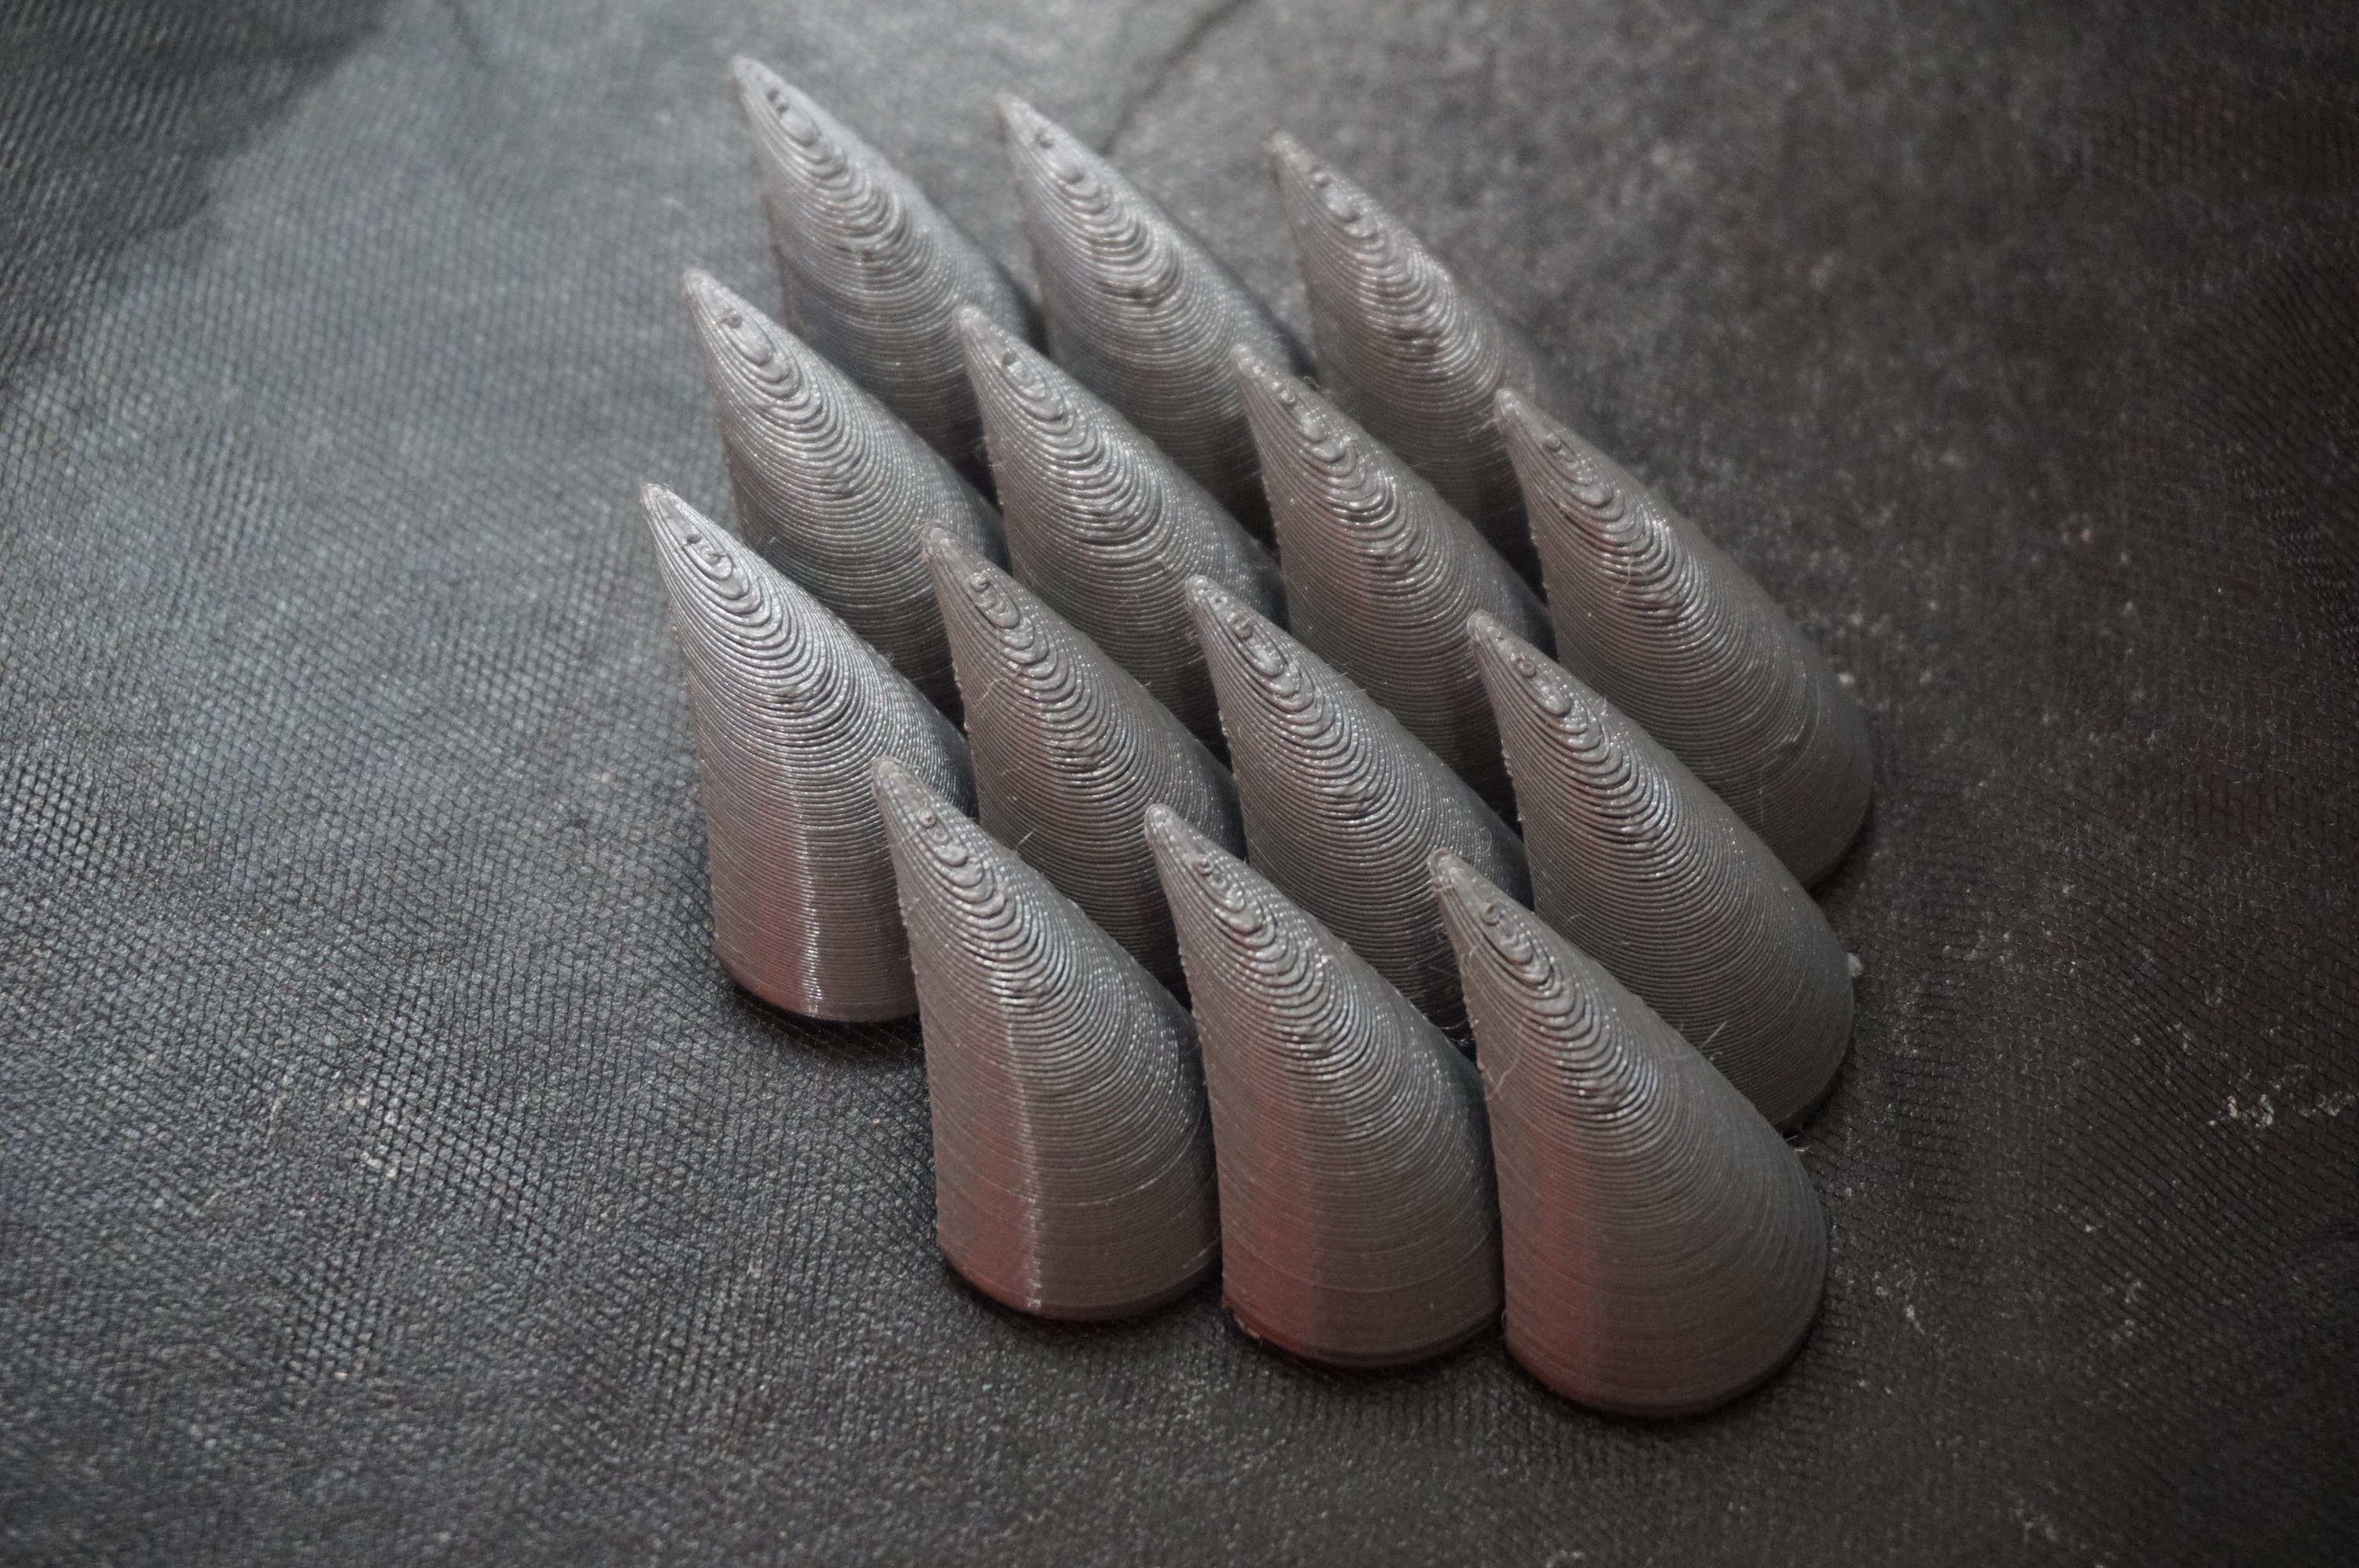
Pointy scales
Using the same meshing as the round scales, I extruded points on top of the scales. This was supposed to give it a look of dragon scales, but ended up looking more like teeth or claws than scales. It is also really heavy and not very flexible. I do keep this one in mind if I need something like spines in my scales, but as a pure covering, I want something more scale like.

Other peoples’ scales
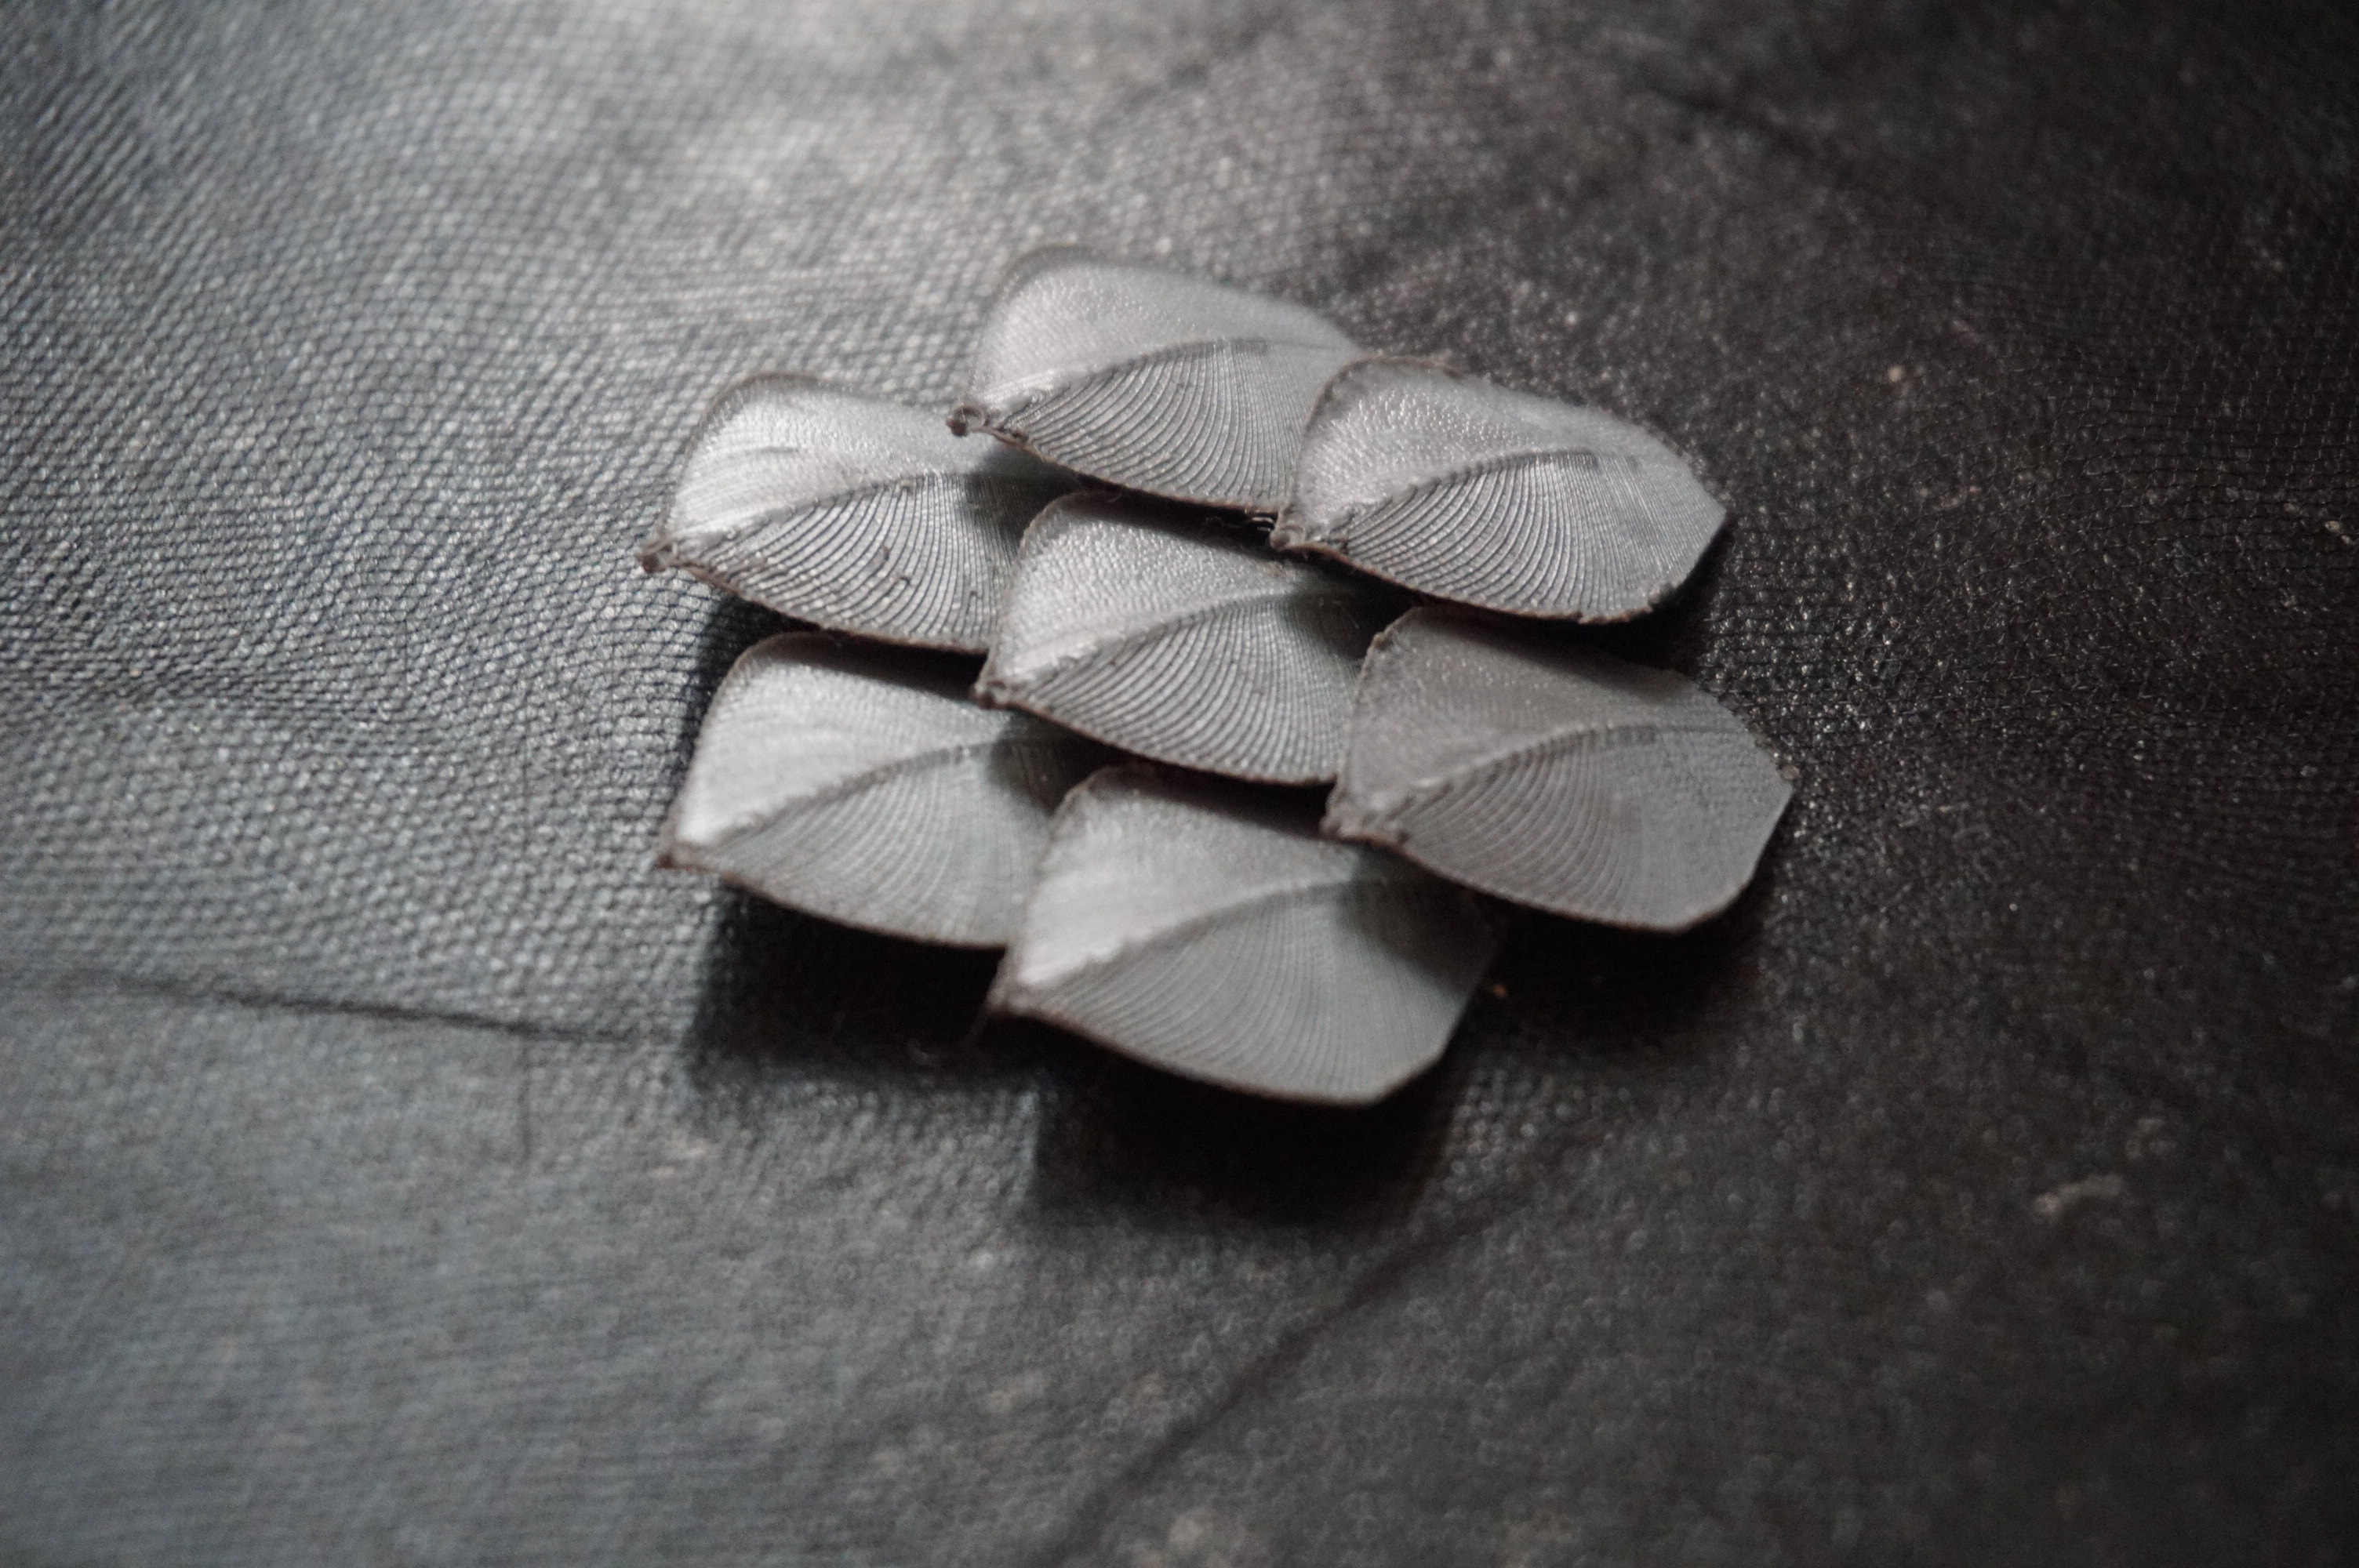
Wanting more dragon-like scales, I went to the internet to find more reference material. The best one I came across was this link for what was appropriately called “Dragon scales”. I know my name is the same, but it is the same thing, and I refuse to think of some other name.
The scales I got are very scale like. They print fairly well, they overlap really nicely and are fairly flexible. They are also very light. There are a few issues though. For one I dislike the broad leaf like shape. Also, the many sharp edges curl up due to cooling issues. I do like how the sharp overhang creates a proper overlap. Time for my own attempt.
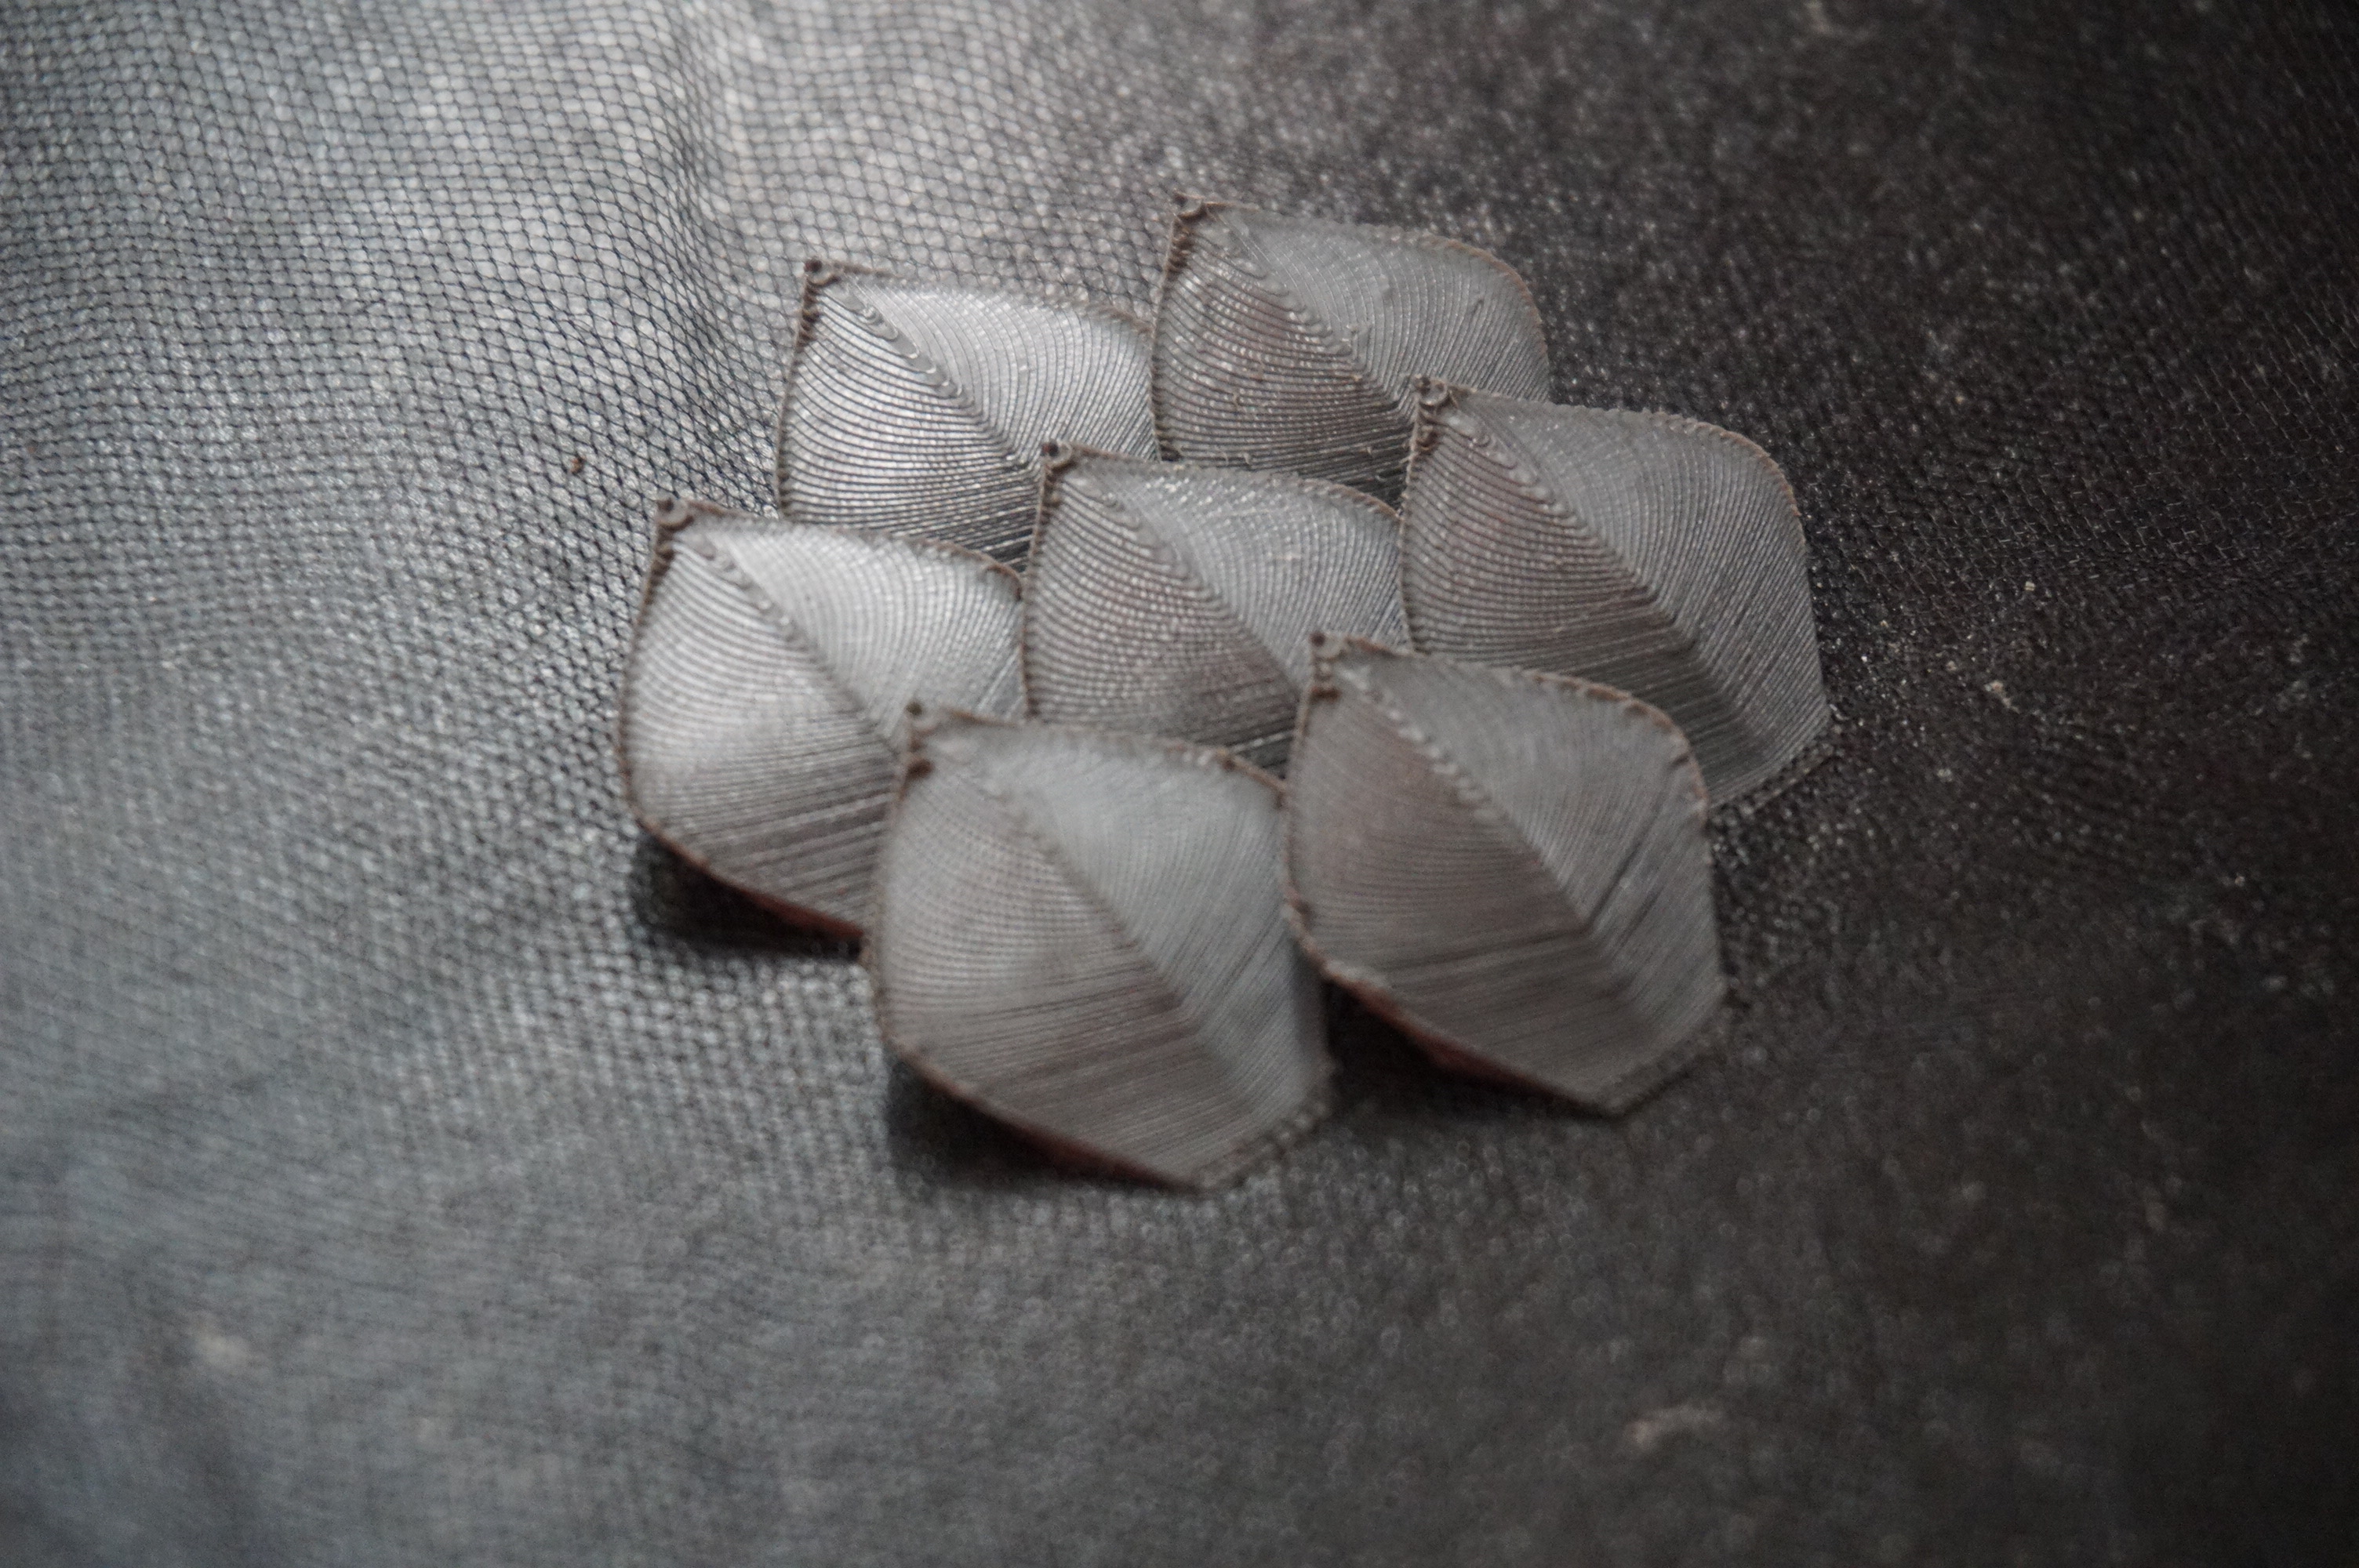
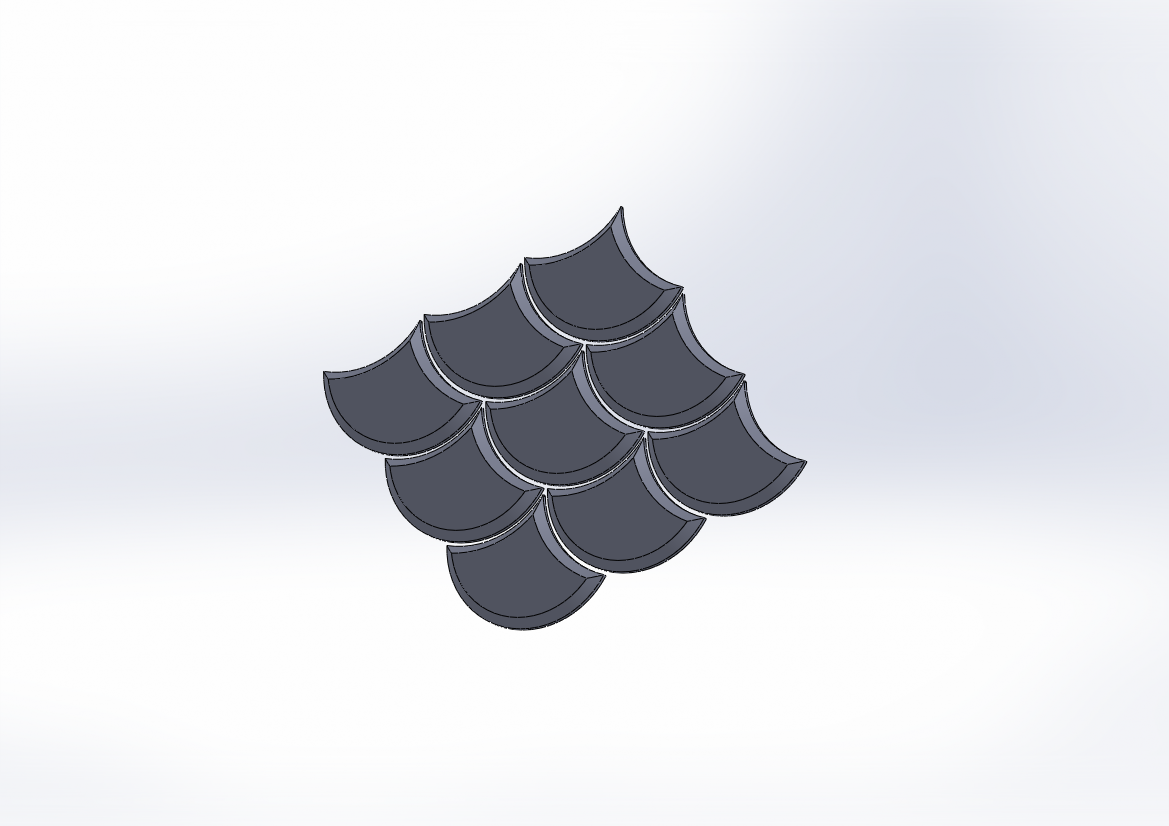
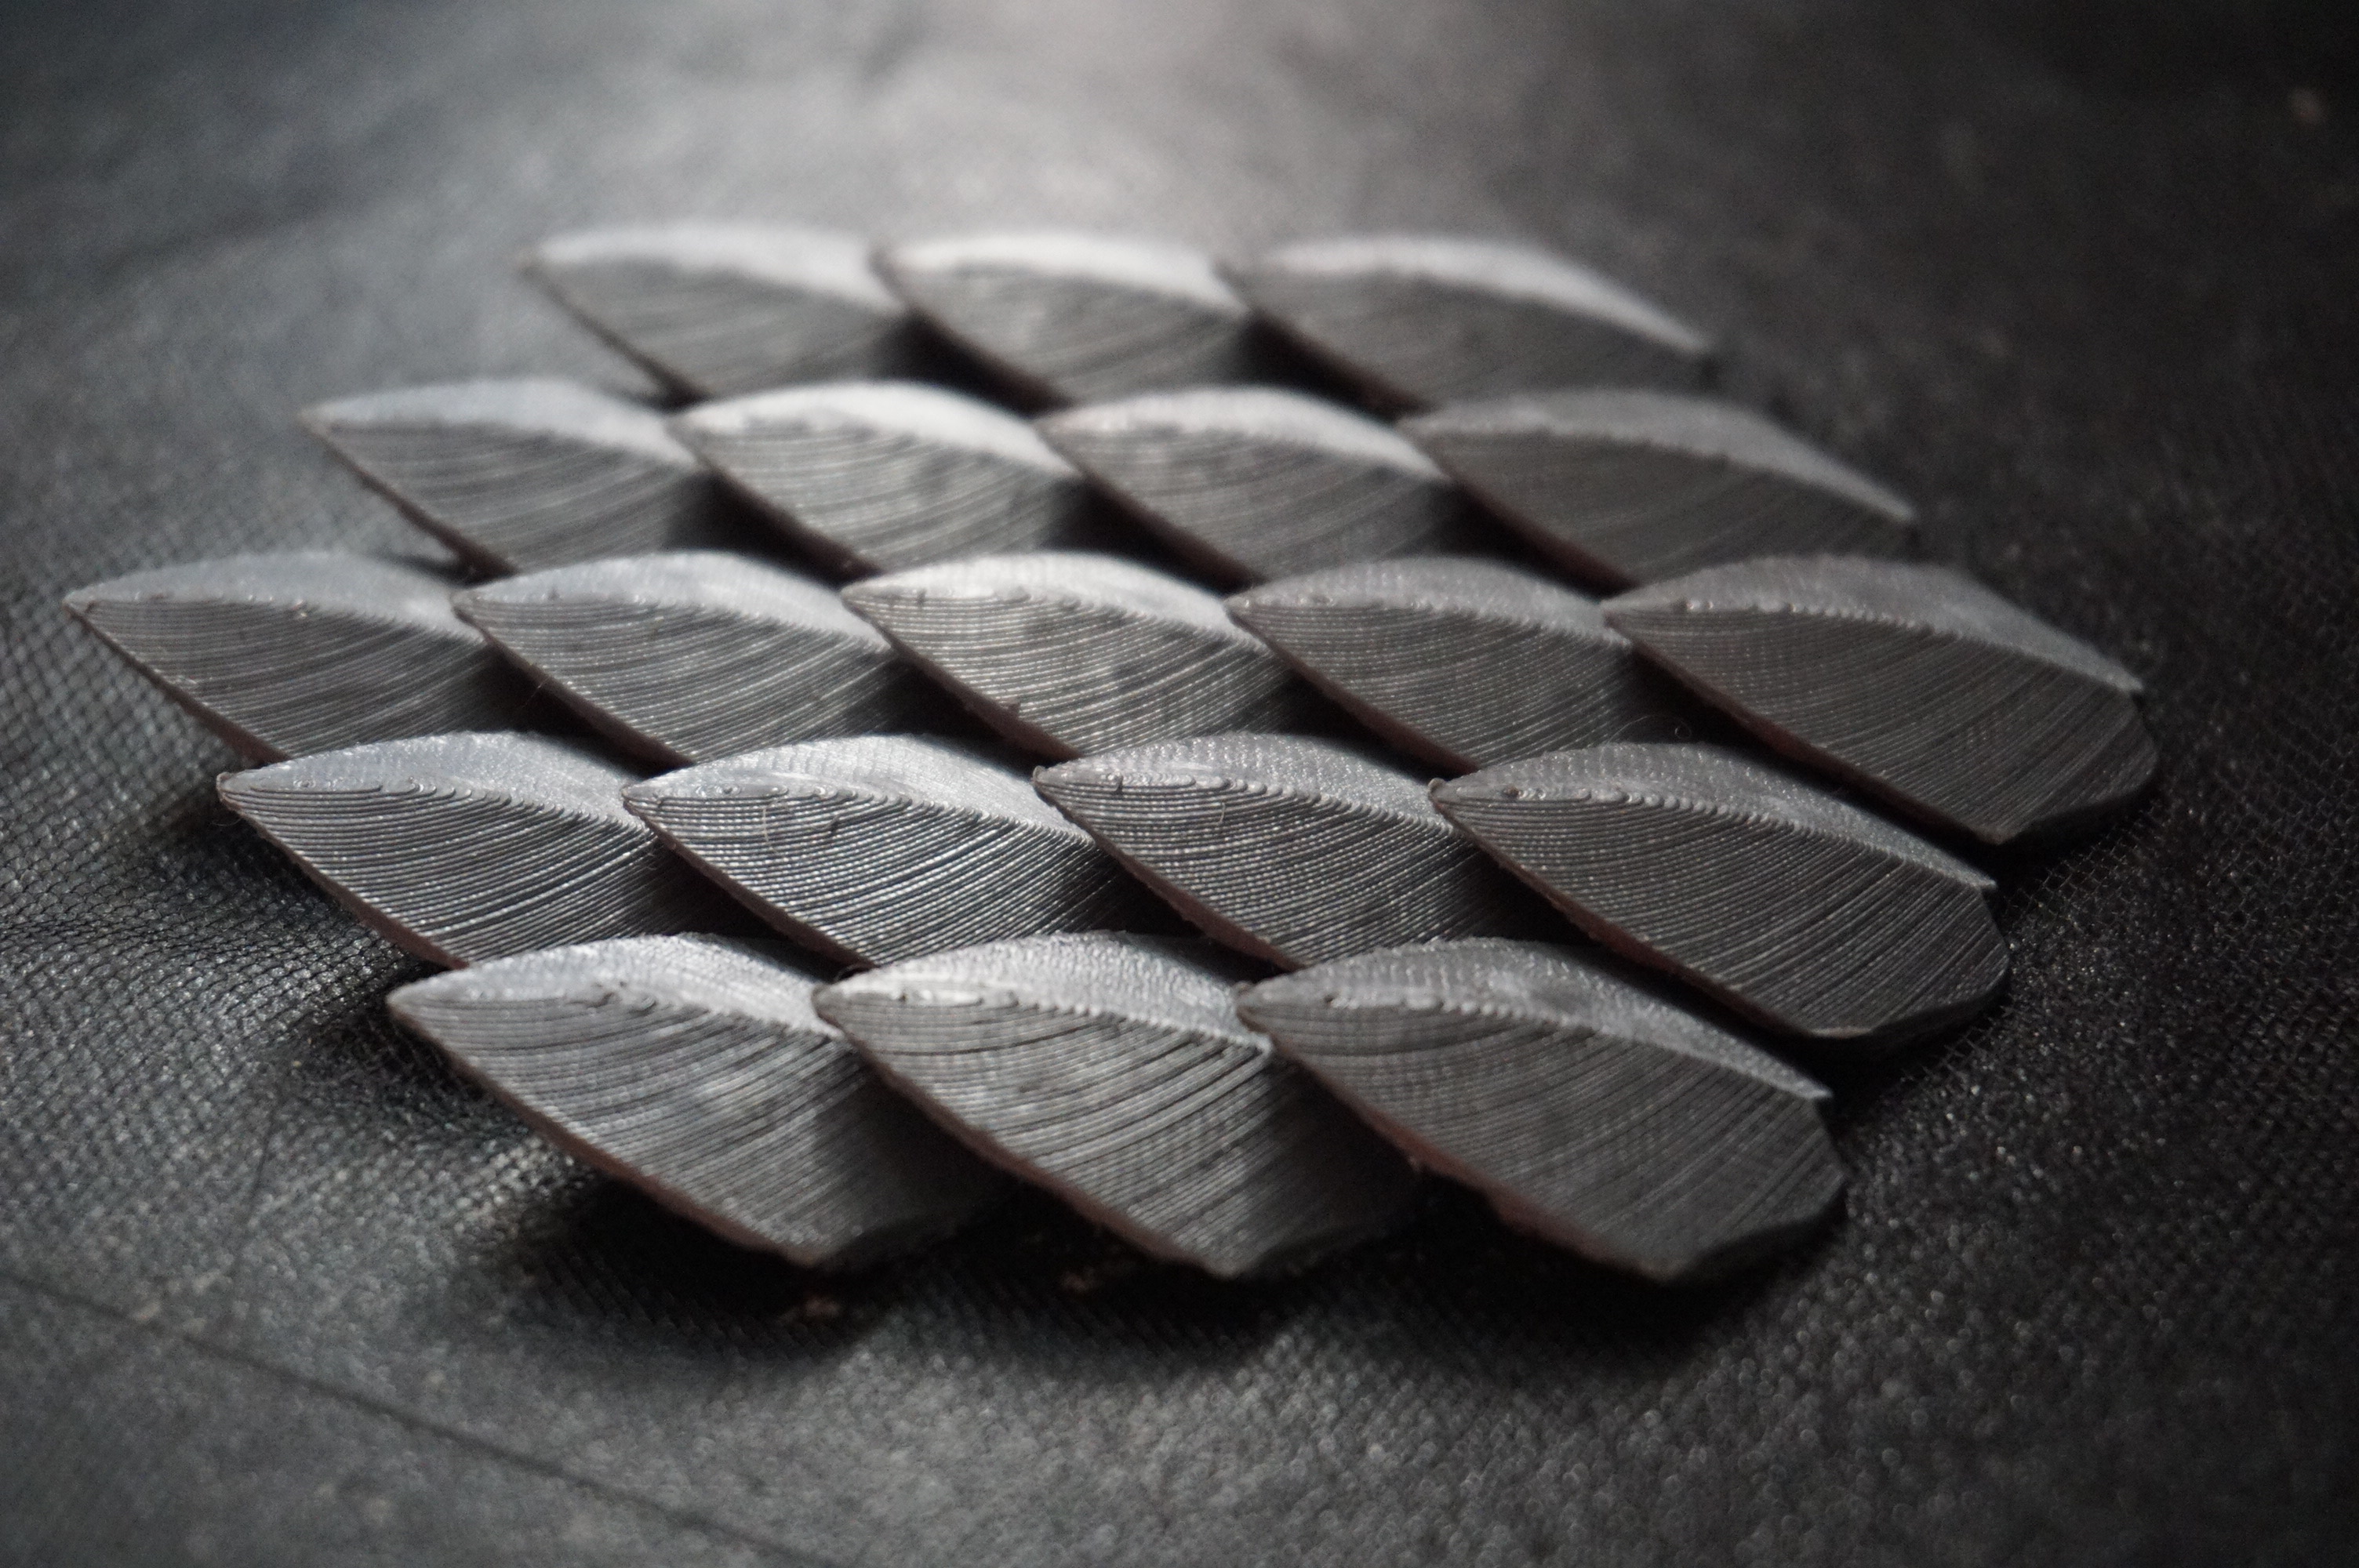
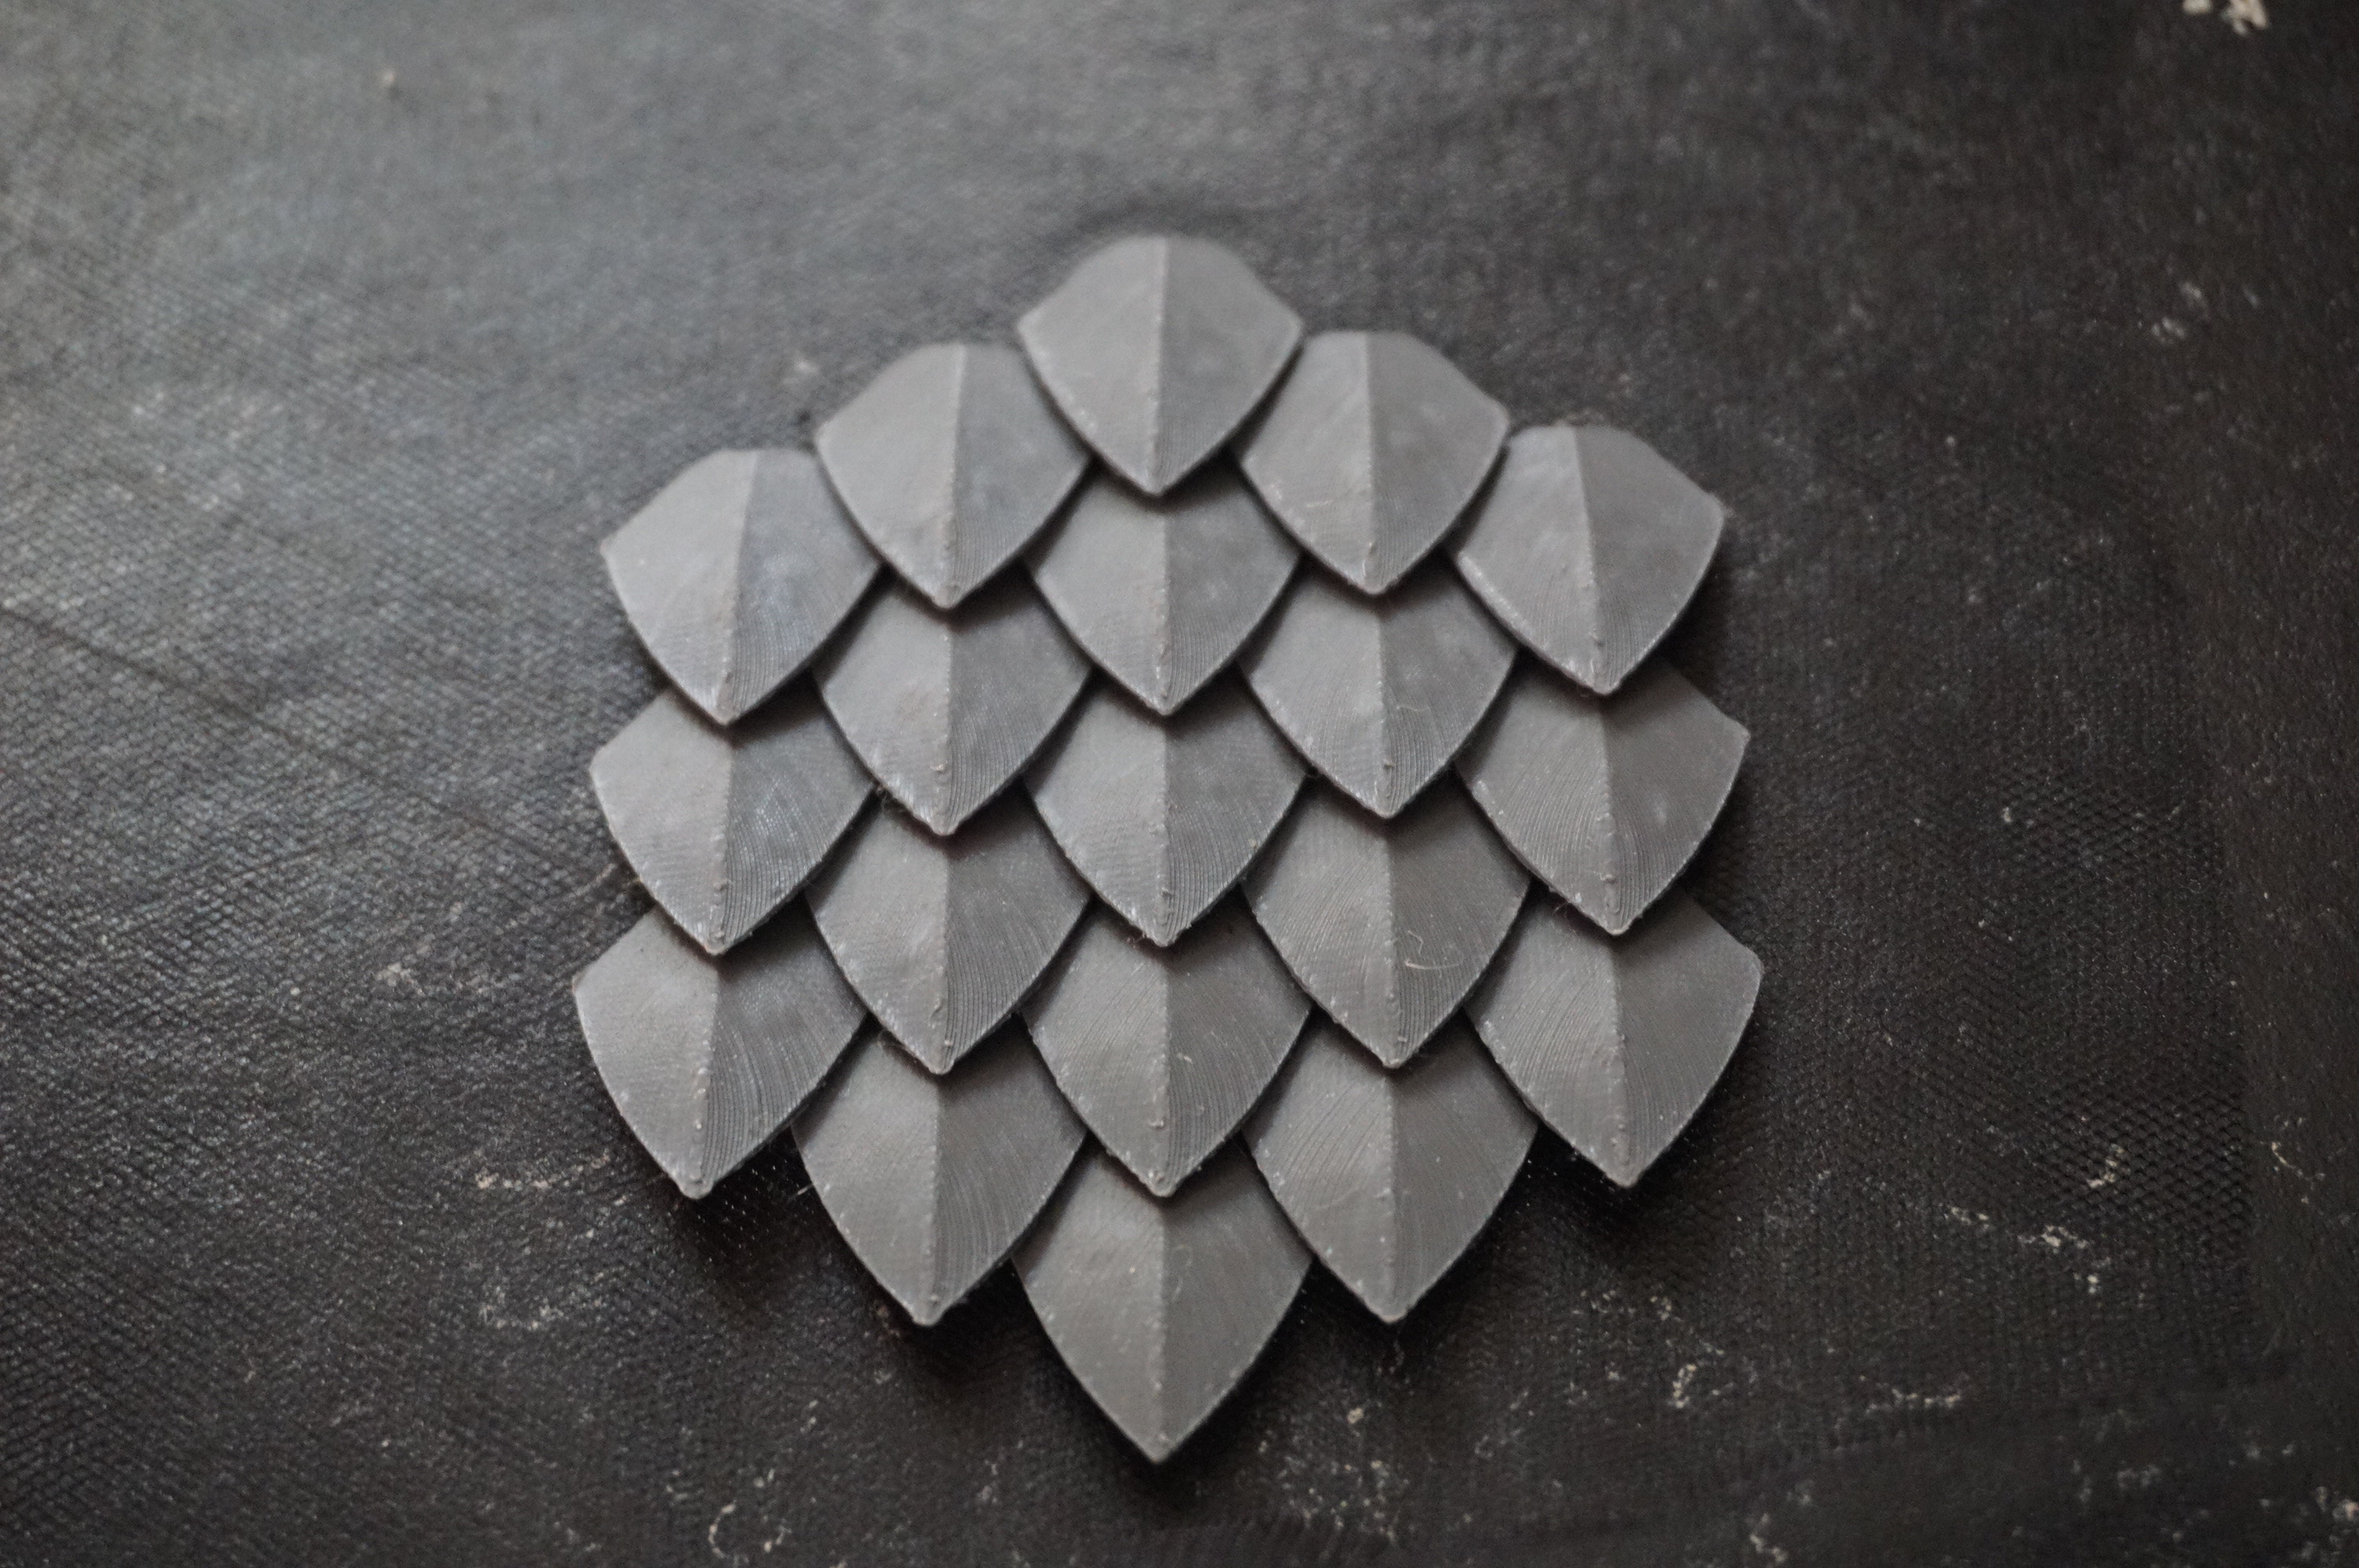
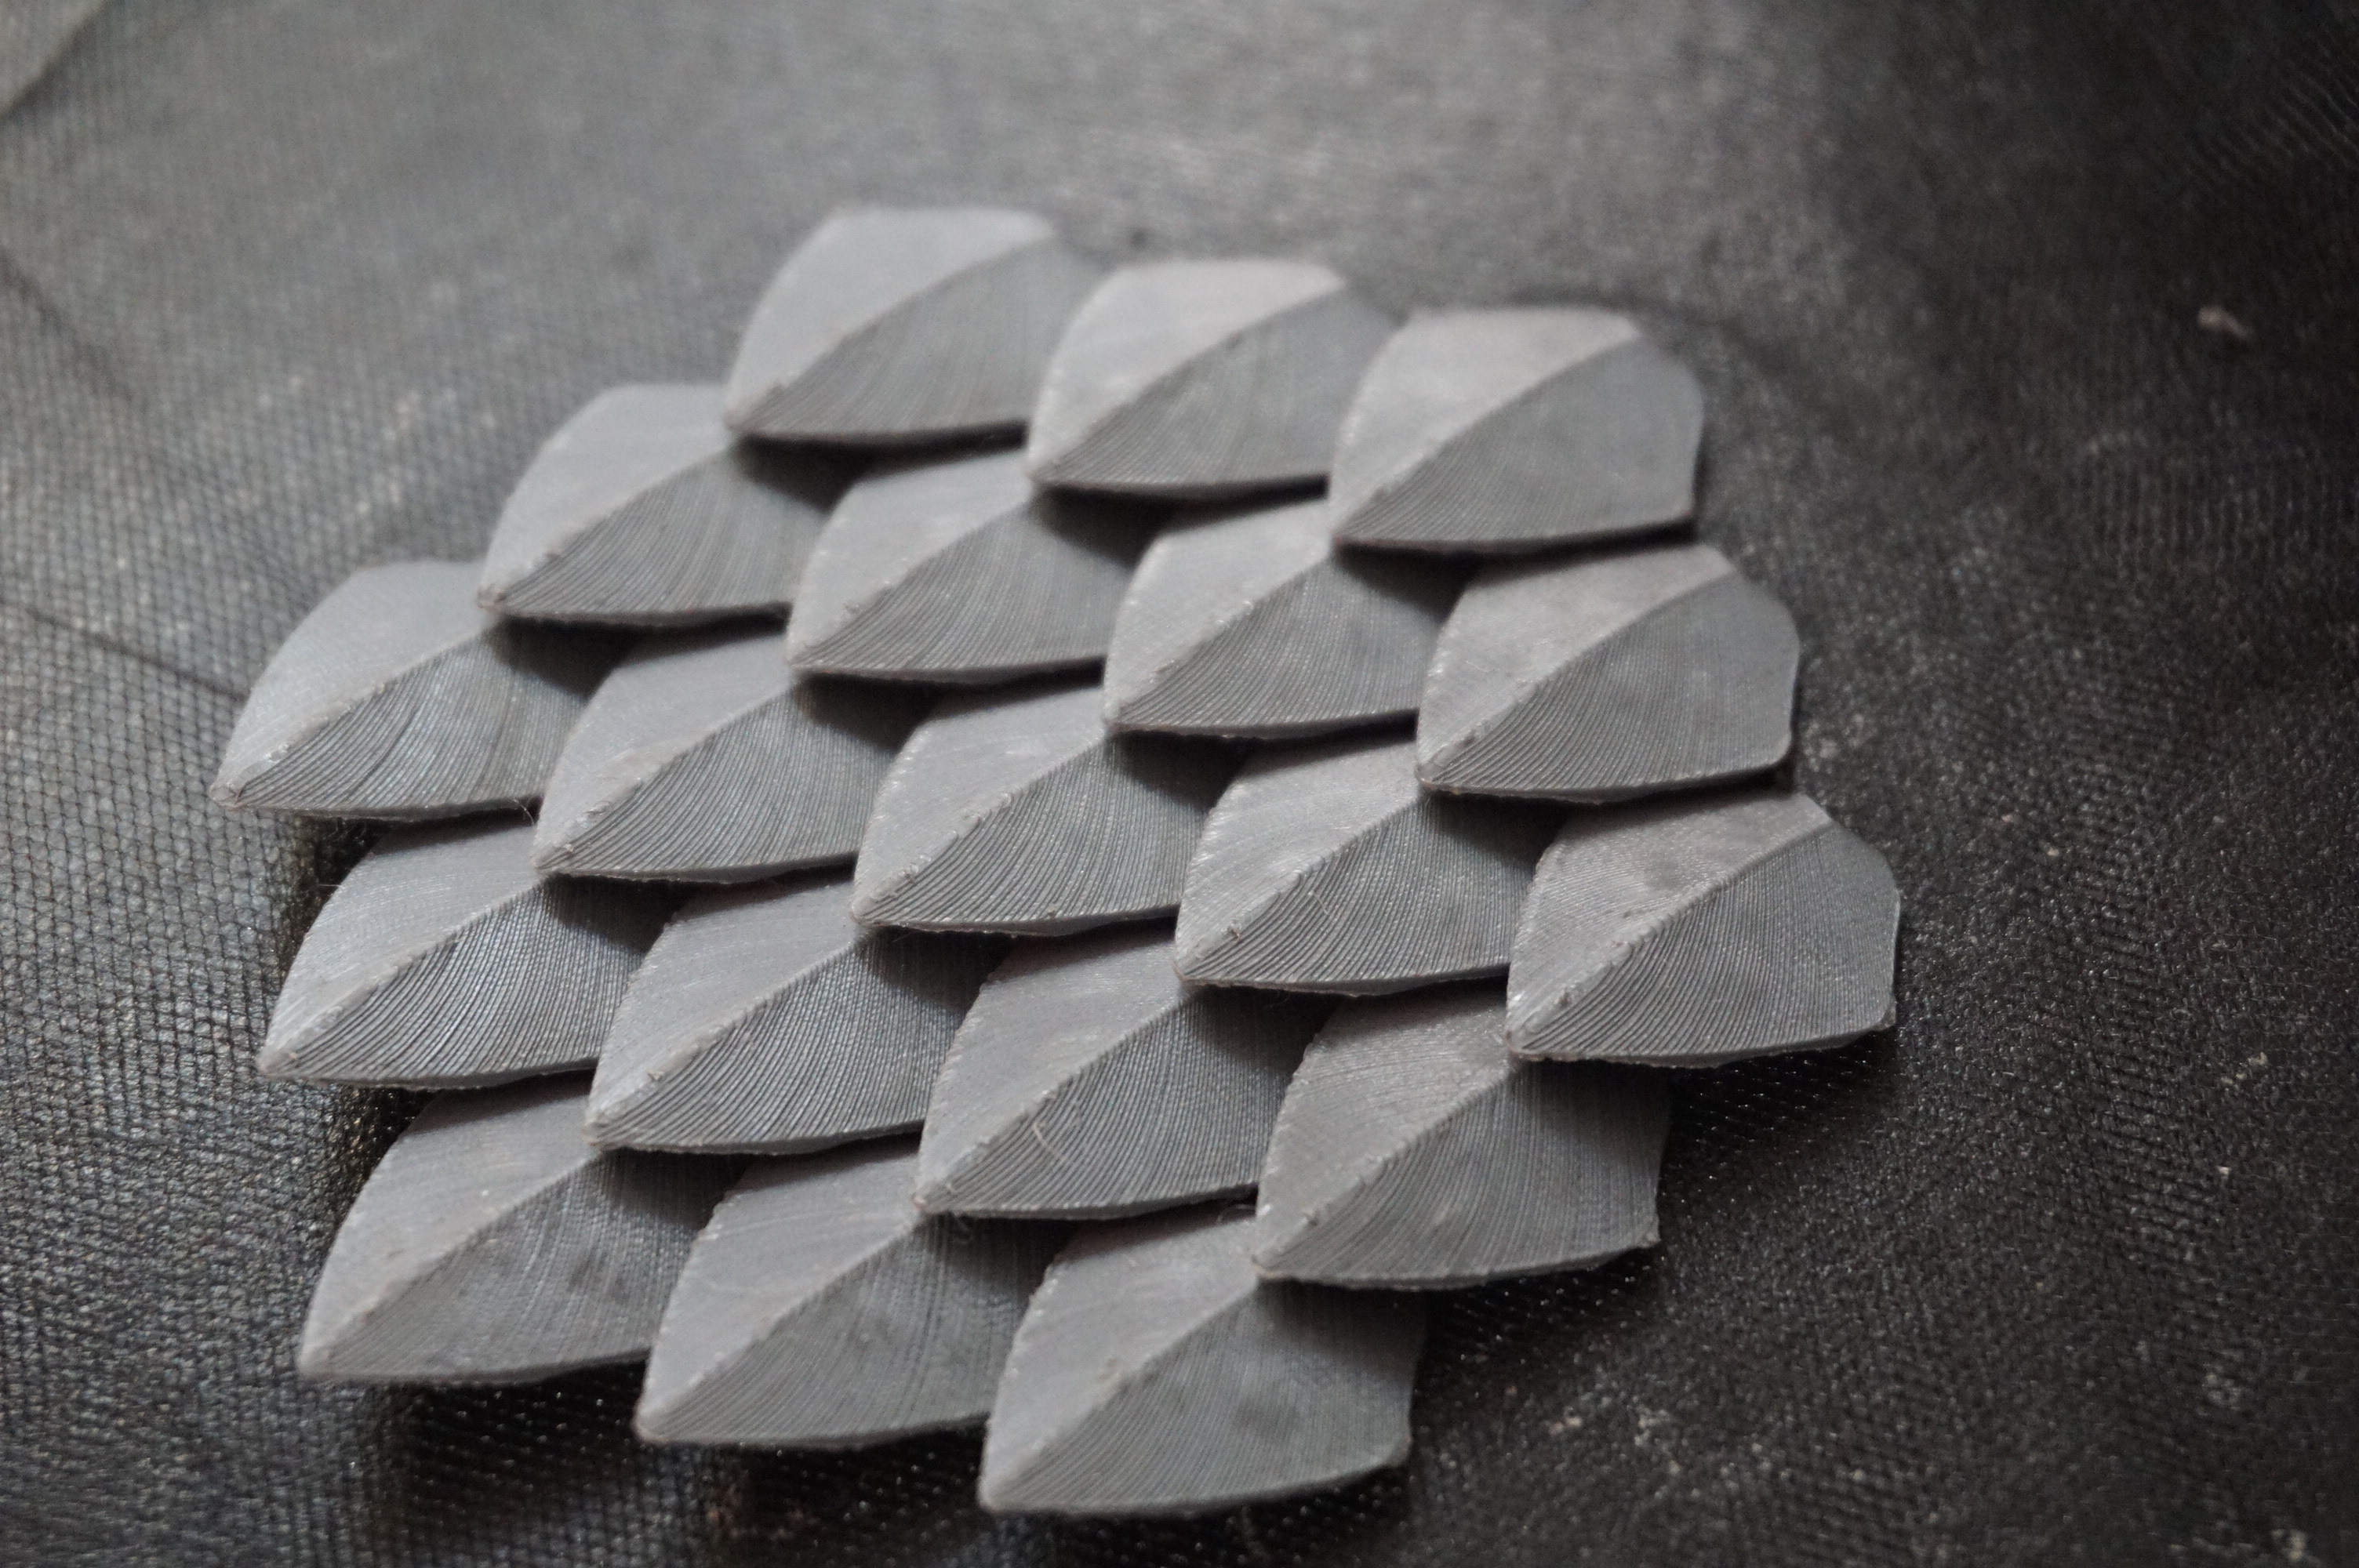
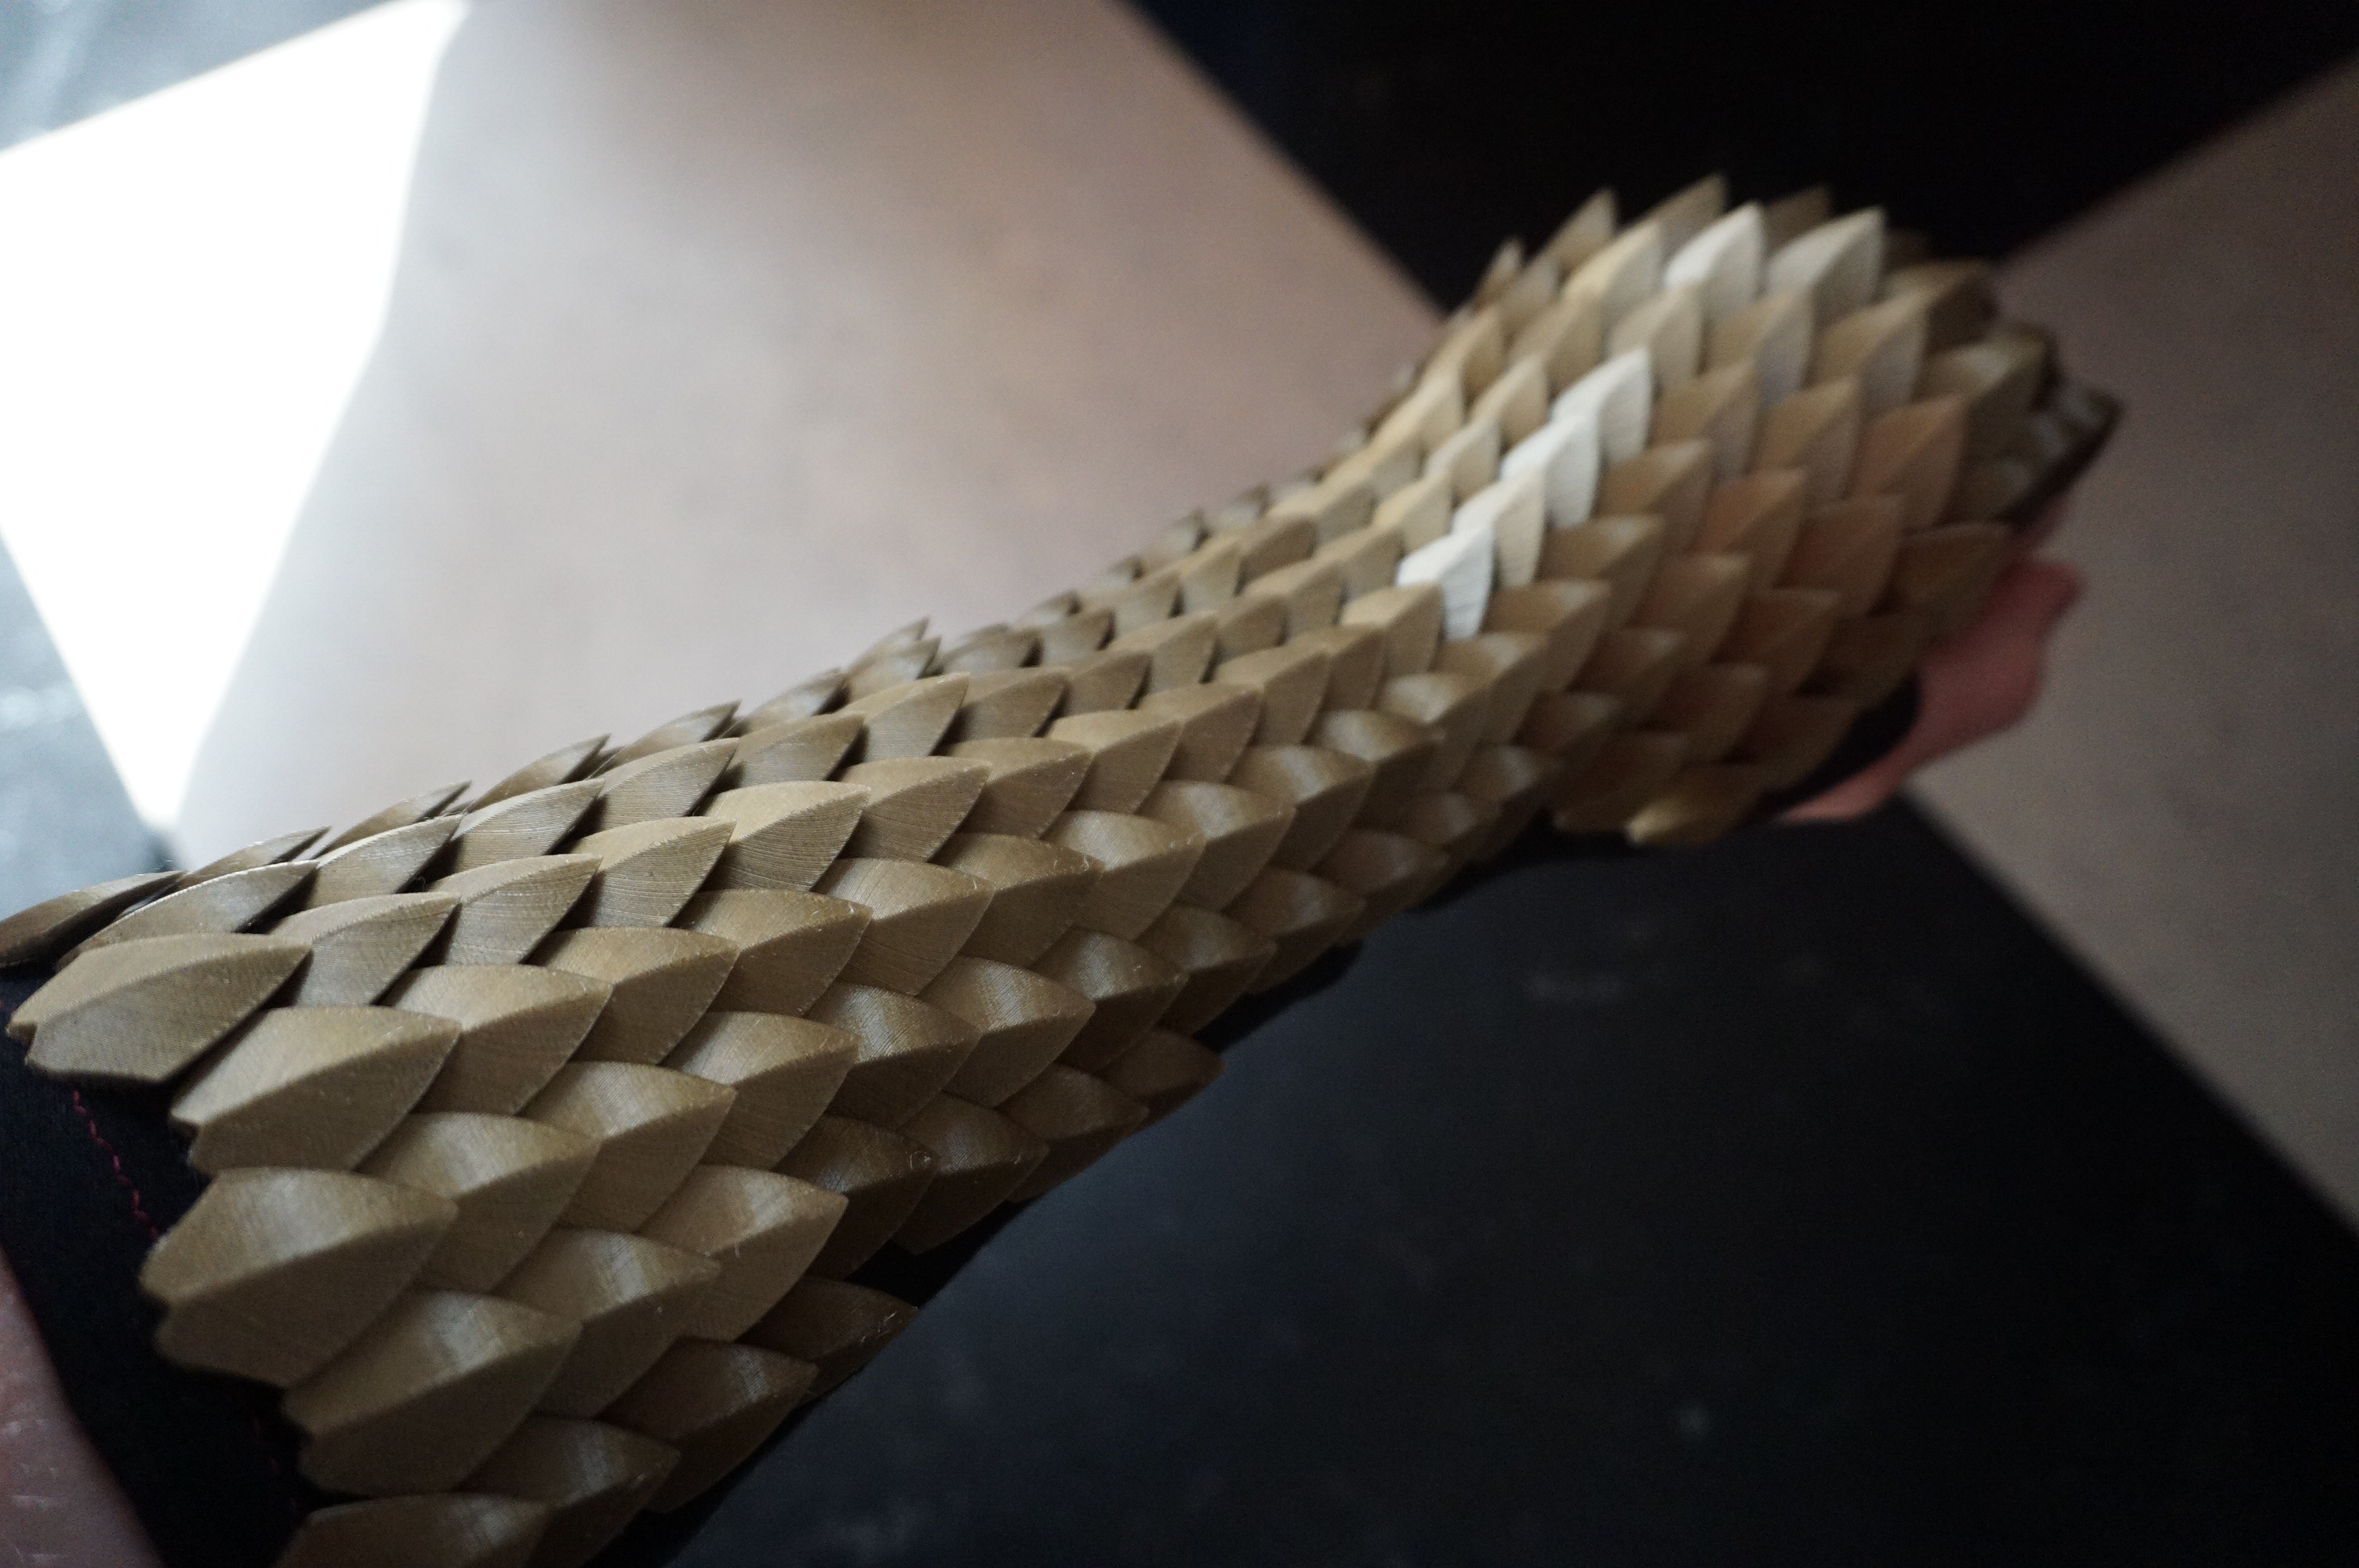
My own version of the dragon scales
With an idea of how to design mine, I started looking for reference. My own version is based mostly on this. I simply found these the best looking.
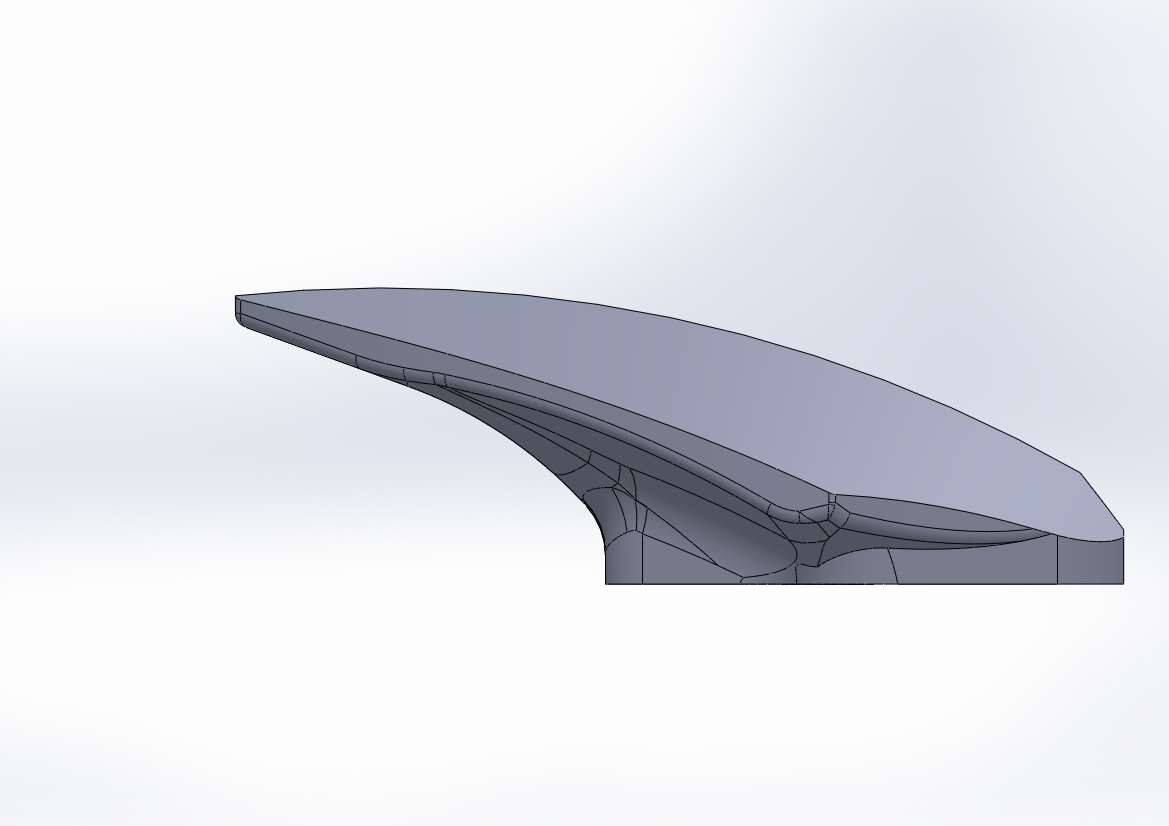
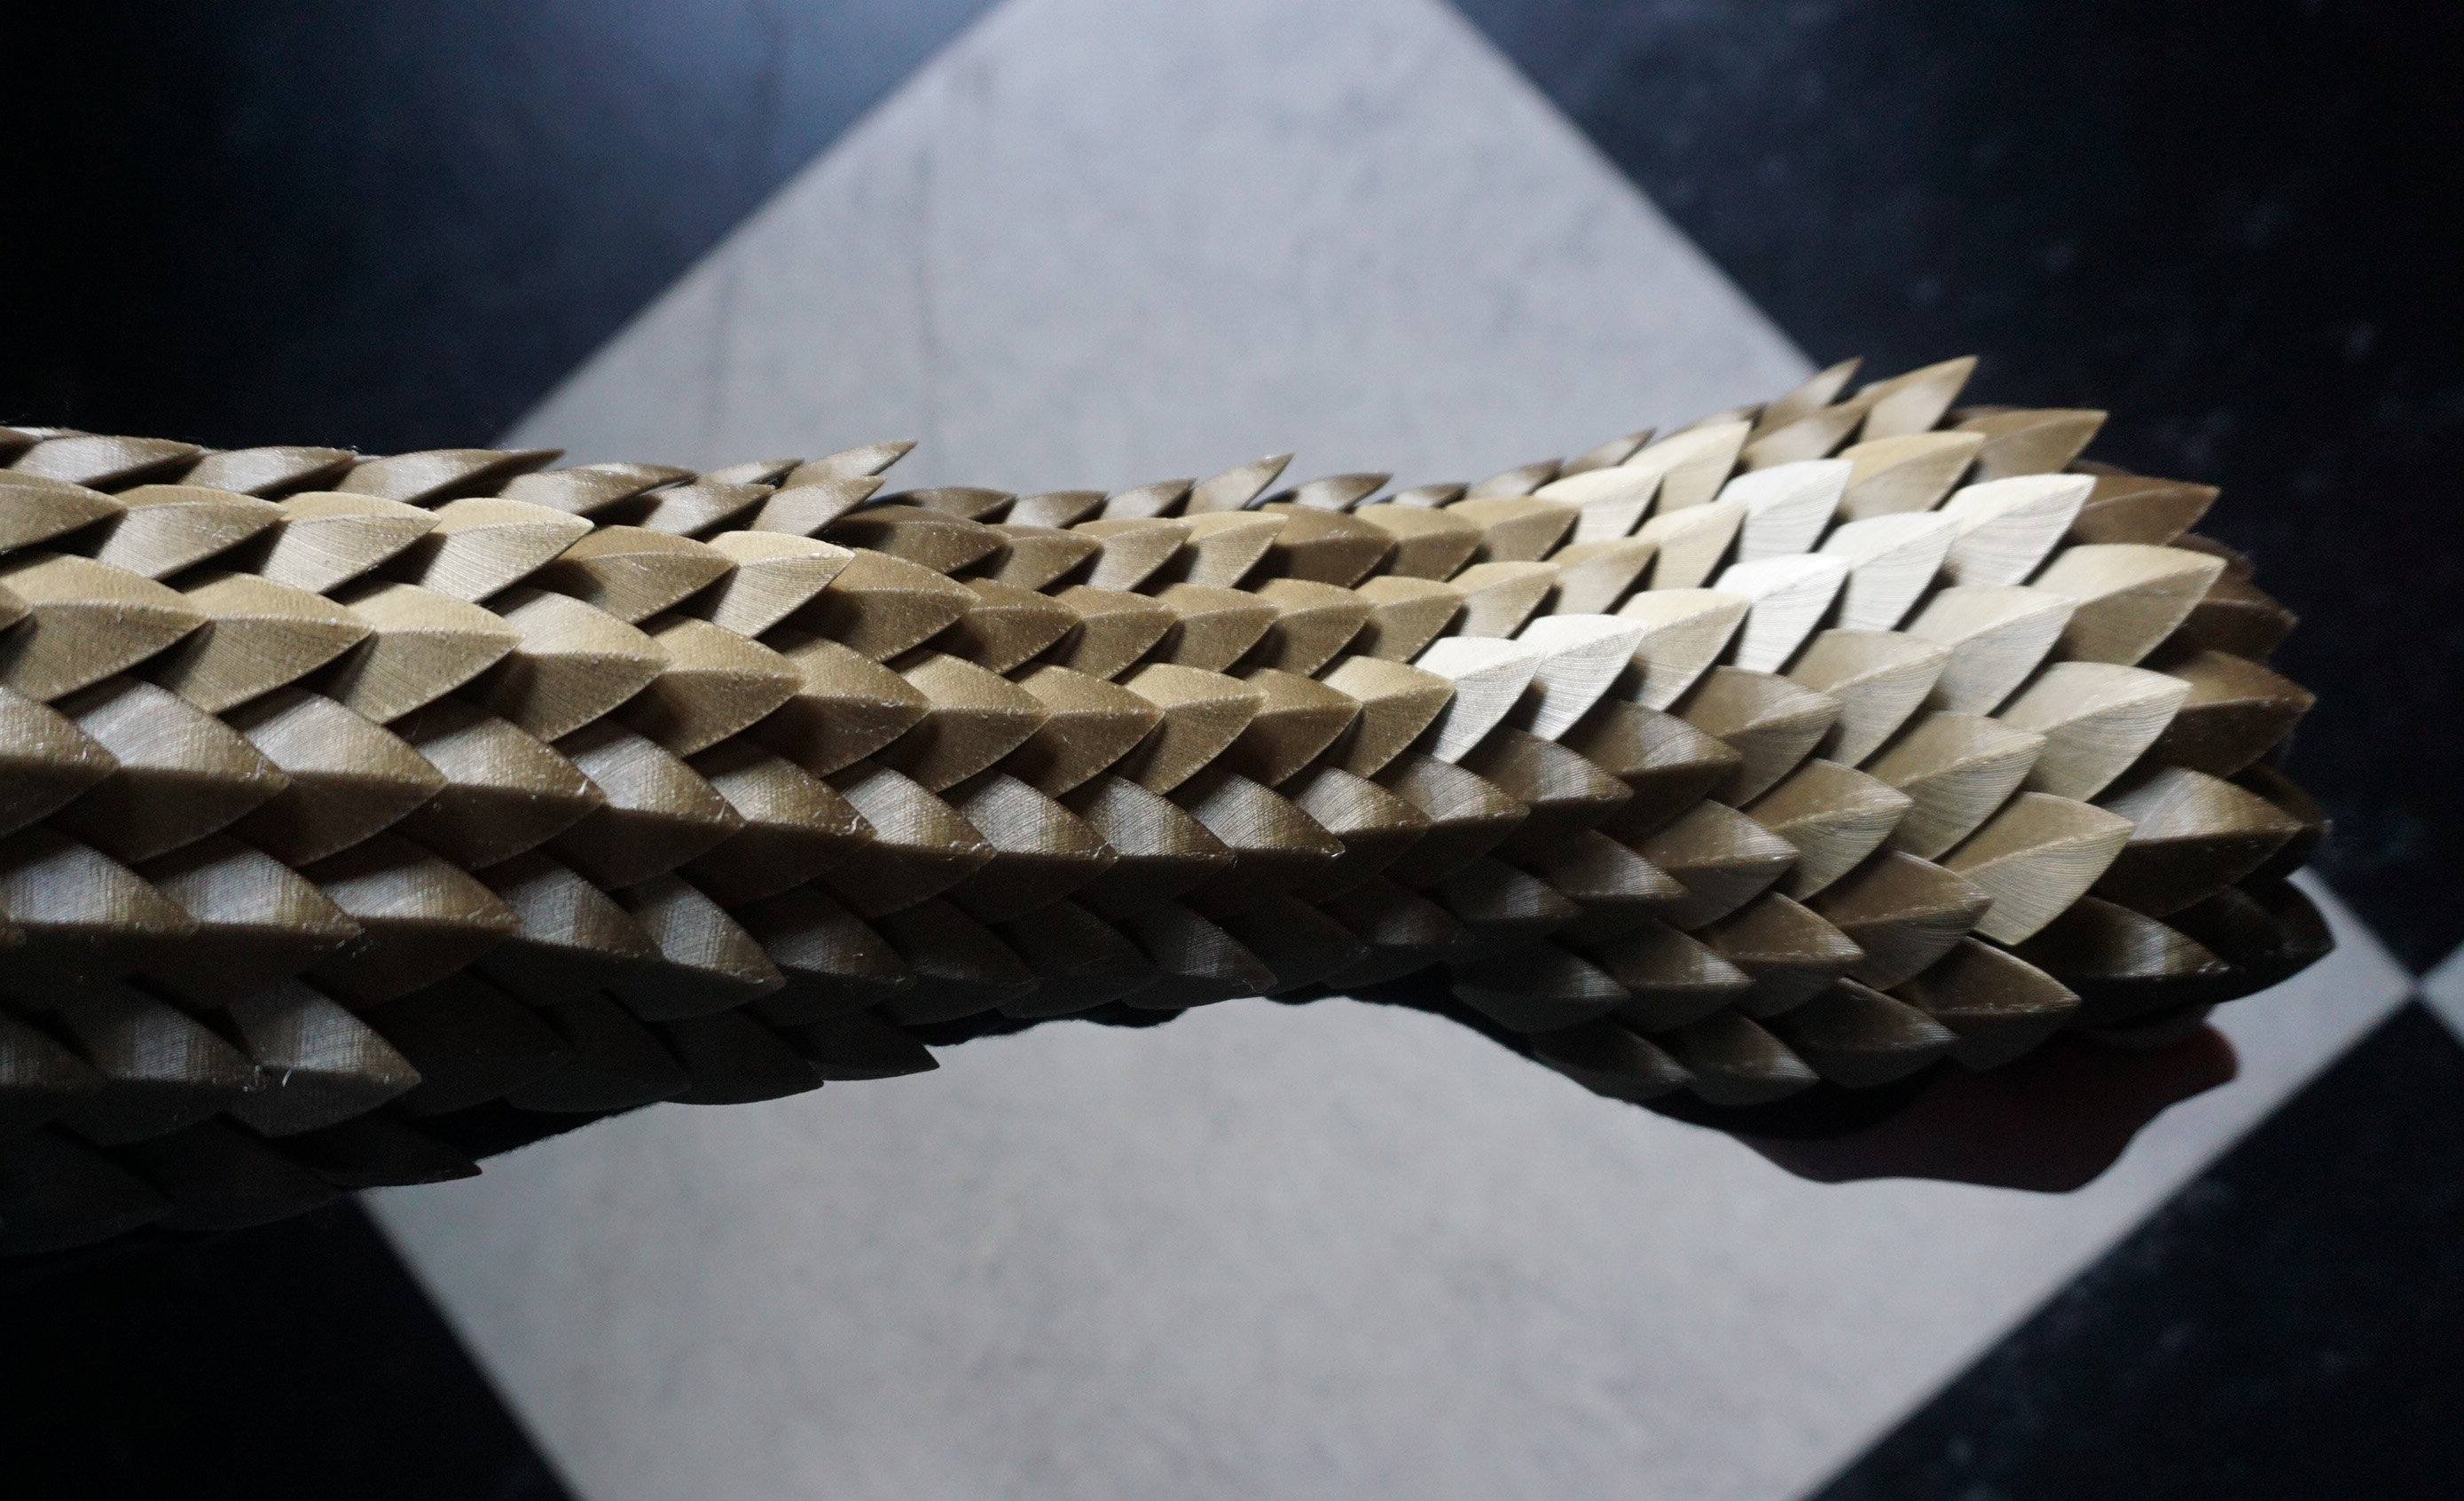
The scale is based on an hexagonal base. This then expands to a point with an overhang angle of 20 degrees. To prevent the edges from curling up like the previous try, I made sure the edges have some thickness to them (around 0.6mm). This meant that the edge is supported by six layers, not one, keeping it more straight.
The scales have looks a little like a tiny shield. They do look less organic than the previous scale, but I do like the overall look and finish a lot better. The edges show no sign of cooling problems, and the overlap is amazing.
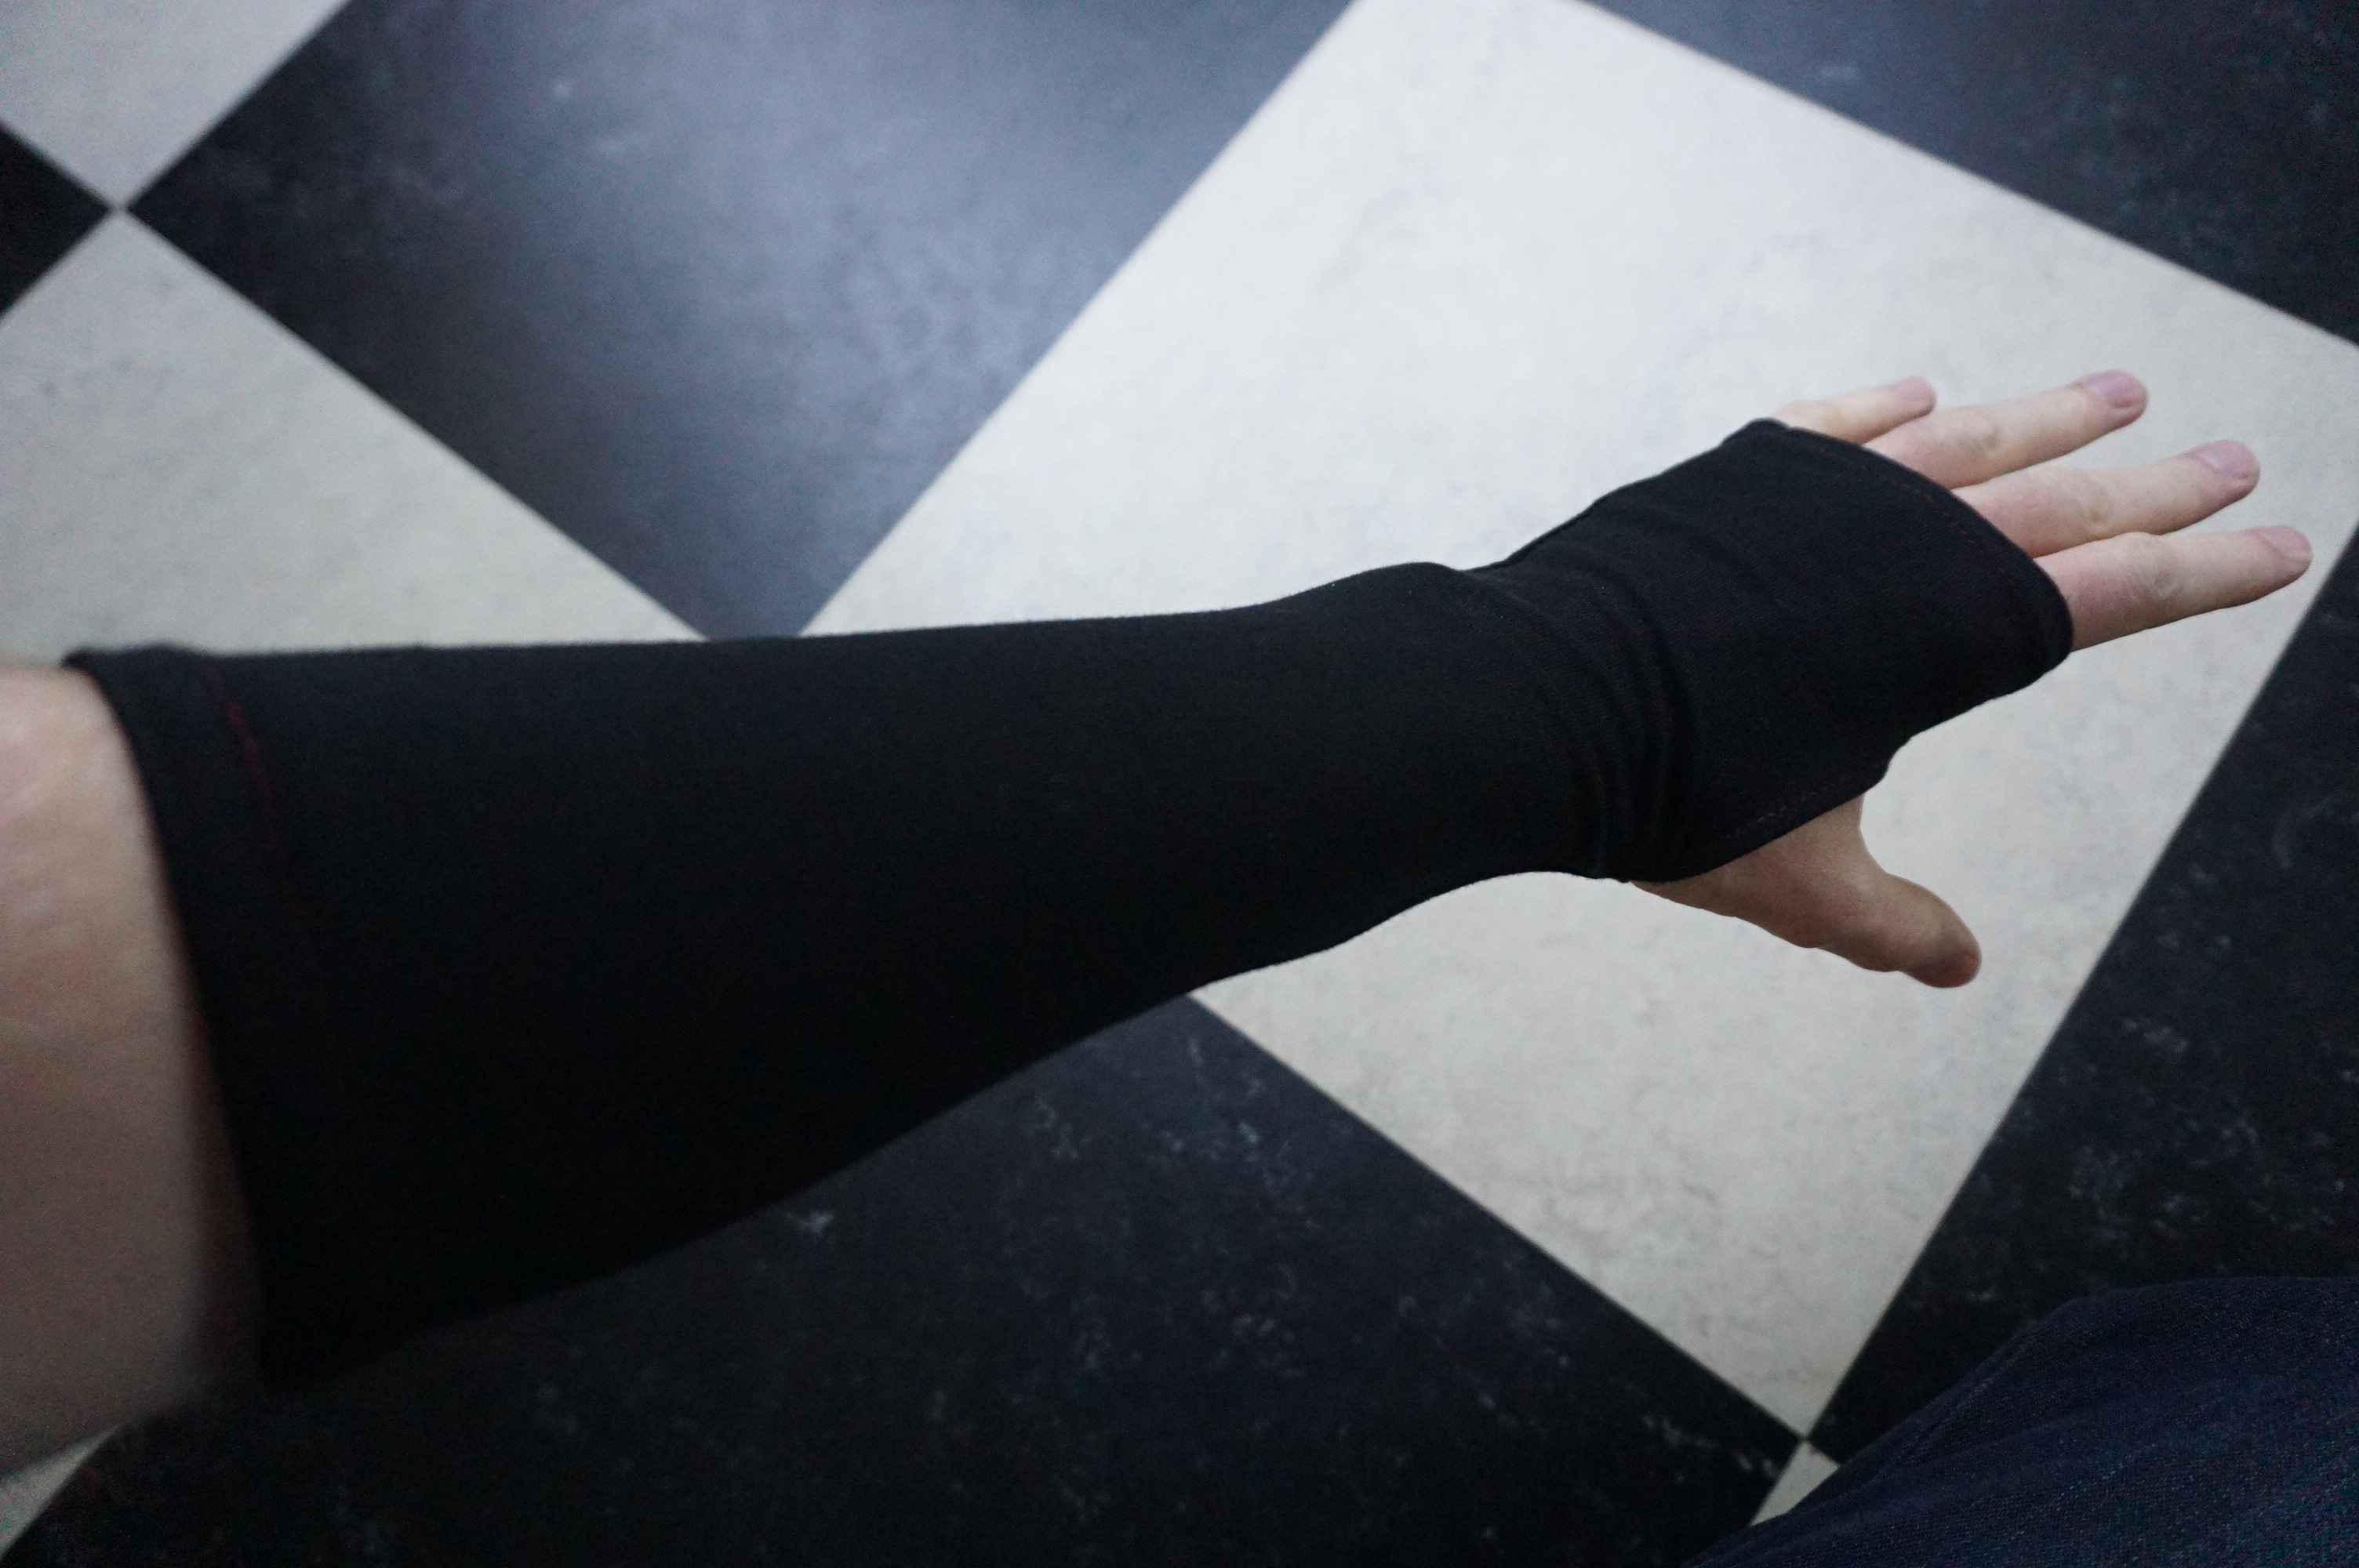
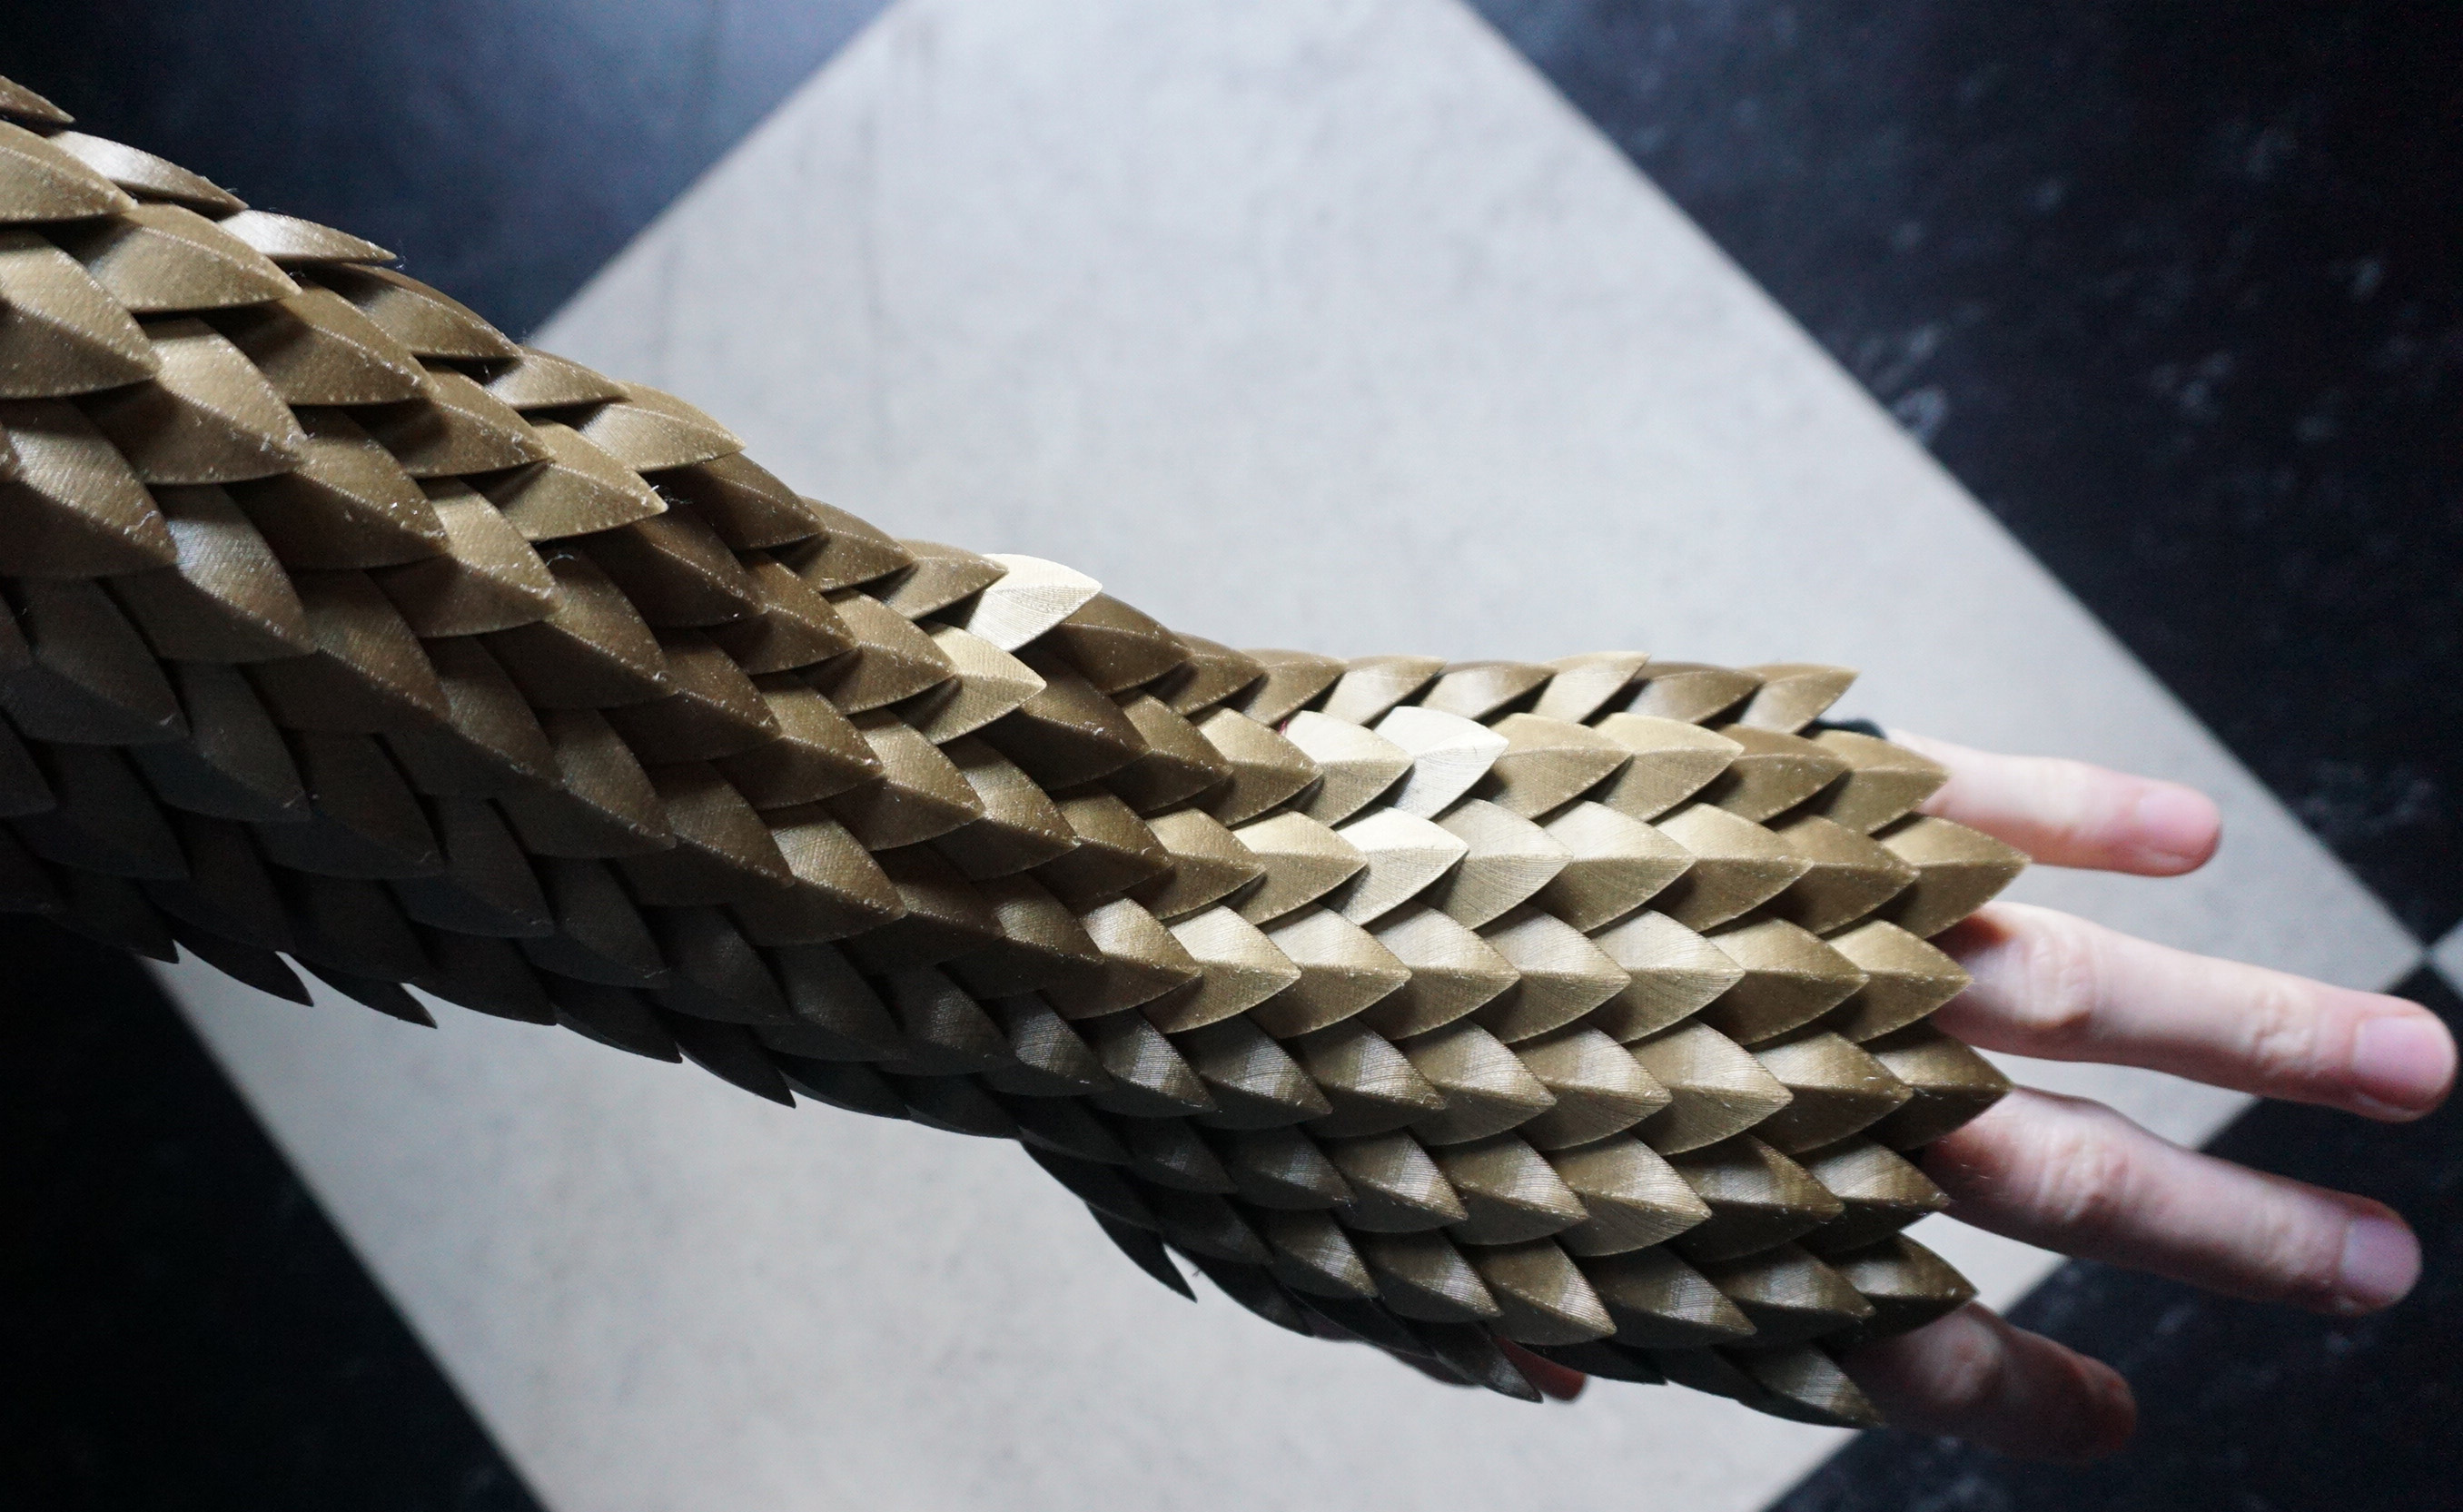
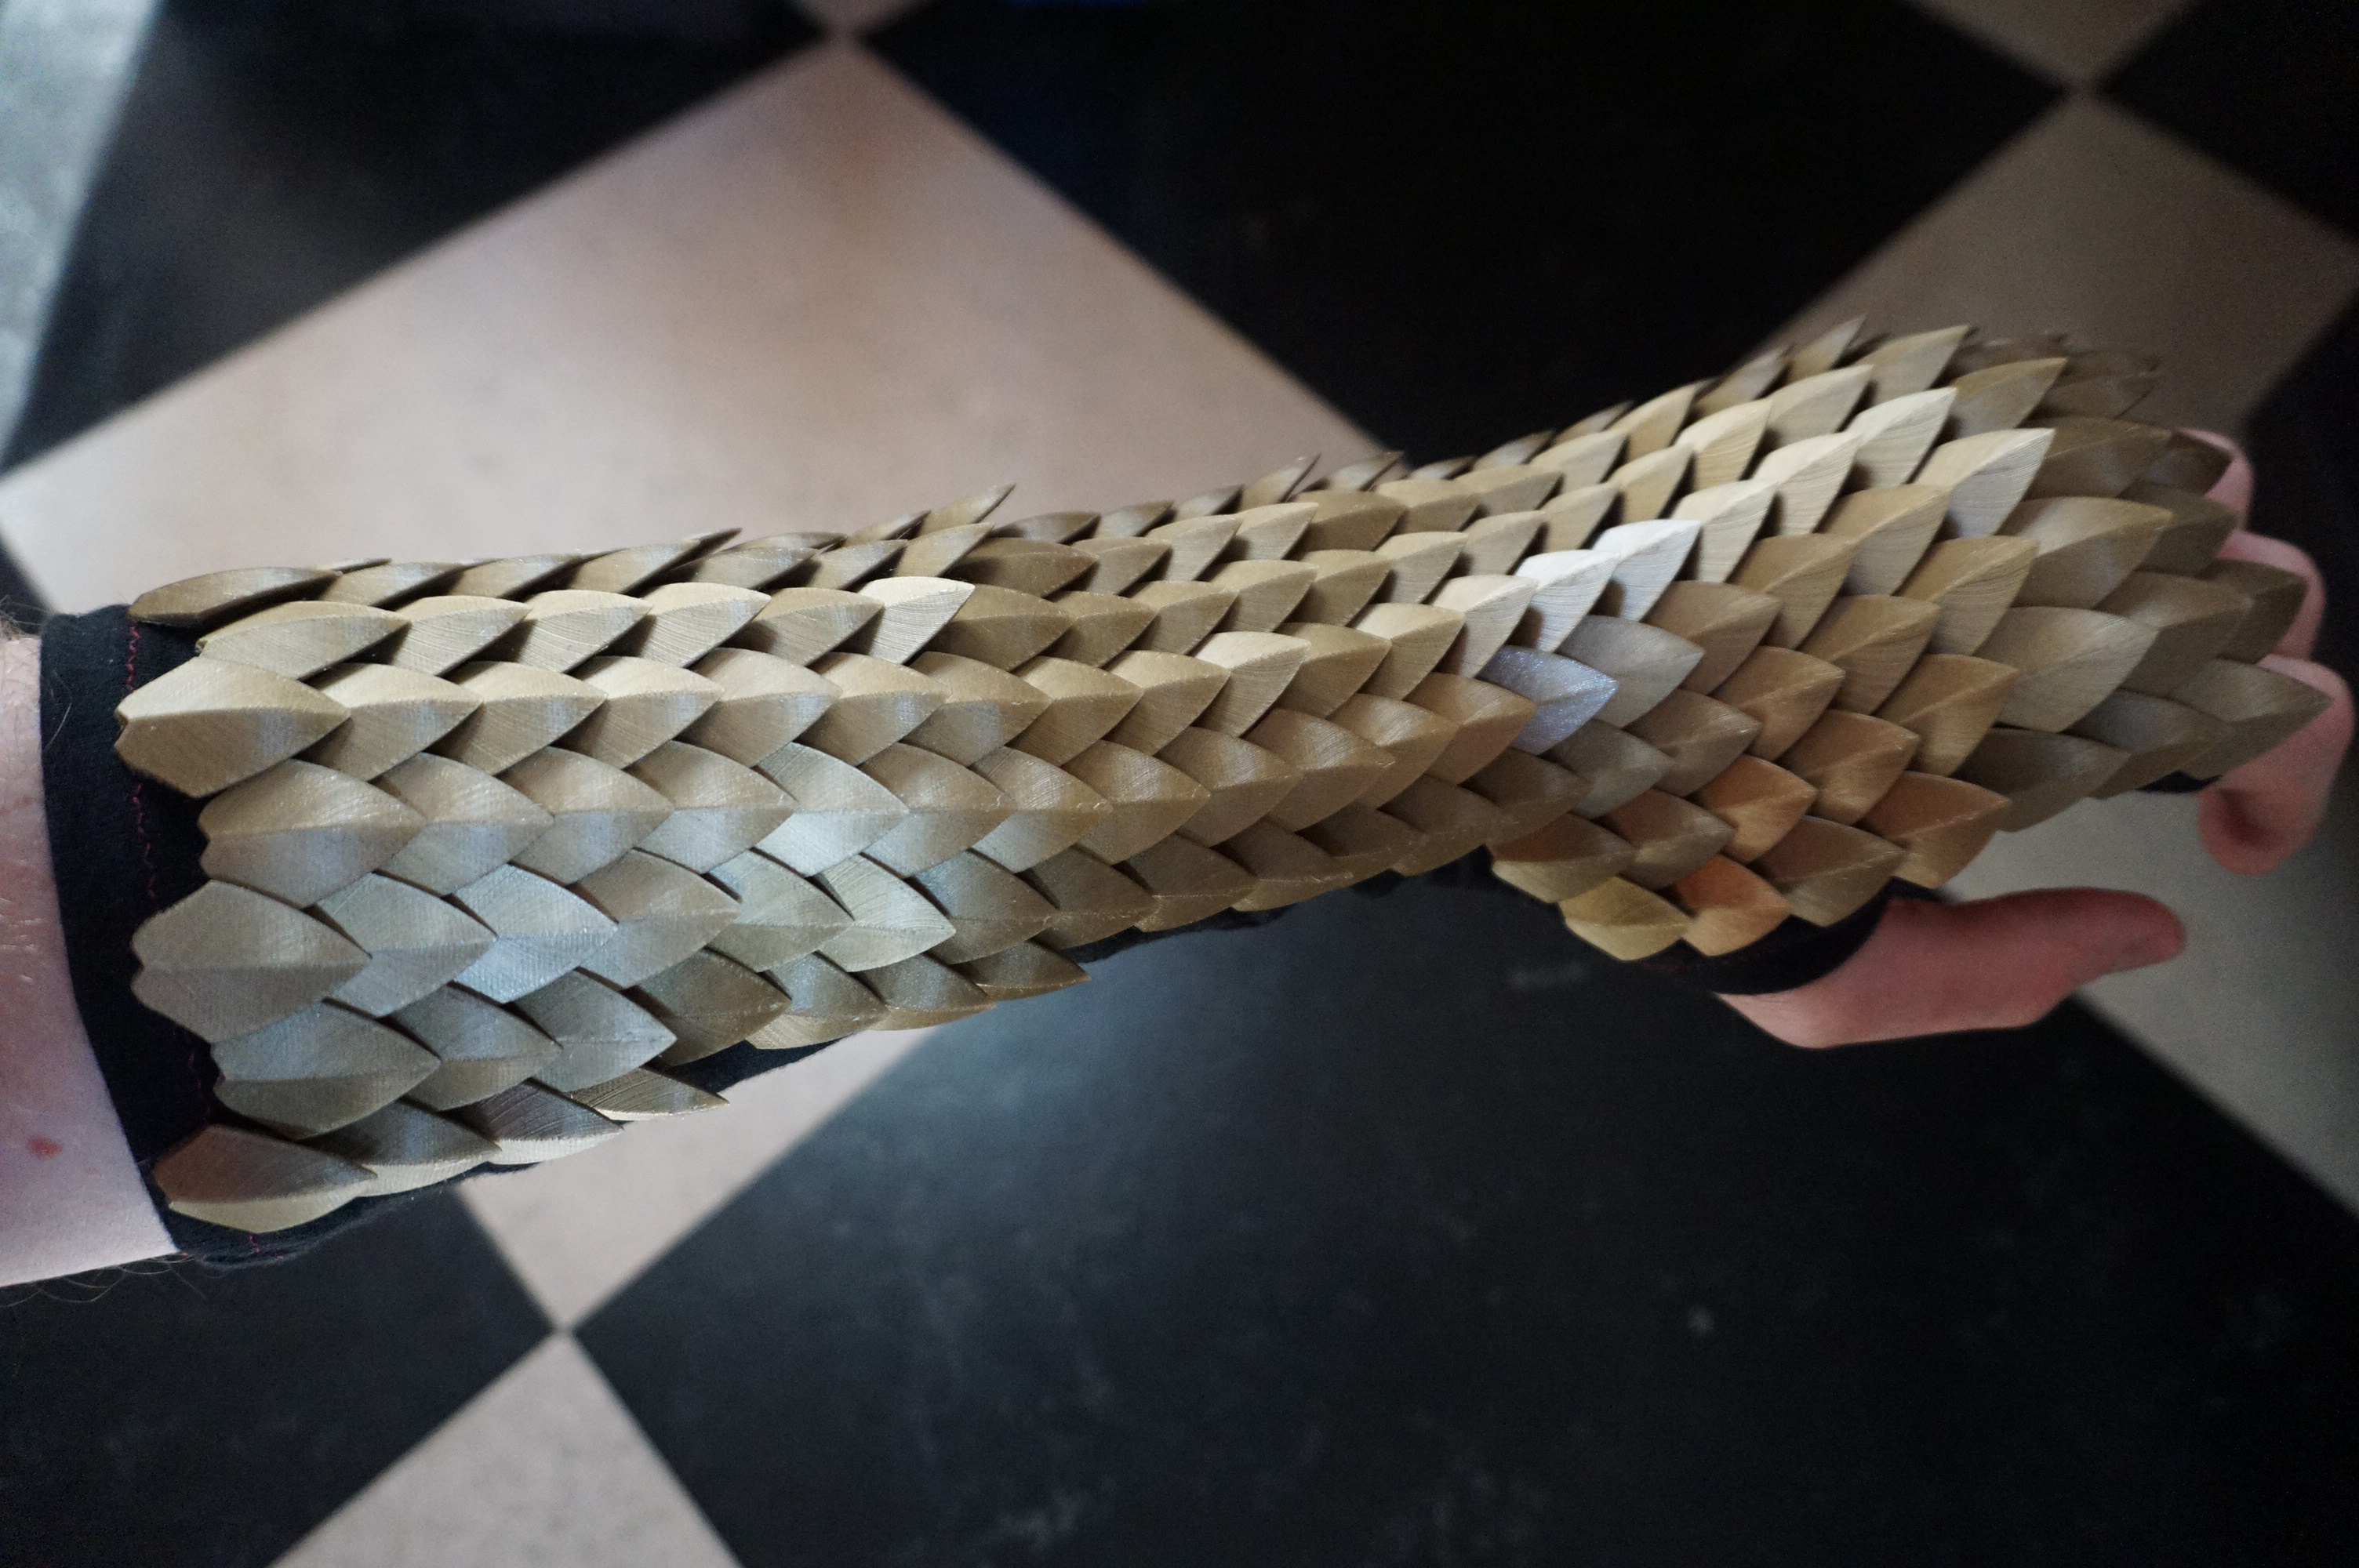
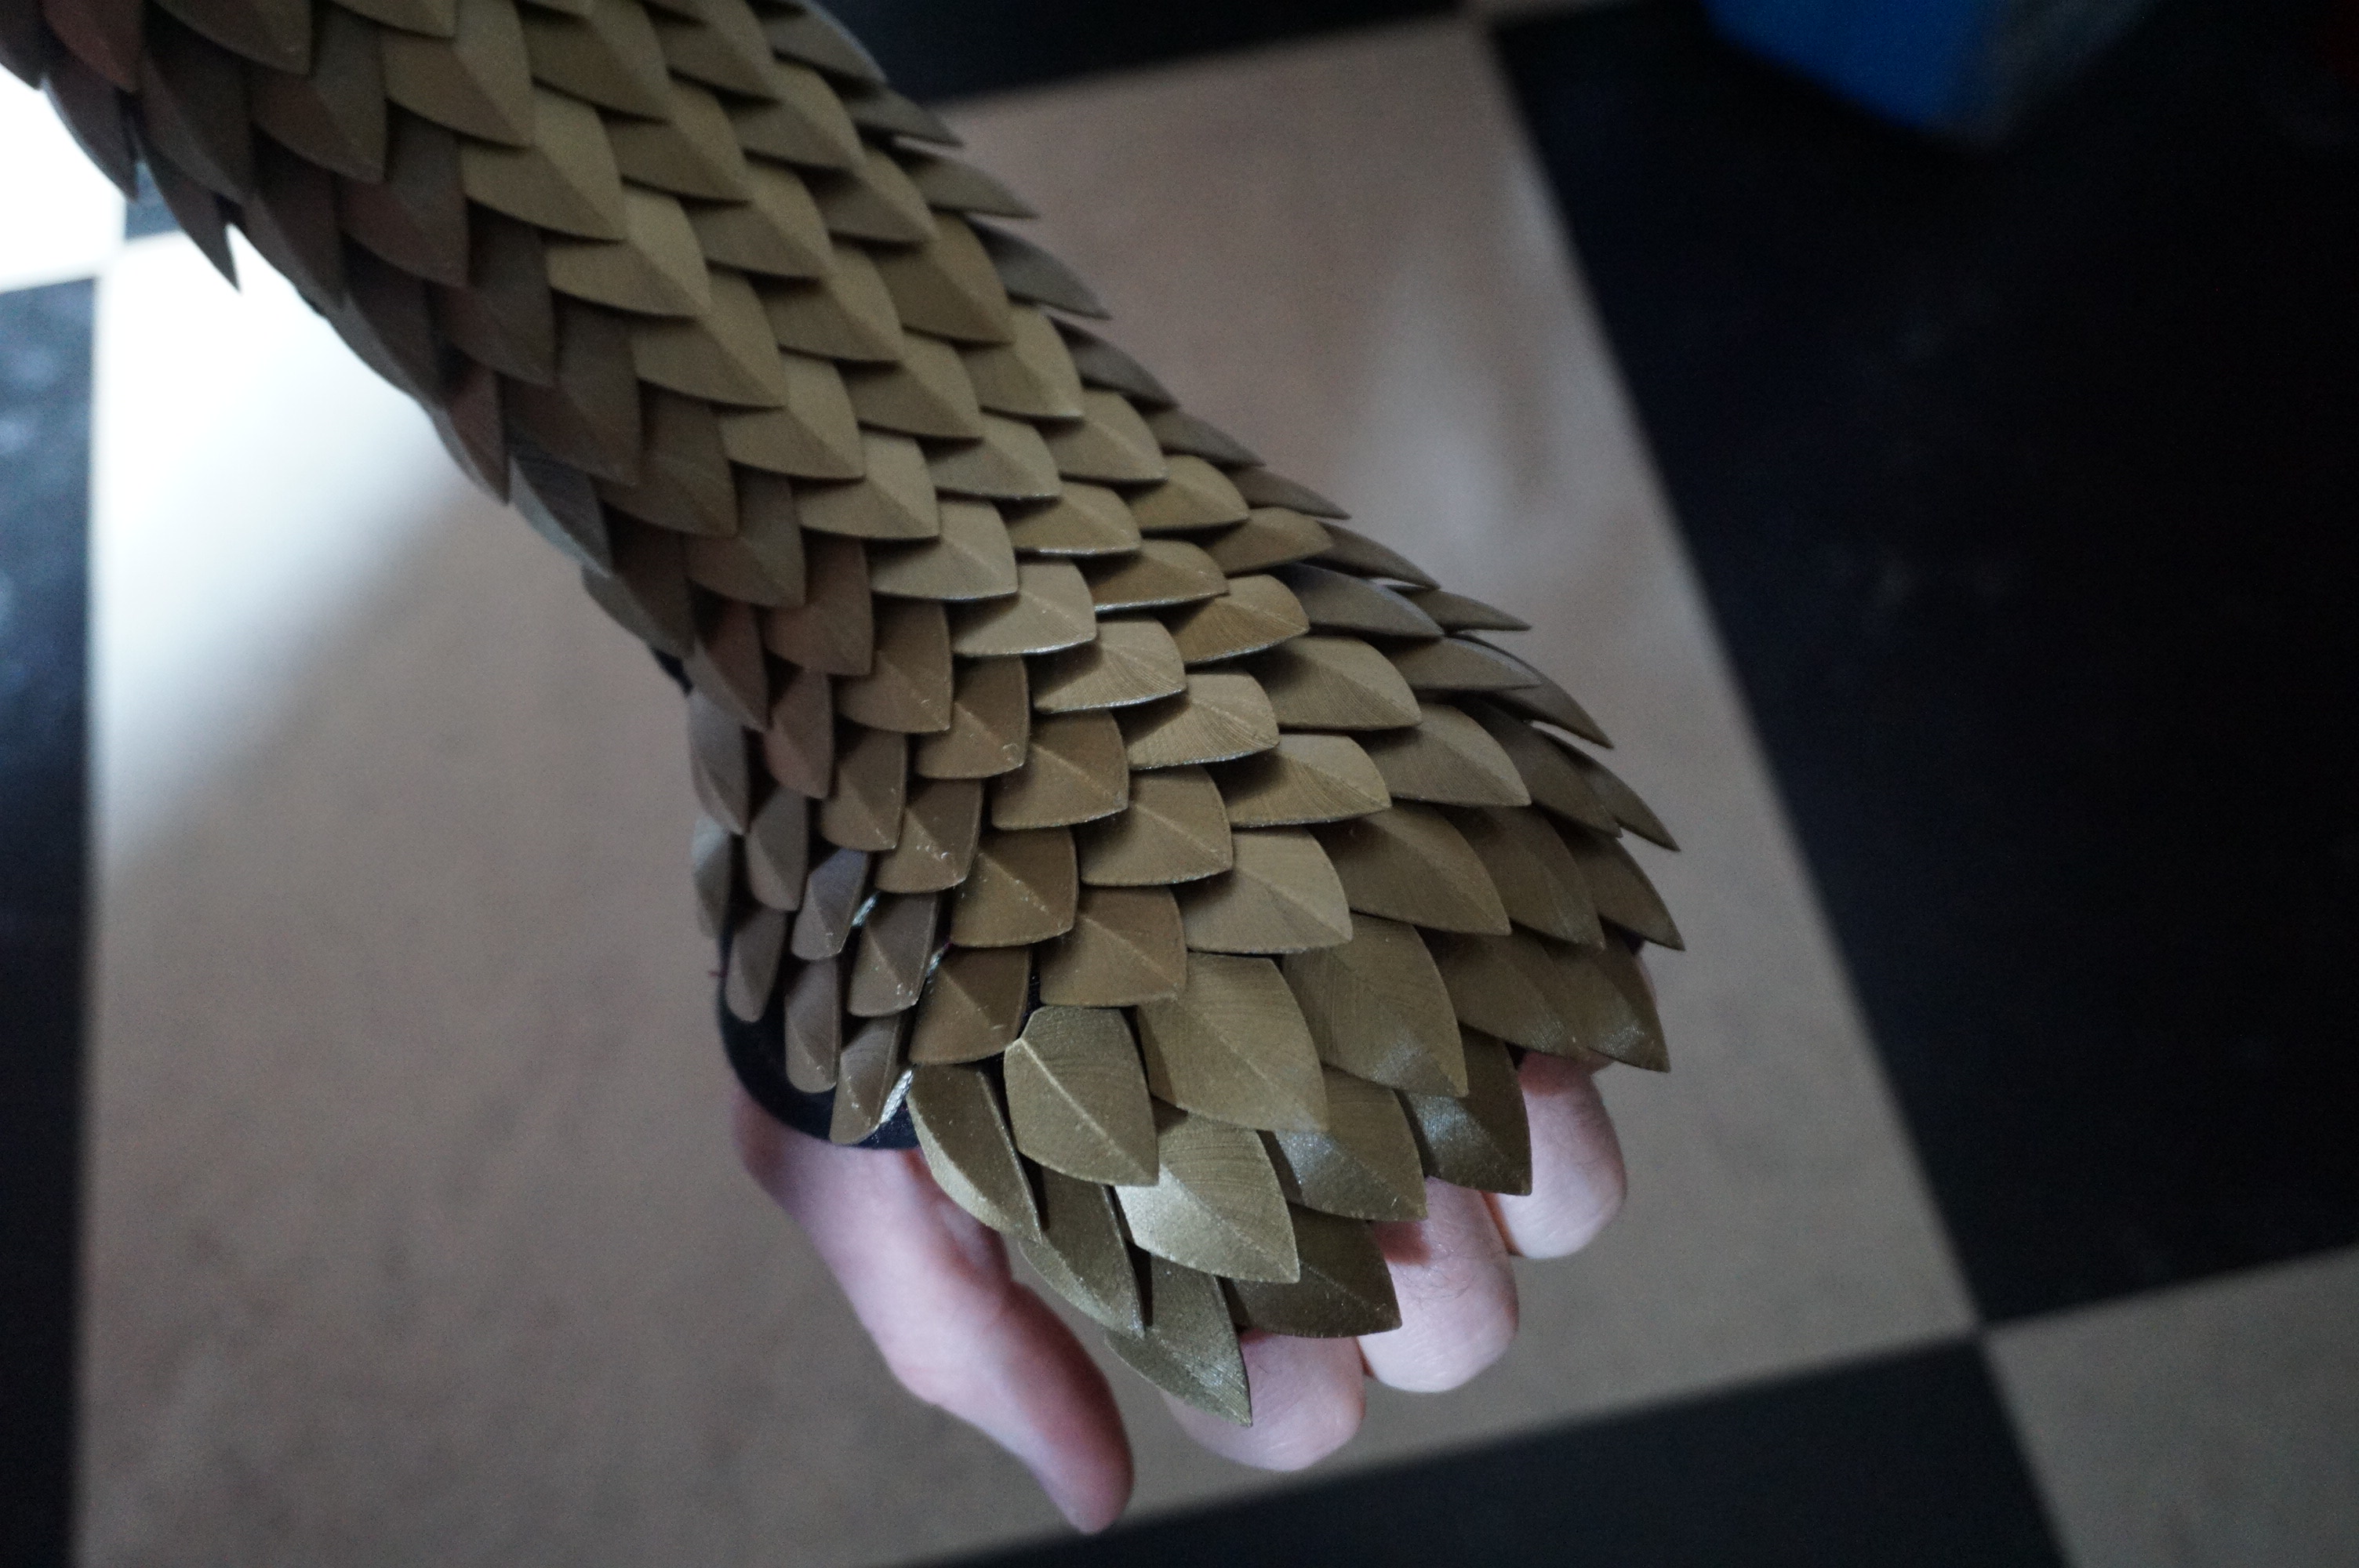
A full gauntlet
With a good design, I wanted something more than a simple small sample. I wanted a full gauntlet. I simplified the design a little more, and added a loop inside the scale to help me mount this to any fabric later. This last one turned out to be a life saver, but more on that later. To create the gauntlet I used:
- Black tulle fabric
- Bronze colored PLA filament
- Black T-shirt fabric
- Tread in a matching color
- 3D printer (Prusa I3 Mk2s)
- Sewing machine (Singer 433)
- A disposable needle
- Too much time
For the color I went for a bronze like PLA I still had from a previous project. It can pass for a mythical organic color and I really like the color to begin with. I printed this at 0.1mm, but I had to increase the layer height of the part to 0.25mm for the first 4 layers. The nozzle would disturb the tulle when I resumed the print. Prusa Slic3r has the button “Layer editing” for this.
Printing on tulle is pretty straight forward in theory. Pause the print after layer 2, drape the tulle over the print, and continue printing. To stop the print I looked in the gcode for “;AFTER_LAYER_CHANGE” and went to after the second layer. I then added the following code:
M300 S440 P200
M300 S660 P250
M300 S880 P300
M601
M300 is a “make a sound” command, and notifies me that the printer is pausing. M601 is a Prusa specific “pause printing from SD command”. This code will play a 3 tone sound, and then pause, allowing me to place the tulle. I do need to print from SD to make this work. Printing in total took around 24 hours for one gauntlet.

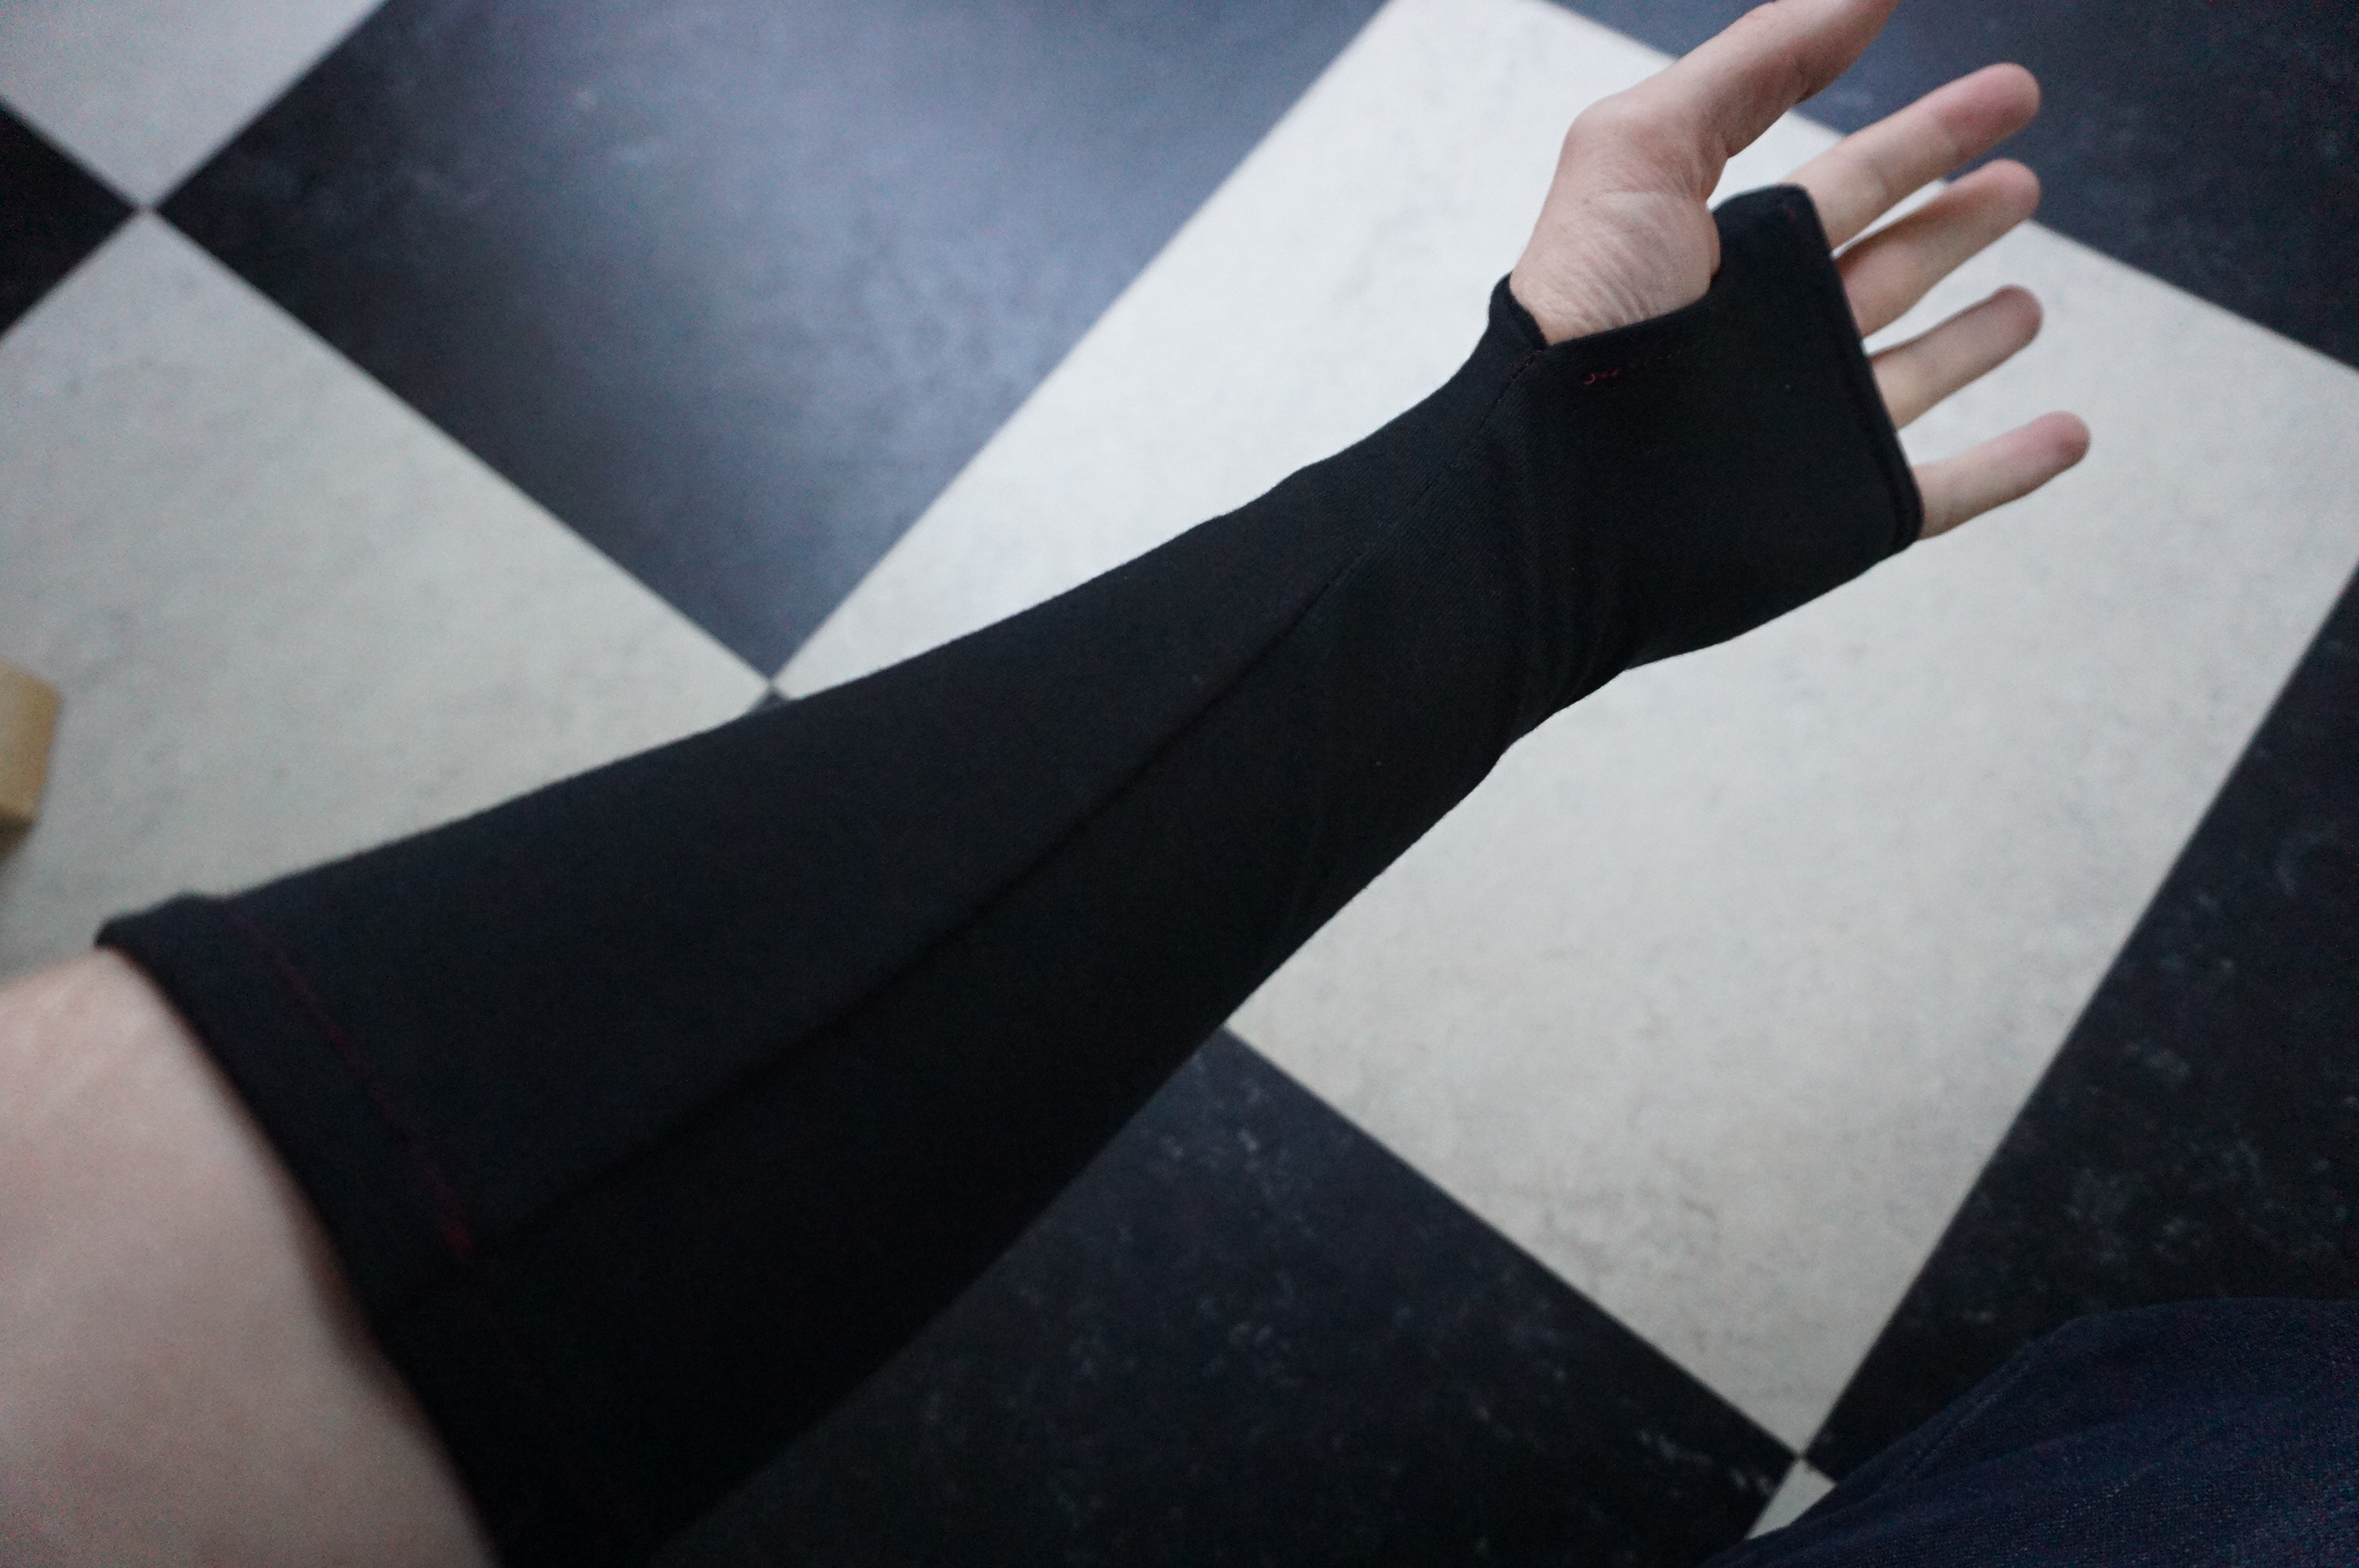
To mount the scales I made a simple sleeve from shirt fabric. It is slightly stretchy so it can fit my arm perfectly. To make the pattern, I simply traced my arm and added some to the sides to compensate for the thickness of my arm. The edges were then sewn, keeping a gap for my thumb. The final fit was done by sewing the arm tighter and tighter until the fit was just right. I then remade the pattern to the fabric so I have a perfect pattern for the future.
Attaching the scales to the sleeve turned out to be a nightmare. Due to size limitations the full arm of scales is split into 2 parts, a front and a back. I first heated a needle to red hot, then let it cool. This reduced the hardness of the needle so I could bend it into a hook. This hook was used to stitch individual scales to the sleeve. At the edges at least every other scale was stitched. In the center only every few scales are stitched in place.
The problem is one of space. The scales cannot be folded inside out, and getting enough space to maneuver the needle was difficult. At the front I could use the thumb hole to get to the backs of the scales, but the back halve the back I had to work my from the center to the back, slowly unrolling the fabric. If a scale in the center detaches, I cannot really mount it in place again.
Also, if you do this, keep the tulle on one sectionand lay the other scales section over this. The fabric is more flexible than the tulle, and if I bend my hand forward the 2 sections slightly detach in the middle. Mounting the scales to the fabric took over 5 hours.
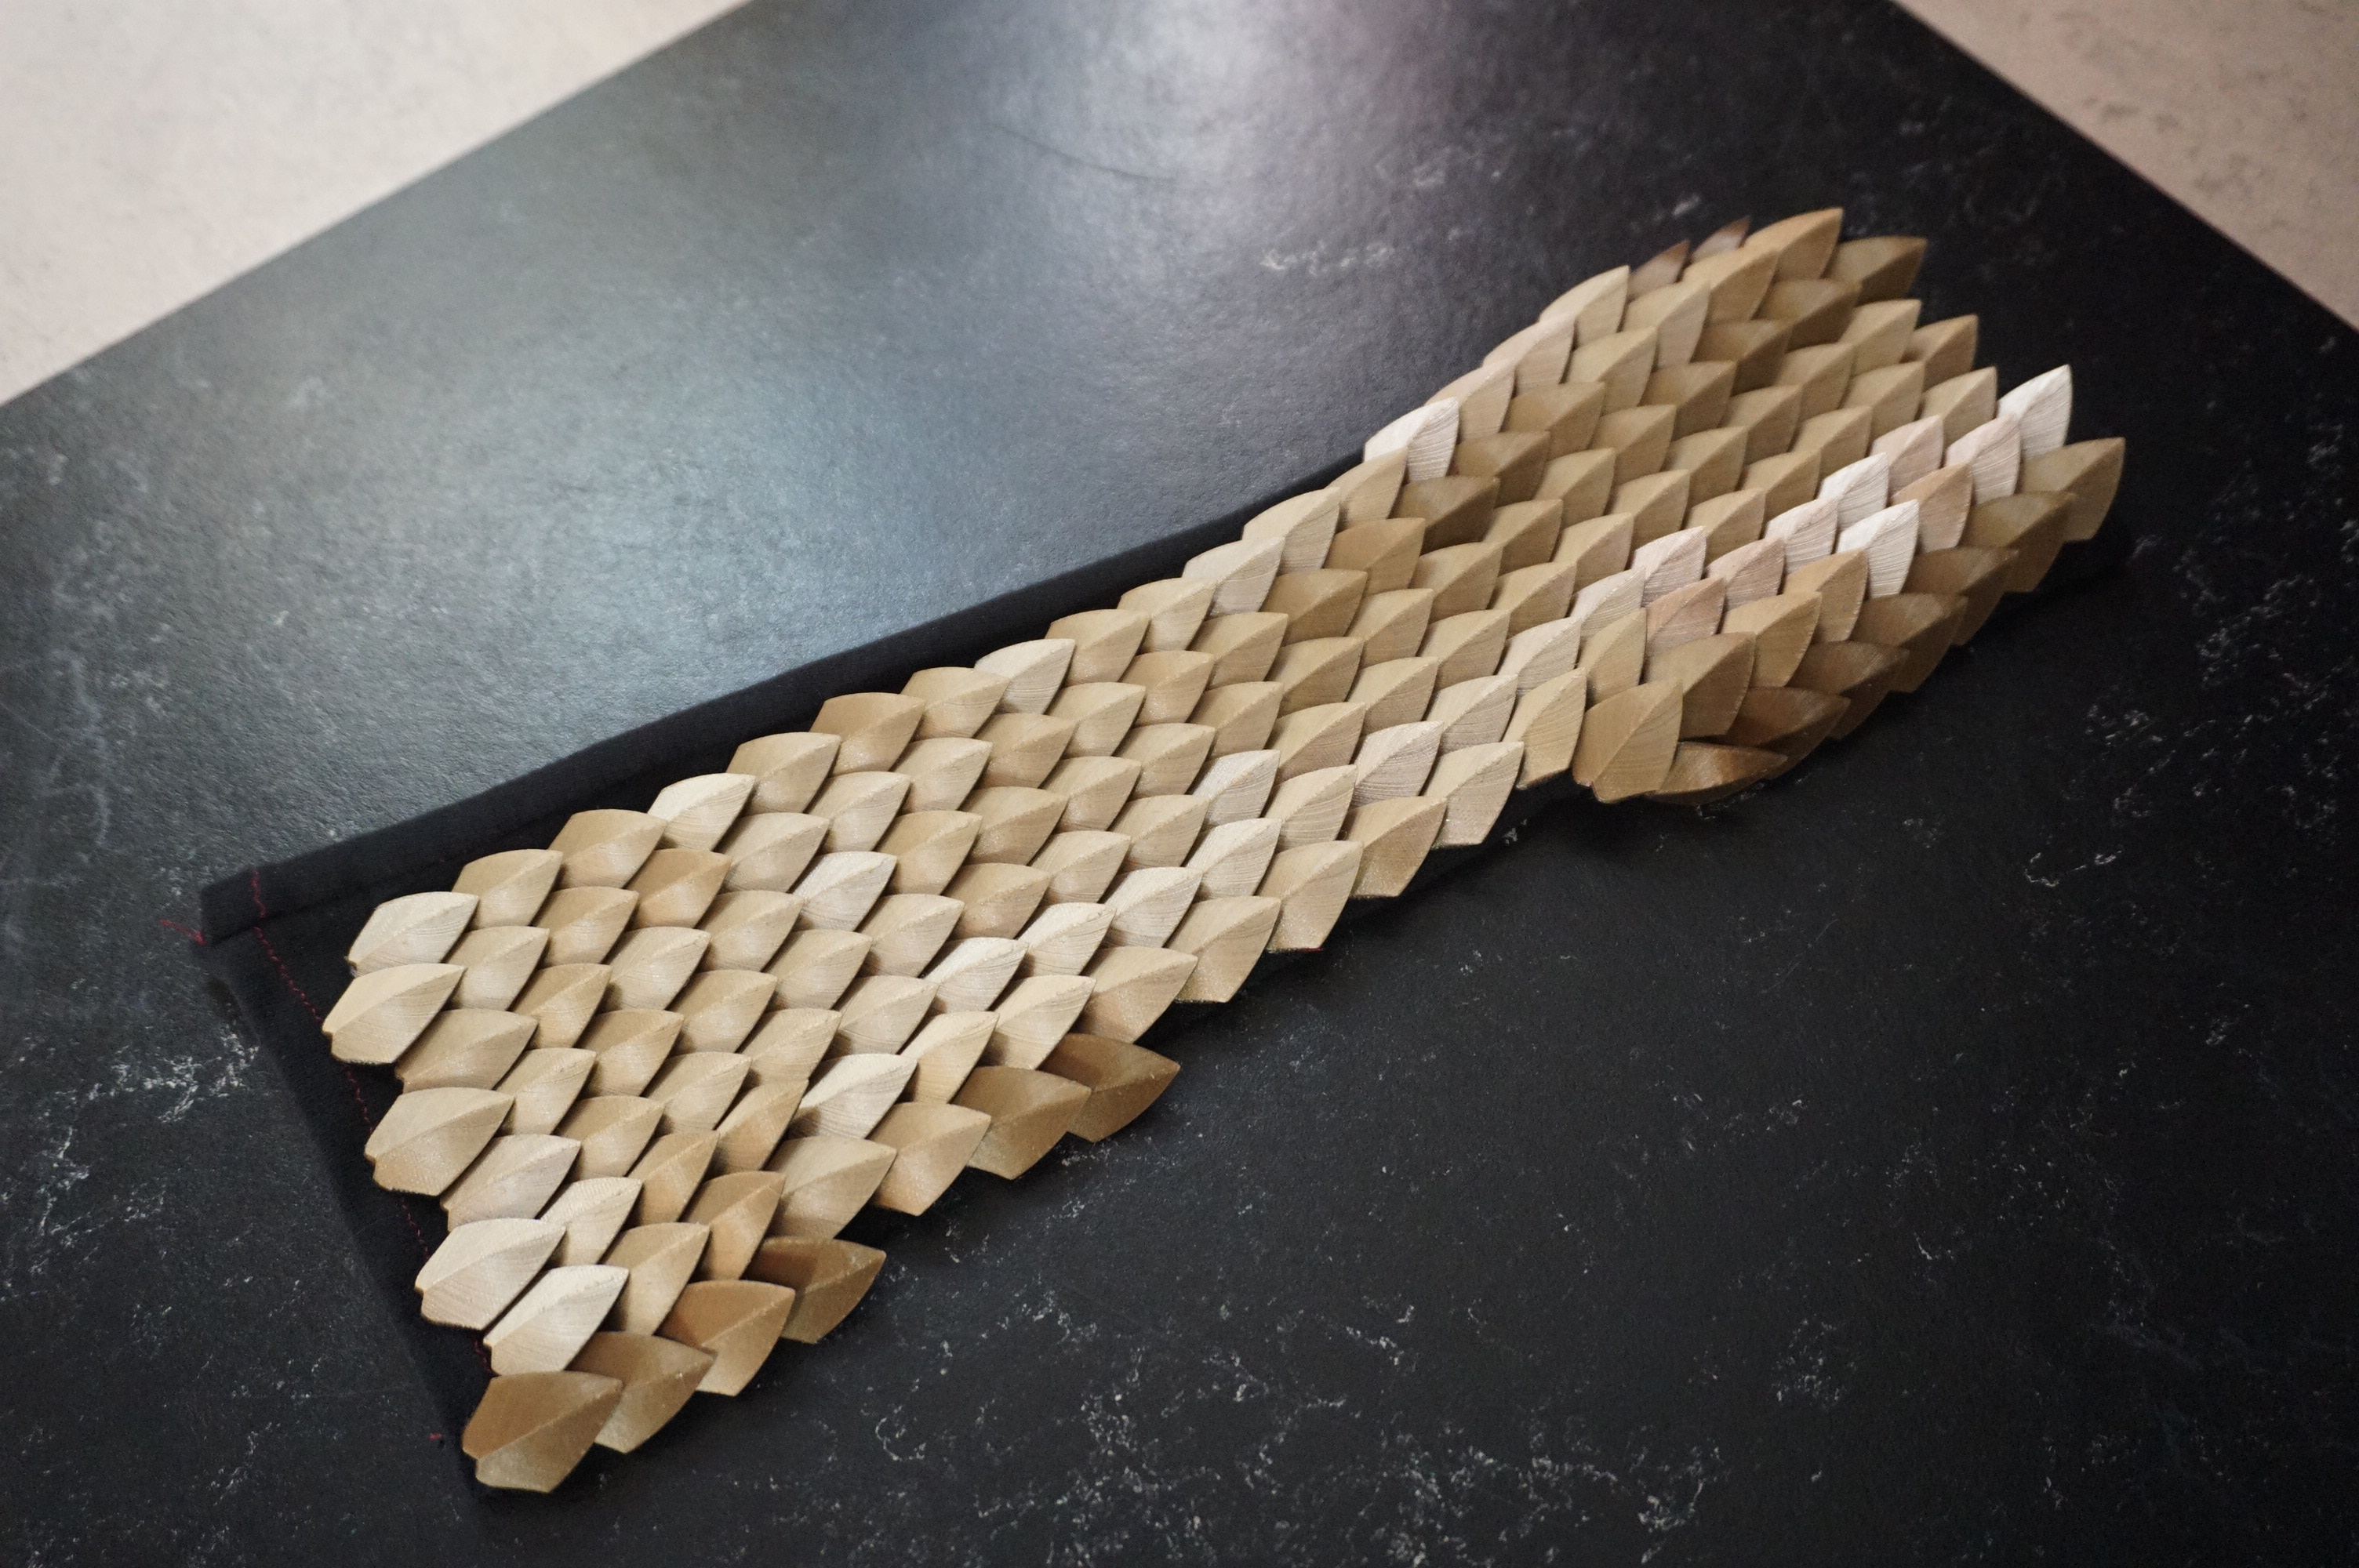
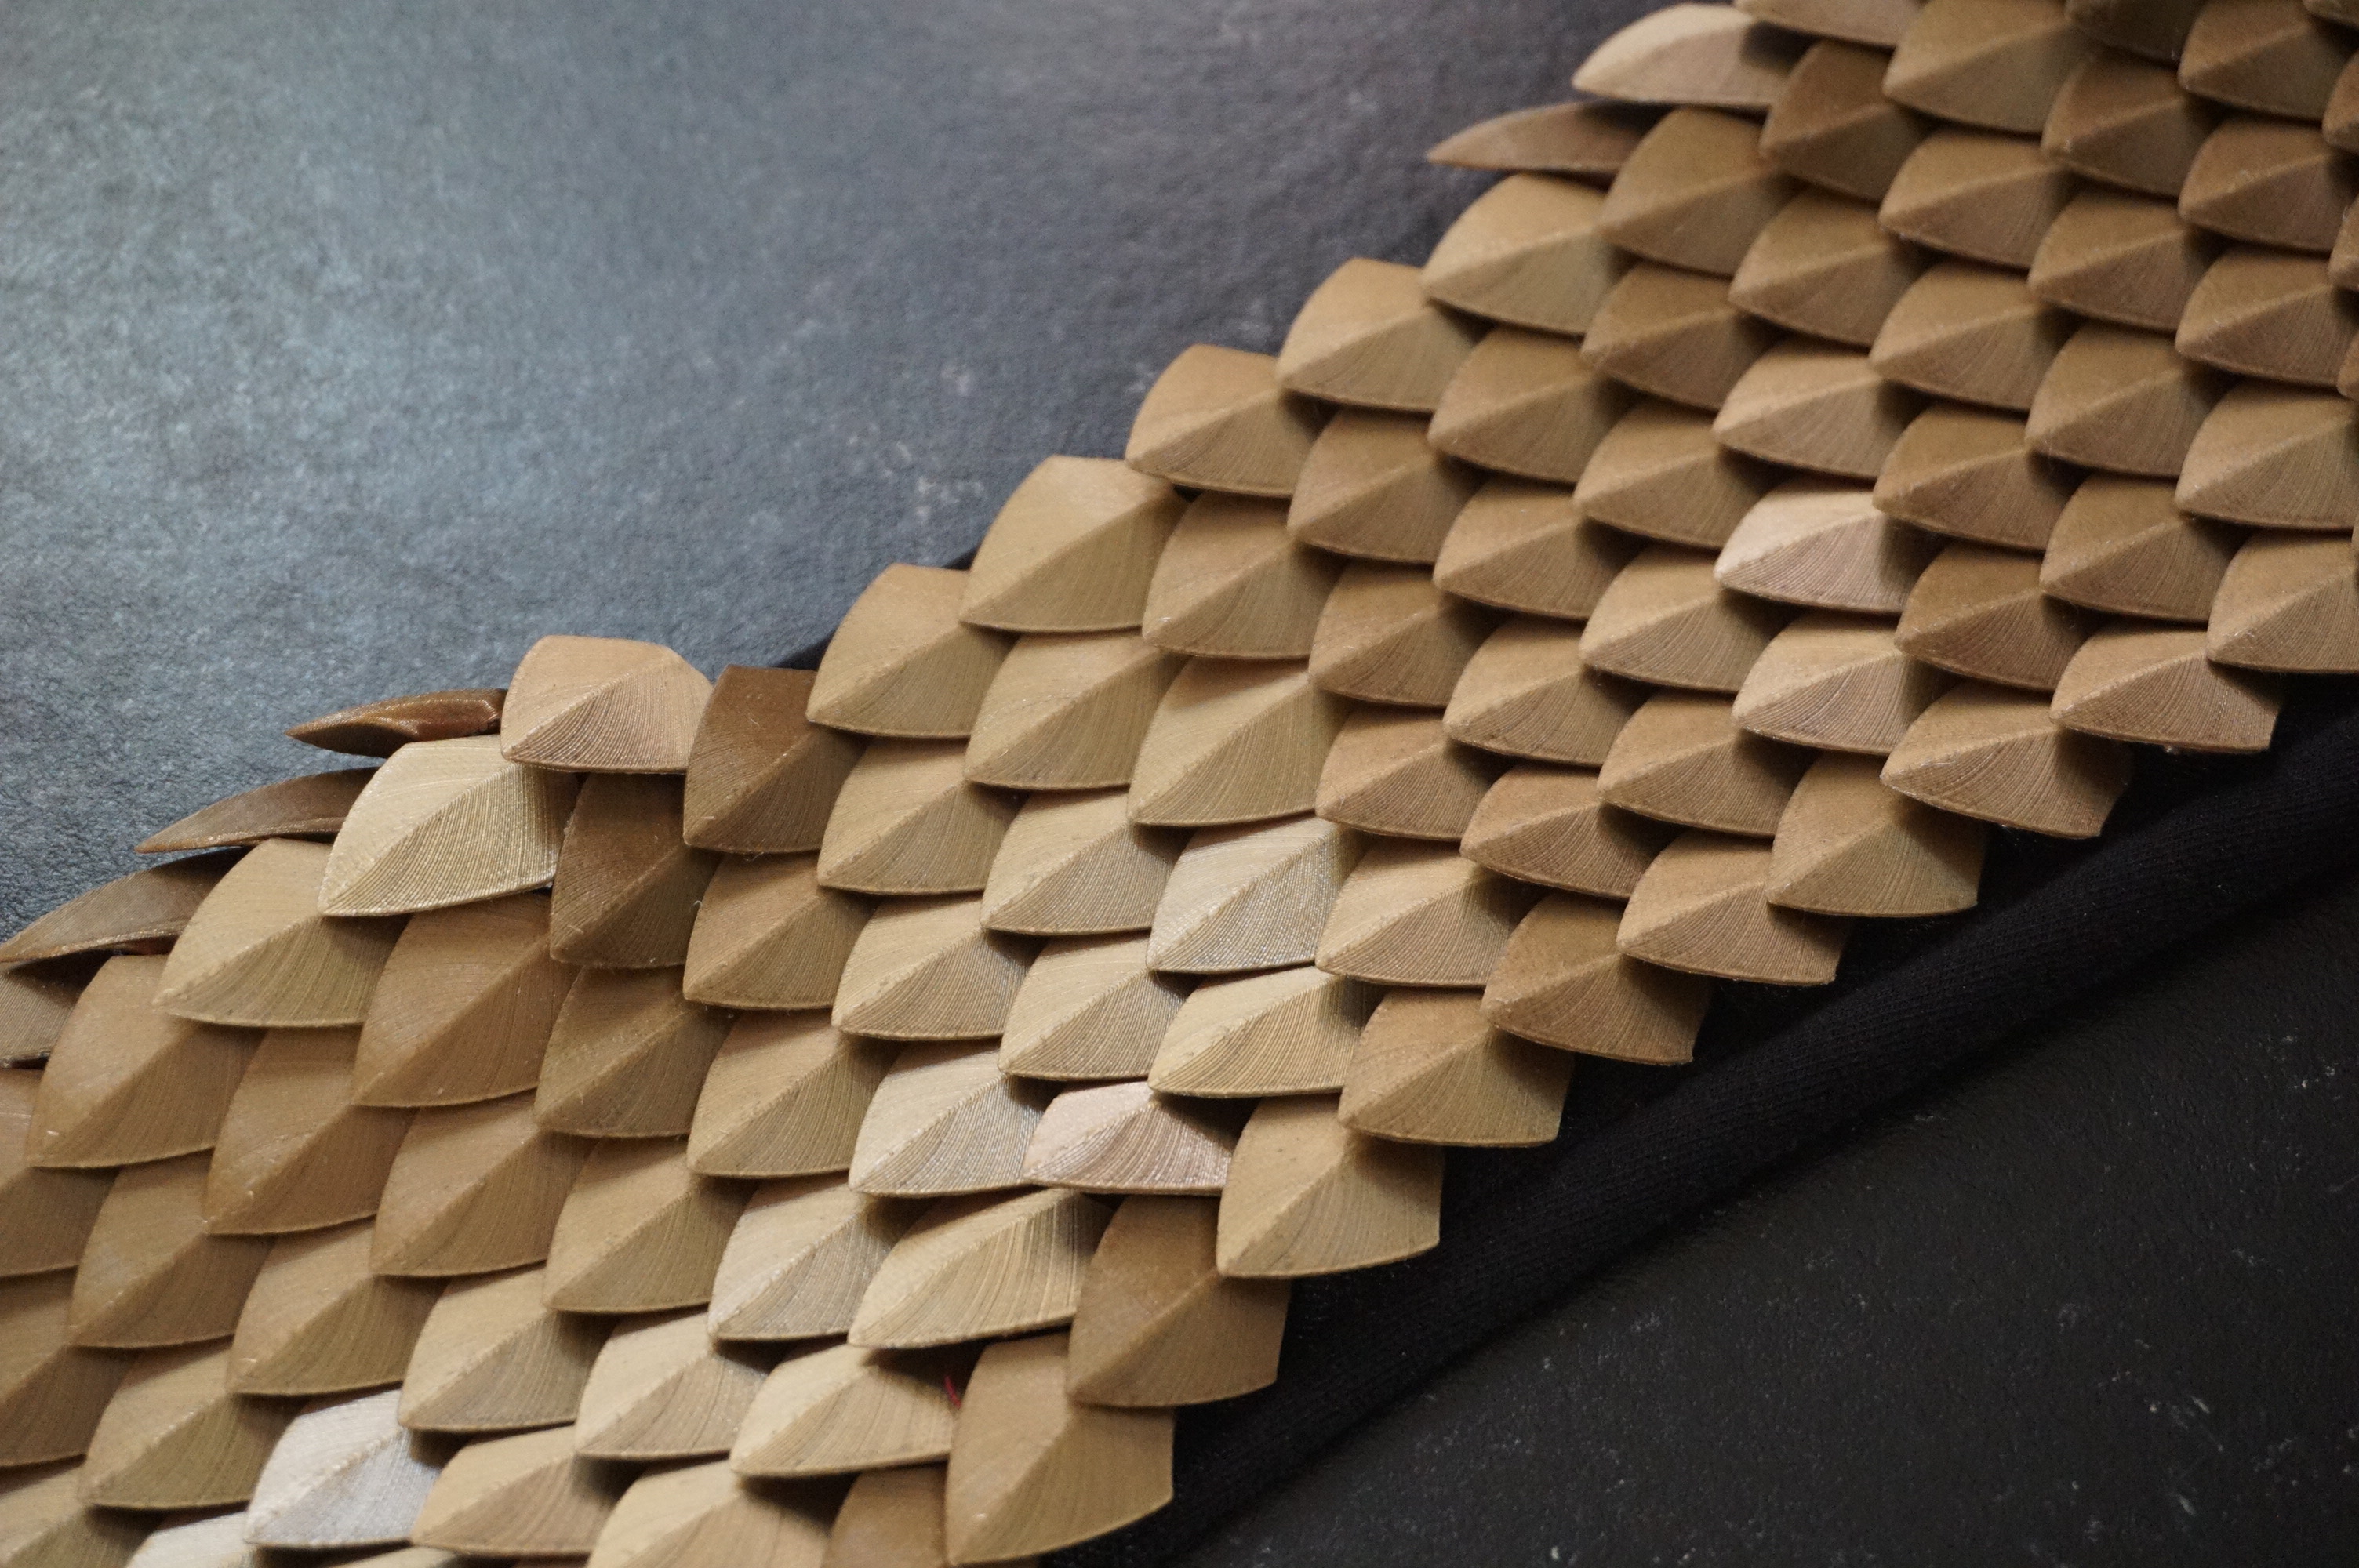
And then the gauntlet was done. I am really in love with this pattern. It looks amazing, especially in this color. It feels amazing to stroke and retains full flexibility. At the front the scales are past my knuckles, so if I make a fist, the pointy scales make a some sort of brass knuckles. I call this proof of concept a great success.

That being said, there is still room for improvement. First of I want to find a better way to mount scales to fabric. Sewing the tulle to the fabric is not possible due to the scales and the lack of strength of tulle, and while the eye in each scale technically works, it is a lot of effort. I am thinking of pop rivets, or the nails used in jeans. Another option is to redesign the scales so they can be sewn from the top, but I do not know what that would look like.
Another advice, make a sleeve that can be opened. Either with laces, buttons, velcro hook and loop fabric or a zipper. The ability to get to the inside is really valuable when mounting or maintaining these.
One last thing I didn’t get to do yet is more designs. The underside is now just black fabric. It would be really cool to have some sort of underbelly scale (thin, light, round, only slightly overlapping) on the bottom. I cannot really mount it anymore, but I love the idea of it. I also would love to see a more organic look by having the scales be bigger or smaller depending on the location, and maybe have different shapes. Having spiky ridges over the back of my arm sounds cool.
And for now I will leave it at that. Below you can find the files of my best scales, and if you have made this yourself or have suggestions, feel free to comment.
The files

If you downloaded the files from this site and liked it, please consider going to the Donations page. This will help the development of more free designs and plans.
License

The project described on this page is licensed under the Creative commons – Attribution – ShareAlike license.
I’ve been experimenting with basically pressfit scales, two pegs on the underside which fit into holes on the two scales it overlaps (each scale is basically a flat kite shield shape, no fabric involved yet). It has some issues with flexibility, which is my main issue; ironically it’s both that the pegs sometimes snap and that the assembled weave doesn’t flex as much as I’d need for anything that moves
It would be a bit of a design issue to try something like that, but if you could add pegs to the bottom in place of the loops, then add the openings to something you could more easily sew onto the cloth, maybe that could work?
I like the look of your scales, though; I might take a break from my approach to play around with this angle.
Someone is reselling your scale models – https://cults3d.com/en/3d-model/fashion/flexible-scalemail-bracer-propsmaker
I was doubtful at first, but it does seem to have my design as a base. Propsmaker added plenty to the design to have improved it, but if my design was used as a base I would prefer to have some attribution. I have notified them on Cults
I have been using your stl a ton!! Thank you so much for sharing these beautiful scales; they are my favorite shape I have found this far.
Do you have the single scale file available? It would be great to mix and match patterns.
Best,
Caitlin
I do not have a single file available at the moment, but I have tried it in PrusaSlicer, and here you can split the model and be left with only one scale. Hope this helps.
What are the dimensions of your printer bed? I am trying to understand how you were able to print such a long strip of scales. Did you print a small section, reposition the fabric and do another print or is your printer large enough to accommodate the entire length of the gauntlet?
Thank you!
This was printed on either an Ultimaker or Prusa, so around 20x20cm. The length is me overlapping the tulle mesh and joining 2 pieces.
The holes are indeed terrible. If I did this again I would try other things, but making holes accessible from the top and not visible is actually quite a challenge. I wanted a top surface with no gaps and no visible mounting features.
If you manage a design that is easier to attach please do share it. It will be an improvement over this design.
Thank you! I have printed so far on a variety of mesh and think overlapping by just seeing the fabric may be easier and secure. Given the space between scales going in between may be difficult but the perimeters are doable!
*sewing
Interesting to me how this is difficult, I am not exactly sure why.
In my opinion, those holes are terrible. Why not have two holes at the end of each top on the top of the scale? Make it very similar to the buttons that you can buy in-store, then people can attach these in many different ways.
I personally would have made it a bit thinner than using a sewing machine with the button function. Or if people want these on chain mail, then they can use those rings to attach these.
You are not wrong in that the curved holes are difficult to use. The basic idea of the printing on tulle is that you do not need to fix many scales to the fabric, but the reality was that quite a few scales needed to be fixed to the fabric to fix the scales to the fabric. I used a curved needle, and that made it work, but it was indeed a challenge.
The button holes might work. My requirement at the time was that I was not able to see the mounting of the scales to the fabric, and any design that would cover the button holes would almost by definition be covered by the other scales, and thus difficult to sew into place. If I do give it another try I might still attempt this, since mounting these to the fabric did take some time.
I’m late to this party but I’d like to share an idea. I sew for a living so thats where this comes from. Instead of the hole like it is already. What about making it like a button. If this is done toward the back end , the overlap could conceal it.
hot glue or possibly silicone? glue wouldnt be super flexible but you could put it in location that dont really flex much like the larger muscles. silicone can be reasonably flexible. im going to try both myself.
I think the download link is not properly working. Can you send me the files? gustavoeberle@gmail.com. Congratulations again for your beatiful work
How is the download link not working exactly? I just clicked the download link and all files downloaded. I’d rather fix any issue than work around it.
Fabulous. Congratulations
Hi!! I am new at this and I was wondering how did you model the scale itself, i am trying to do my own model (similar to yours but not exactly the same) and i failed with loft it makes more of a claw shape, would you mind sharing what tools more or less you used?
I’d have to go digging for an exact answer, but if I remember correctly the basis of the scales was made with the revolve cut tool. Each halve is a revolve cut at an angle. The previous attempts I also used lofts, but these do indeed make more like claws, which I also did not fancy.
is there away to print separate pieces and i use cura and my printer is cr 6se could you do a video on this and send me a link youngdrayco@gmail.com ill even send some cash your way
I have seen the request. Sadly, I will not be able to help beyond the files and instructions already posted here. There are more people who have done stuff like this and made more detailed video’s. Perhaps the missing information can be found in those instructions.
is there away to print separate pieces and i use cura and my printer is cr 6se could you do a video on this and send me a link youngdrayco@gmail.com
A ziptie mechanism attached to a flat chain mail . Such as the long part to go inside the scale and lock in place and a part like on a zip tie to detach the scale so they are replaceable
I have an idea for mounting the scales that would be super easy. Think of it as a ball and socket design. Create a 3D printed underlay with small raised balls at the spacing you want for the scales. The underlayment is a sheet of plastic with gaps that hinge together, making the underlayment flexible. Then, the scales will “pop” on to the protruding balls, like a ball and socket. Alternately, you can just make many plastic balls that would press through the fabric so that the ball sticks up enough that the socket scales could snap into place.
Would the underlay be mounted in any way to fabric, or would it be standalone? If it is standalone, I can imagine simply printing the scales with the underlay, with the flexible hinges included. This would give you a flexible sheet of scales. For the balls I am worried that it might be difficult to get the strength and tolerances right, but in principle it should be doable.