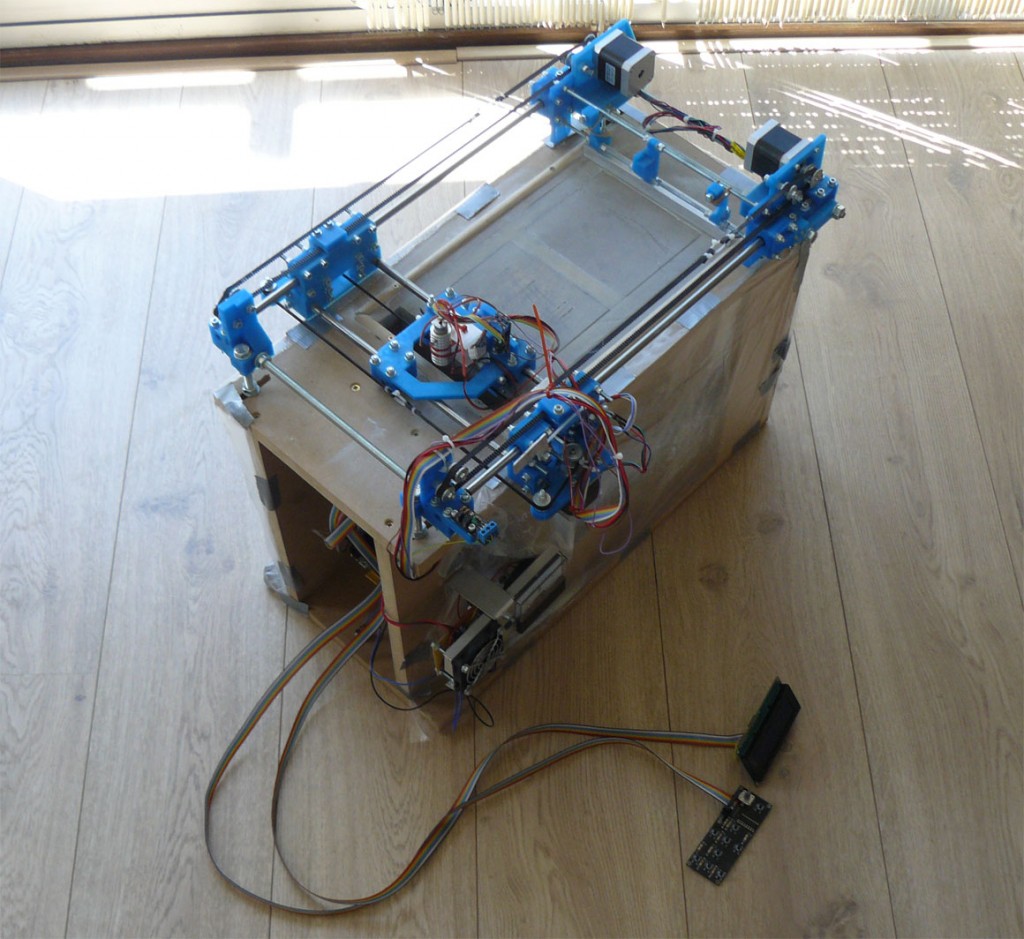
Focus is an experimental open source powder 3D printer. It is designed for experiments with 3DP and SLS printing, both powder based techniques. The frame is built using 3D printed parts and an MDF frame. It can be built with a simple 3D printer and basic tools. It uses standard components for 3D printing so parts should be fairly easy to source. Focus can be built for around €500,- if the parts are sourced right.
Focus was originally built for experiments with SLS printing, but after disappointing results it was retrofitted to 3DP printing. This did yield result. The speed is not great but the detail is simply amazing.
Focus has been discontinued. While it was very useful as an experimental platform, it was severely limited as a functional 3D printer. It was hard to use, fairly unreliable and incredibly slow. All files made are maintained for legacy purposes, but Focus will no longer be updated or improved.
What is SLS
SLS is often seen as the strongest and cheapest technique around. The biggest issue is the initial cost of the printer. It uses high powered lasers to melt (or sinter) metal or plastic, layer by layer, into a solid part. It produces parts that require hardly any post processing and are immediately strong, right after 3D printing.
What is 3DP
3DP is one of the first 3D printing techniques around. It uses a special binder that fuses powder into a solid part. By controlling where the binder is deposited, a part can be created layer by layer. The powder can be a lot of things. Most common is gypsum with special additives to make it react with the binder, but ceramics and sugar are also possible. 3DP almost always requires post processing. When the part leaves the 3D printer, it is brittle. It needs to be infused with a special glue or fired in a kiln before it reaches its full strength.
Focus as an SLS printer
Initially Focus was designed to be an SLS (Selective Laser Sintering) printer, using lasers to locally sinter material to a part. This was done with two 1.5W 808nm laser diodes focused on a single point. This way it was possible to locally melt wax or Nylon, both with carbon added to absorb the laser’s energy. Focus was also capable of laser engraving dark materials and even laser cutting dark paper.
In the gallery, the pictures with the dark powder is Candelillawax with carbon powder, the whiter powder is PA (Nylon) with a tiny percentage (<2%) of carbon powder.


While Focus was capable of melting PA when it was contaminated with carbon, it could not make any strong parts out of it. Also the parts had huge amounts of shrink, even parts smaller than a centimeter squared would have millimeters of shrink after even a few layers. This inability to sinter has several reasons.
- Focus had infrared lasers (808nm). Lasers at this wavelength are mostly reflected by the white PA. In order to heat pure PA, a CO2 laser is necessary. CO2 laser have a much larger wavelength (10600nm) that is almost fully absorbed by any plastic (even clear plastic).
- An inert environment is needed for the PA not to be burned by the heat of the laser. This is done by making an airtight chamber that is completely filled with nitrogen. This way the PA can’t burn because there is no oxygen available. Focus lacks an airtight chamber.
- To prevent shrink, the PA has to be preheated to near melting point. This way the part will not shrink during printing and the layers of the print won’t distort. Focus is made of MDF and therefore can’t be heated.
Because SLS required too many alteration (and to much money) to function, the decision was made to experiment with 3DP printing.
Focus as a 3DP printer
3DP printing requires an inkjet cartridge capable of depositing binder and special powder with certain additives. The experiments with 3DP didn’t start from scratch. There is already a company specialized in 3DP printing: Zcorp (3D Systems). By using the existing powder and binder, the uncertainty of having the wrong material was eliminated. As for the inkjet cartridge. There has already been someone that has developed a way to control an (ancient) inkjet cartridge with an Arduino. The project was called inkshield [link] and it used C6602A cartridges with 12 nozzles and a resolution of 96DPI. While these cartridges are not ideal, they do the job without too many control issues.

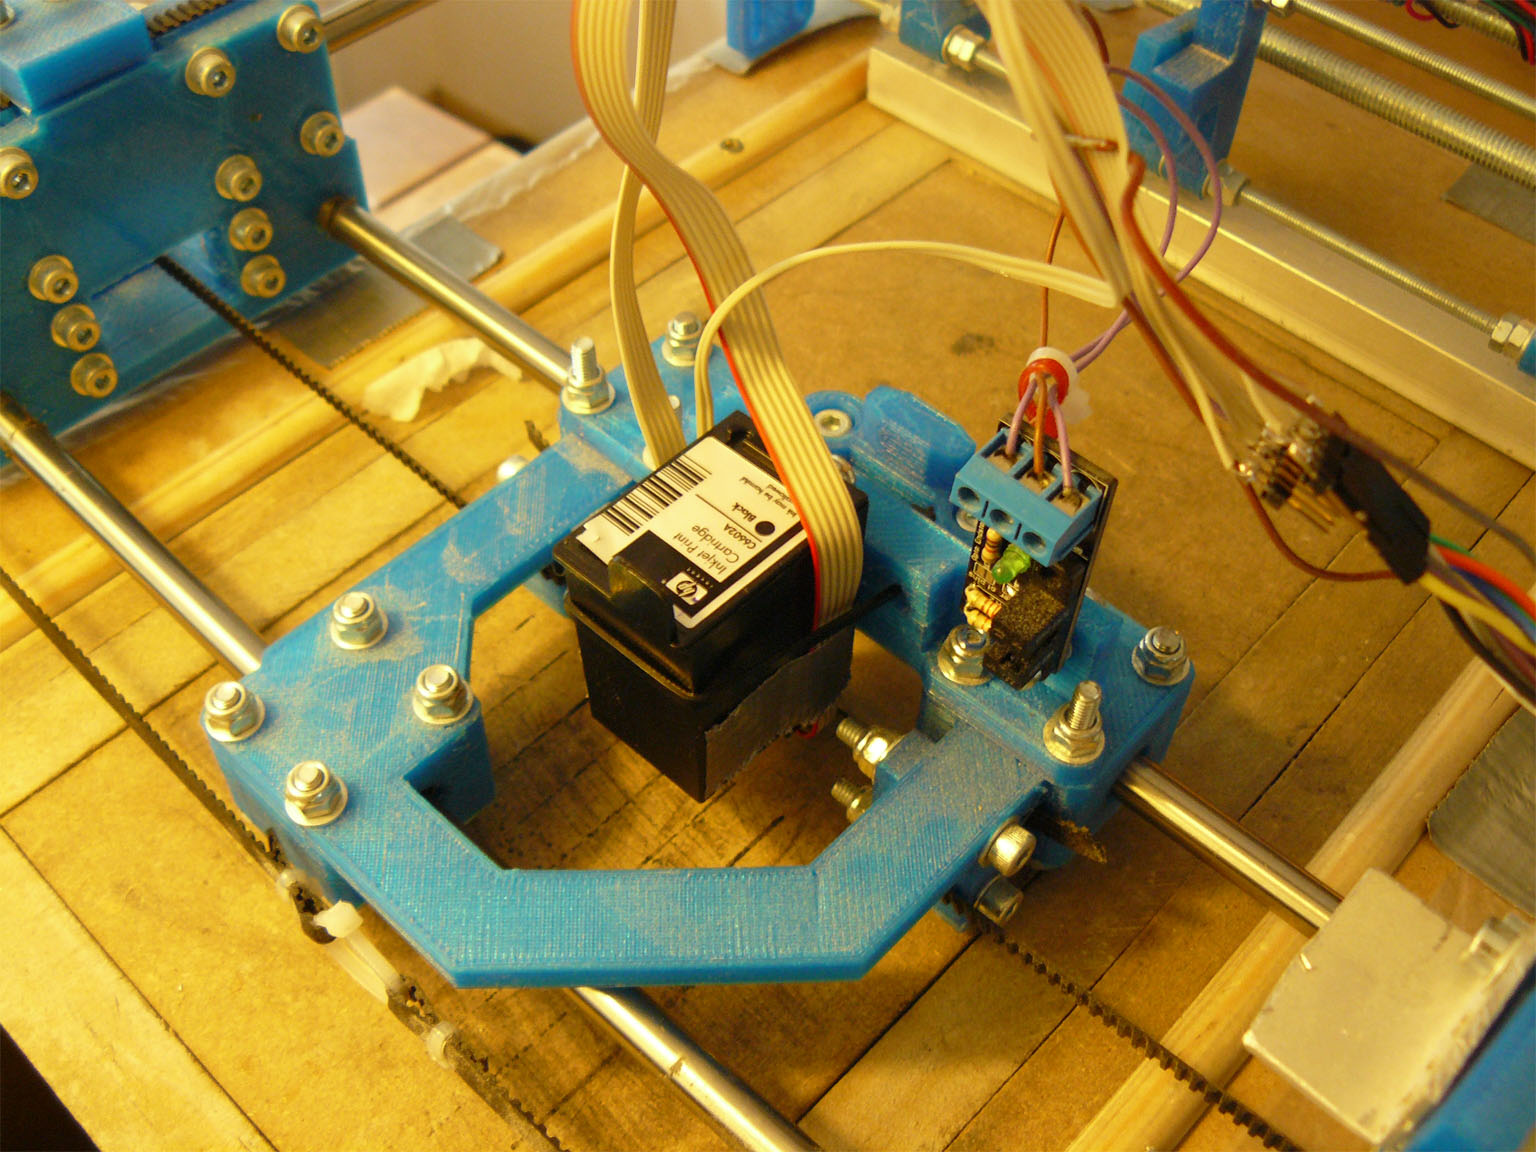

To prevent a complete rewrite of the firmware, a shortcut was taken. Instead of printing like a normal printer does (printing full sweeps with 12 nozzles at the same time) it printed like a FDM printer (with only one nozzle following the path that otherwise the extruder would have followed). An extra Arduino was added that simply took the laser input and triggered only a single nozzle at a set frequency. This was not the fastest way of printing, but it was fast enough to proof the concept.
Focus was too slow to print any parts bigger than 1cm3. All of the test prints were smaller than that. The biggest drain on the speed was the new layer function. It took a whopping 30 seconds to deposit a new layer. If you add that to the fact that Focus print at a resolution of 150 microns, it becomes clear that printing is going to take a while. A 1cm high product takes 33 minutes in new layers alone.
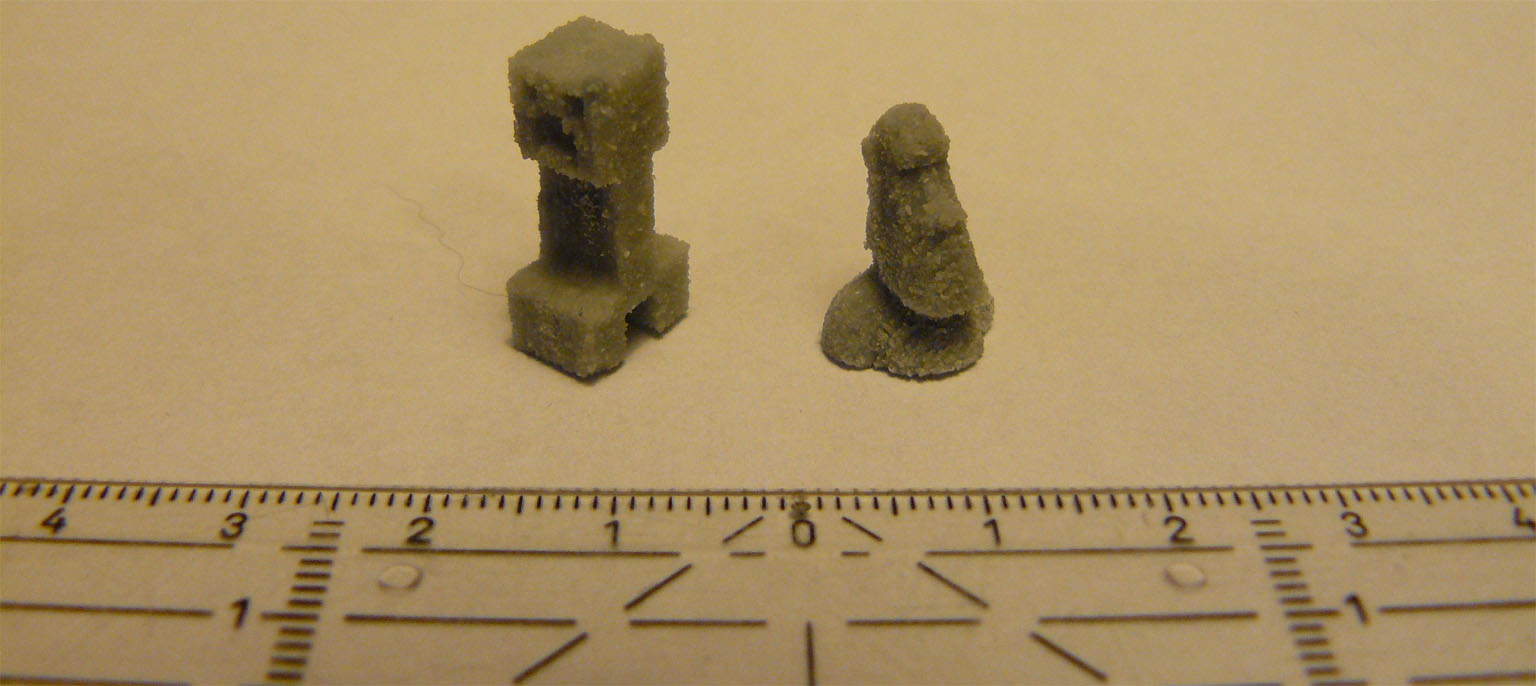
Having pointed out the obvious flaws a simple fact remains. All of the problems are hardware problems that lie with Focus, not with the 3D printing technique itself. Focus was capable of printing in 3 dimensions at a resolution that no FDM printer can reach. It is amazing to see just how much details there is in the tiny prints. Yes, the prints took 45 minutes to make but it works.
Final thoughts on Focus
All in all I am pleased with Focus. It did not do exactly what I wanted it to do. It was not capable of printing SLS, its main goal. It did however prove that another technique was possible. 3DP printing. The results that Focus has managed with all of the obvious drawback is simply amazing and it has given me enough proof of concept that I am willing to build a 3DP specific printer.
This printer is Plan B.
Focus is now discontinued. It has proven its value but it no longer has any use for me. I have disassembled Focus because it was in the way and the parts were of good use to me in other projects. Focus has been reincarnated (at least for a bit) into Plan B. No new updates regarding Focus will be posted. All new development will be in future 3D printers.
Building a Focus
The design files for Focus are still available for anyone that wants to experiment with powder based printing themselves. I have a download for all the files, including 3D print files, technical drawings and the latest firmware. The firmware is nothing special but it will function.
There is no step by step assembly video or a page that explains in detail how to build it. Focus was discontinued long before Ytec3D.com. The technical drawing, combined with pictures, should however be enough to assemble a full Focus. On this site there is a condensed version of how to build a Focus. For the most complete instructions, follow the link below to go to an old instructables page that has most of the information.
https://www.instructables.com/id/Focus-an-experimental-powder-printing-platform/
Download the files by clicking the button below:

Pros and cons
Like everything, Focus has several advantages and disadvantages. Whether these will be in the way depend on what you want to do with it.
Advantages of Focus:
- Focus is incredibly cheap to build. It is based on easy to source parts and cheap 3D printed parts. Most parts in the frame are either cut out of MDF or 3D printed;
- Focus is versatile. It was designed to carry a wide range of tools for testing several options. The carriage has enough space for most thing. You can turn Focus into a 3DP, SLS or FDM printer and the carriage is even strong enough to carry a milling head. Given the right additions, Focus can become anything.
Disadvantages of Focus:
- Focus is unreliable. After several hours of printing the pistons will jam and the printer will have to be cleaned before it can be used again;
- Focus is not easy to use. I had to write the firmware myself. Some functions, especially getting the printing file on the printer, can be a hassle;
- Focus is not fast. Understatement of the year 2012. Focus is incredibly slow. While the gantry can still reach 30mm/s (quite fast considering it has no acceleration), deposition a new layer takes so much time that it ruins the speed completely;
- Focus lacks features. Because it was designed to be cheap, a heatable buildbox and airtight chamber were not included in the design. It does limit the functionality of Focus.
Electronics
Focus uses a Ramps 1.4 board connected to a Arduino mega 2560. The board has an additional keypad, 4×20 lcd screen and an SD card reader (micro or normal doesn’t matter). Instructions on how to connect any of these components can be found:
http://www.reprap.org/wiki/RAMPS_1.4
http://reprap.org/wiki/RAMPS_LCD
http://reprap.org/wiki/Keypad
http://reprap.org/wiki/Sdramps
There is and will not be a schematic or diagram of how to connect the motors to Focus. The connections are however explained in the firmware, so anyone with the schematics of RAMPS 1.4 should also be able to properly connect Focus. If this is not the case anyone can contact me at the contact me page. I will try and answer any questions.
Firmware
The firmware of Focus is both my biggest achievement and Focus’ biggest shortcoming. I learned so much from writing Focus’ firmware but it also is crude and lacks functions. Because Focus is discontinued, I will no longer update this firmware.
Probably the most obvious flaw of the firmware is the print.txt flaw. Focus reads the file from an SD card. A file cannot be selected in the firmware. The file has to be in the top folder of the SD card and has to be called “print.txt”. While this is not the most user friendly way of reading a file, it is the easiest to program.
At the end of a print file, sometimes the firmware freezes, sometimes even with the nozzle or laser on. This problem lies in the unreliable buffer that sometimes fails to notify the firmware that it is done or does notify the firmware while the print file is not yet complete.
The firmware has no acceleration. This was attempted ant this failed. At low speed acceleration does not add anything but at higher speeds the lack of acceleration causes missing steps or vibrations. Keep the speed below 60mm/s to prevent any problems.
Gcode print files
Focus reads ordinary Gcode that is also used for normal 3D printers. It uses the extruder axis (E axis) to determine when the nozzle or laser needs to be on. As long as the E axis is moving forward, the nozzle or laser is on. When it is stationary or moves backward, the nozzle or laser turns off.
Note that the 0,0 point of Focus is in the center of the buildbox, not in a corner.
An example code has been added to give an idea of that Focus uses. This code is not an actual code that Focus printed, the code is too big for the buildbox of Focus. It merely serves as an example.
G1 X68.37 Y47.79 Z0.15 F600.0
G1 F798.0
G1 E0.0
G1 F600.0
G92 E0
G1 X70.19 Y47.79 Z0.15 F1200.0 E0.092
G1 X70.21 Y45.29 Z0.15 F1200.0 E0.218
G1 X83.11 Y45.29 Z0.15 F1200.0 E0.87
G1 X83.11 Y47.79 Z0.15 F1200.0 E0.996
G1 X85.11 Y47.79 Z0.15 F1200.0 E1.097
G1 X85.11 Y80.7 Z0.15 F1200.0 E2.759
G1 X83.11 Y80.7 Z0.15 F1200.0 E2.86
G1 X83.11 Y83.2 Z0.15 F1200.0 E2.986
G1 X70.2 Y83.2 Z0.15 F1200.0 E3.638
G1 X70.2 Y80.7 Z0.15 F1200.0 E3.764
G1 X68.2 Y80.7 Z0.15 F1200.0 E3.865
G1 X68.2 Y47.79 Z0.15 F1200.0 E5.527
G1 X68.33 Y47.79 Z0.15 F1200.0 E5.533
G1 X68.37 Y47.37 Z0.15 F1200.0 E5.554
G1 X69.78 Y47.37 Z0.15 F1200.0 E5.625
G1 X69.8 Y44.87 Z0.15 F1200.0 E5.752
G1 X83.53 Y44.87 Z0.15 F1200.0 E6.445
Supported commands are:
G1, move axis
G92, Set value to axis
License

The project described on this page is licensed under the Creative commons – Attribution – ShareAlike license.