Oasis is an open source 3D powder and inkjet (3DP) prototype printer. It is designed to be a hackable platform to experiment with 3DP. It was entered in the Hackaday prize on Hackaday.io. More information on the actual development can be found there.
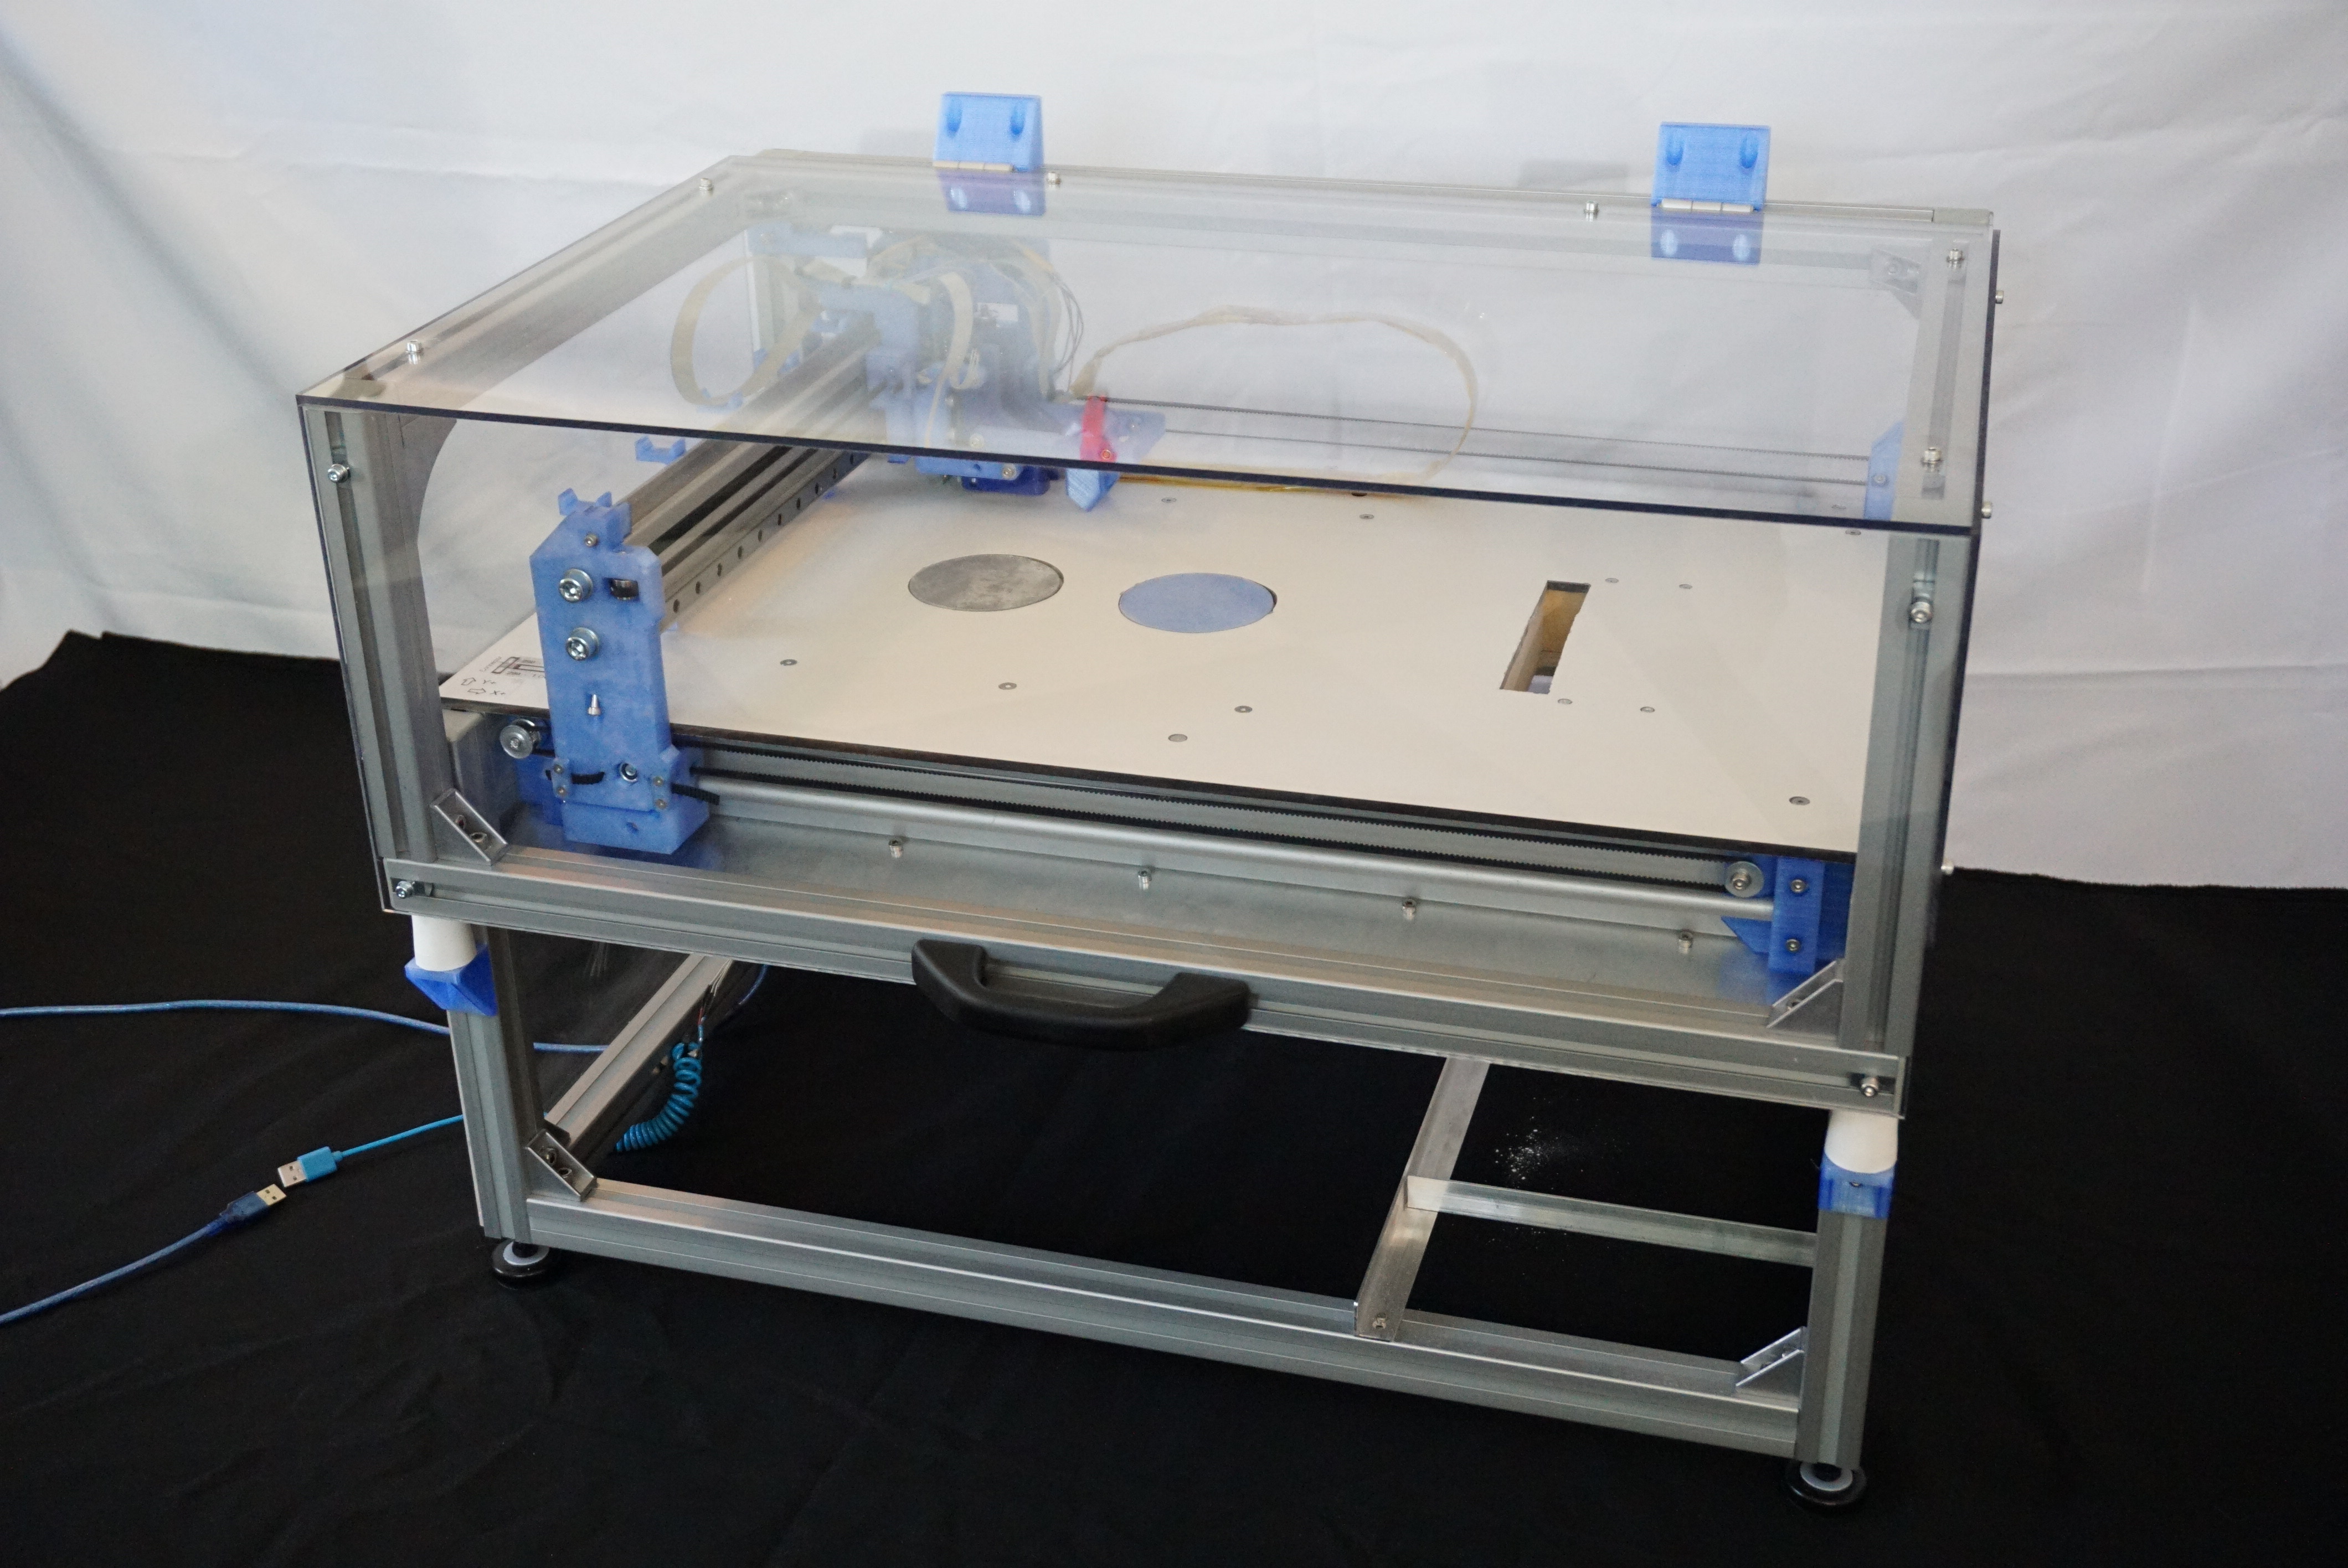


Oasis is an ongoing project to make 3DP available to makers everywhere.
Current specs:
- Build size: Ø84mm x 100mm;
- Printhead: HP45;
- Printhead DPI: 600;
- Printhead swatch size: 300 nozzles, 0.5″ (12.7mm);
Handy features:
- A cover to keep dust out and powder in. (This may seem mundane, but was seriously lacking in my previous printers).
- A large, flat, unobstructed build area that is easy to clean. (Again, seems mundane, is not mundane).
- An aluminium extrusion frame where parts can easily be bolted on.
- Plenty of room for future additions (It should be able to handle 5 printheads or a 200mm cubed print area).
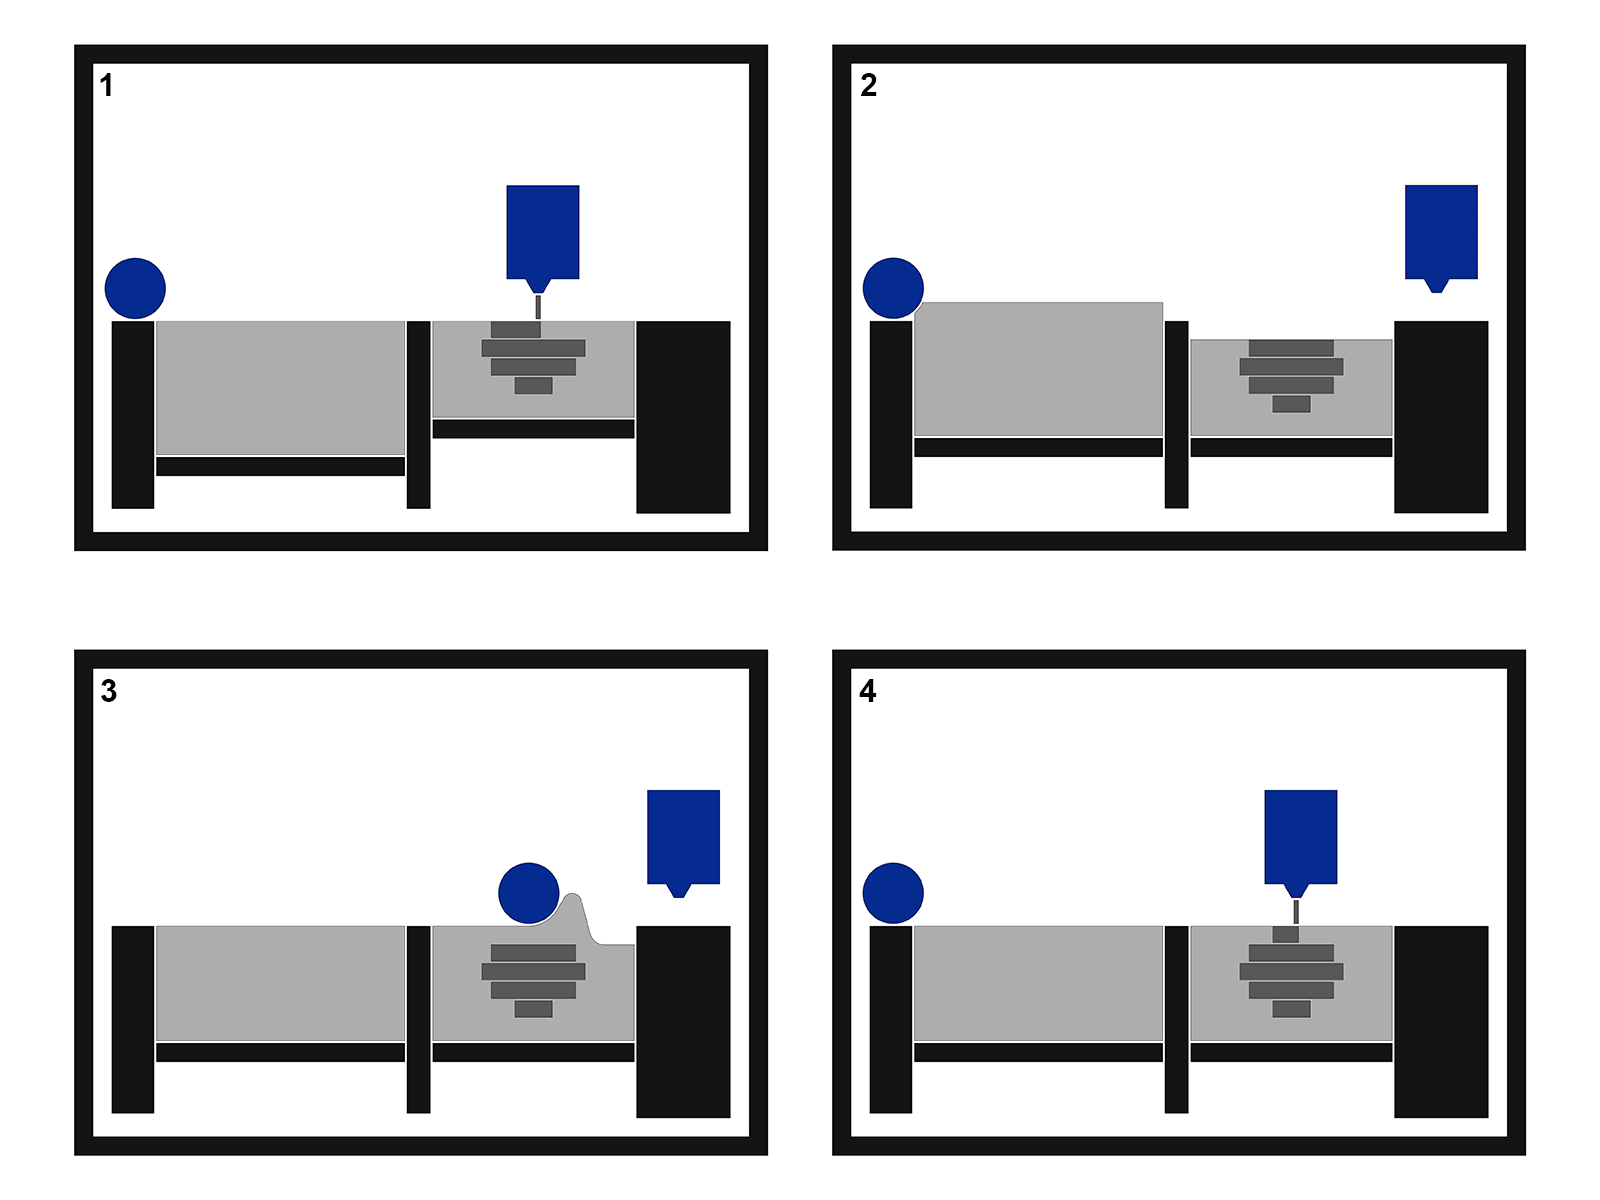
How 3DP works
‘3DP’ also going by the names ‘binder jetting’ or ‘powder and inkjet printing’, is a technique that uses inkjet and powder to fabricate parts. 3DP printers consist of a moving inkjet printhead, a build area, and a way to deposit new layers of powder in said build area. The example below uses 2 hoppers and a spreader. The left hopper supplies the powder and is called the ‘feed hopper’, the part is built in the right ‘build hopper’. A spreader can move between these hoppers to transfer powder from one to another. The order of operation for 3DP printing is as follows:
- The inkjet head deposits binder wherever the part needs to be. Where the binder fills the powder, the powder solidifies;
- The build piston lowers by the layer thickness, the feed piston raises enough to fill the build area completely;
- The spreader spreads the powder from the feed hopper to the build hopper;
- The spreader returns and the printer starts at step 1 again. This is repeated until the part is finished.
After this printing, the part is allowed some time to dry. It can then be removed from the printer and gently cleaned. After this the part can either receive further processing, or be used directly.
Why use 3DP
3DP is quite unlike FDM and SLA. It’s biggest advantages are:
- You do not need support material. The powder is added one layer at a time, and the powder from the previous layers supports the next layers. All the unprinted powder can be reused infinitely.
- A wide range of materials can be printed. While FDM is limited to plastics, and SLA requires light sensitive resins, 3DP can print most materials that come as powders.
- Color can be printed. Because 3DP uses standard inkjet technology, it is possible to add color, simply by printing dye alongside the binder.
3DP is not perfect though, There are some drawbacks that need to be considered:
- Powder printing is inherently messy. Very messy.
- All prints require post processing, ranging from simple cleaning to firing or infiltrating. Untreated parts are often fragile. This also limits maximum size of parts. The part needs to be able to survive post processing.
- All of the print area needs to be filled with powder. While the excess can be reused, a minimum amount of powder is required to print at all.
- 3DP prints only one material at a time.
- Hollow parts need escape holes to drain unprinted powder.
What 3DP can print
There are a variety of materials 3DP can print. The only thing these materials have in common is that they are powders. In most cases, a glue is added to the powder. Examples of this are PVA, sugar or maltodextrin. The binder is generally an inert liquid, like an alcohol/water mix. I have seen people printing directly with Vodka or Rice wine (Rice wine smells amazing). While I do not posses a full list of possibilities, a range of know materials is provided below.
- Gypsum (with PVA) and a water/glycol/potassium sulfate mix is used on Zcorp machines. The material safety datasheet gives insight into what the powder is. Gypsum allows for full color prints. The printed parts are cleaned and infiltrated with a wax or resin afterwards to give the parts strength. (Powder / Binder)
- Sand (for sand casting molds). ExOne specializes in this. By printing in types of sand with special binders (Furan, Phenolic and silicate binders are mentioned) you can create detailed sand casting molds that can receive metal without special post processing.
- Metal can be printed with a special binder. The part is printed in fine stainless steel with a glue in the binder. After printing the part can be infused with bronze in a kilt, turning it into a full density metal part. ExOne and several others do this technique. (A good example is this video)
- Ceramics can be printed by adding glue to the powder. Most of the available information uses maltodextrin and powdered sugar to make the ceramic powder printable (most recipes 4-1-1 ceramic, sugar, malto). A 10%-20% alcohol/water based binder is then used to bind the part. A site called open 3DP (university of Washington) has some great potential recipes, not only in ceramics. Check the site out if you have time.
- Powdered Sugar was revealed by a company called ‘The Sugar Lab’ around 2013, but was almost instantly bought by 3D systems. It now lives on as Chefjet. Exact details of how to print sugar are not known, but I suspect printing in pure sugar with water/alcohol should already somewhat work. I will investigate.
Making your own
Right now the Hackaday.io page linked here will give the best guide. Once I have worked more on Oasis, I might add a better guide here. For specific questions you can always try the contact me page.
License

The project described on this page is licensed under the Creative commons – Attribution – ShareAlike license.
Hi, I really appreciate you sharing this project, excellent work!
I’m currently working on a similar project with a few modifications. As a mechanical engineering student, my experience with electronics is somewhat limited. During my research, I’ve struggled to find detailed information about the electronics used in industrial/commercial inkjet printheads from manufacturers like Ricoh and Xaar.
Could you kindly guide me on how to establish communication with these commercial printheads? Or, if possible, point me toward any technical documentation, resources, or tutorials that could help me move forward with this project?
Thanks in advance for your support!
Sadly I know very little about that myself. On the forum there is work on a Xaar 128, which someone got printing. That is the best thing I can point to.
Hi Yvo, i’m a big fan of your work, thanks a lot for sharing!
I’m trying to improve a powder printer that currently works with a BigTreeTech Octopus V.1 as motherboard and a relay that works as a headprinter. That kind of boards are used for FDM, as matter of fact, this printer emulates the extruder using the relay to deliver the Binder like a tattoo machine. Also, this machine can be controled with a Raspberry Pi.
The resolution that can be achieved is very poor, due to the big size of the droplets that come out of the relay Nozzle. The printed parts should be loaded using GCode or via Repetier Host.
In order to improve the resolution of the machine, i’m working on my bachelor thesis and have the idea to include the inkjet headprint as you has done.
If i just take the printhead part (HP45 standalone) with your PCB, do you think is possible to make it work? The pieces you have obtained seems to have enough resolution for me. At least to make it work as you have done with the HP45 with one nozzle drawing a dragon on paper.
PS: I’ve seen that the code used on the board is on Marlin
Thanks a lot
What you want to do with the printhead is one of the simpler things to do with a printhead, though getting it to work with the current state of this project is a bit more challenging. Triggering a single nozzle over and over while a signal is high is one of the easier things, but the current controller version is no longer available due to the lack of the Teensy 3.5 and Teensy 3.2. People have been trying to get the V4 controller to work with the Teensy 4.1, but I have not seen anyone succeeding and sharing their results, and I currently don’t have the time for this.
When there is a new working version of the controller, some minor firmware changes would be needed, but that is easy once you have a working controller.
Hello, I would like to know what work is required to replace the main control with teensy4.1?
Hi,
I was looking for commercial binders but I don’t know where to start from. Do you know if Exone or ther OEM provides just binders even if we don’t have their machines? Or, are there any other binder suppliers?
I know a few powder suppliers do just provide powders and binders in bulk, though the prices are not always nice. In the last few years I have not looked into it much, so I am not the right person to ask to be honest.
Hello, I am following in your footsteps to make Oasis 3DP recently, but I can’t find Inkjet Commender according to the tutorial. Would you please tell me where to download this software
The files are on the hackaday.io page (https://hackaday.io/project/86954/files). I have recently added a new version of the software as well. This is called “Oasis controller”
Inkjet commander is currently not used for Oasis, it is used for bitmap image printing.
what did you use for piston ? , stepper or gear drive
The pistons use Nema 17 stepper motors
Hi. May I know which stepper driver did you use? I think you only mentioned that you used two TMC2100 in the GRBL for the X and Y axis. How about the other two Z axis? Or does it matter? Will DRV8825 or A4988 work? And also, did you use 1/16 or 1/8 step for the motors? I think you did not include the position of jumpers in your Oasis wiring diagram. And also, how did you calibrate your printer? e.g. How did you came out with the values
$100=80.000 (x, step/mm)
$101=80.000 (y, step/mm)
$102=2560.000 (z, step/mm)
$103=2560.000 (A, step/mm) for the GRBL setting?
Lastly, are your GRBL codes the same as the ones available online? Or did you tweak some parameters to make them suitable for Oasis?
Thank you!
Copy paste from the answer I gave on Hackaday.io:
For the Z-axes I used either DRV8825 or A4988 (i can’t remember). It does not really matter though. Anyone building this is expected to set their own steps per mm. The jumpers also do not really matter, as long as it matches. The values are calculated using the pulley pitch and teeth (or leadscrew pitch), microsteps and motor type. It is wise afterwards to verify that the steps/mm actually are correct by moving an axis and then measuring the amount of movement.
In the make files under Electronics there is an image showing how to wire this up on a CNC shield. This does not include the electromagnet, but it is wired parallel with the motor (polarity does not matter).
The GRBL firmware used is a 4 motor variety. It is included in the make files.
Can you print UV hardening resin and add UV light to harden each pass?
I do not think it is possible with the HP45, but in principle it is possible. I think you need a piezo inkjet head to print in something as reactive as UV setting resin.
I do not sell this. I have shared the all the files, but be aware that this is a prototype project and I have seen people having issues building this.
Hello,
Is this available for purchase and if so at what cost?
Thanks,
Ralph