Making the Pip-Boy 3000 Mark IV
To make a pip-boy, you’ll first need to decide what version you want, and what size you will need. The version is either phone or accurate. Do you want to have a pip-boy that can hold your smartphone, pick the phone version. Do you want to do something a bit more challenging and make a wrist wearable computer with working buttons, pick the accurate version. With the accurate version you’ll probably need to make modifications to the design, but it does offer more accuracy and more possibilities.
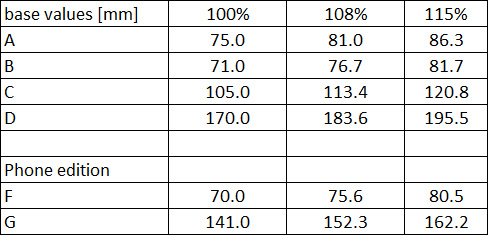
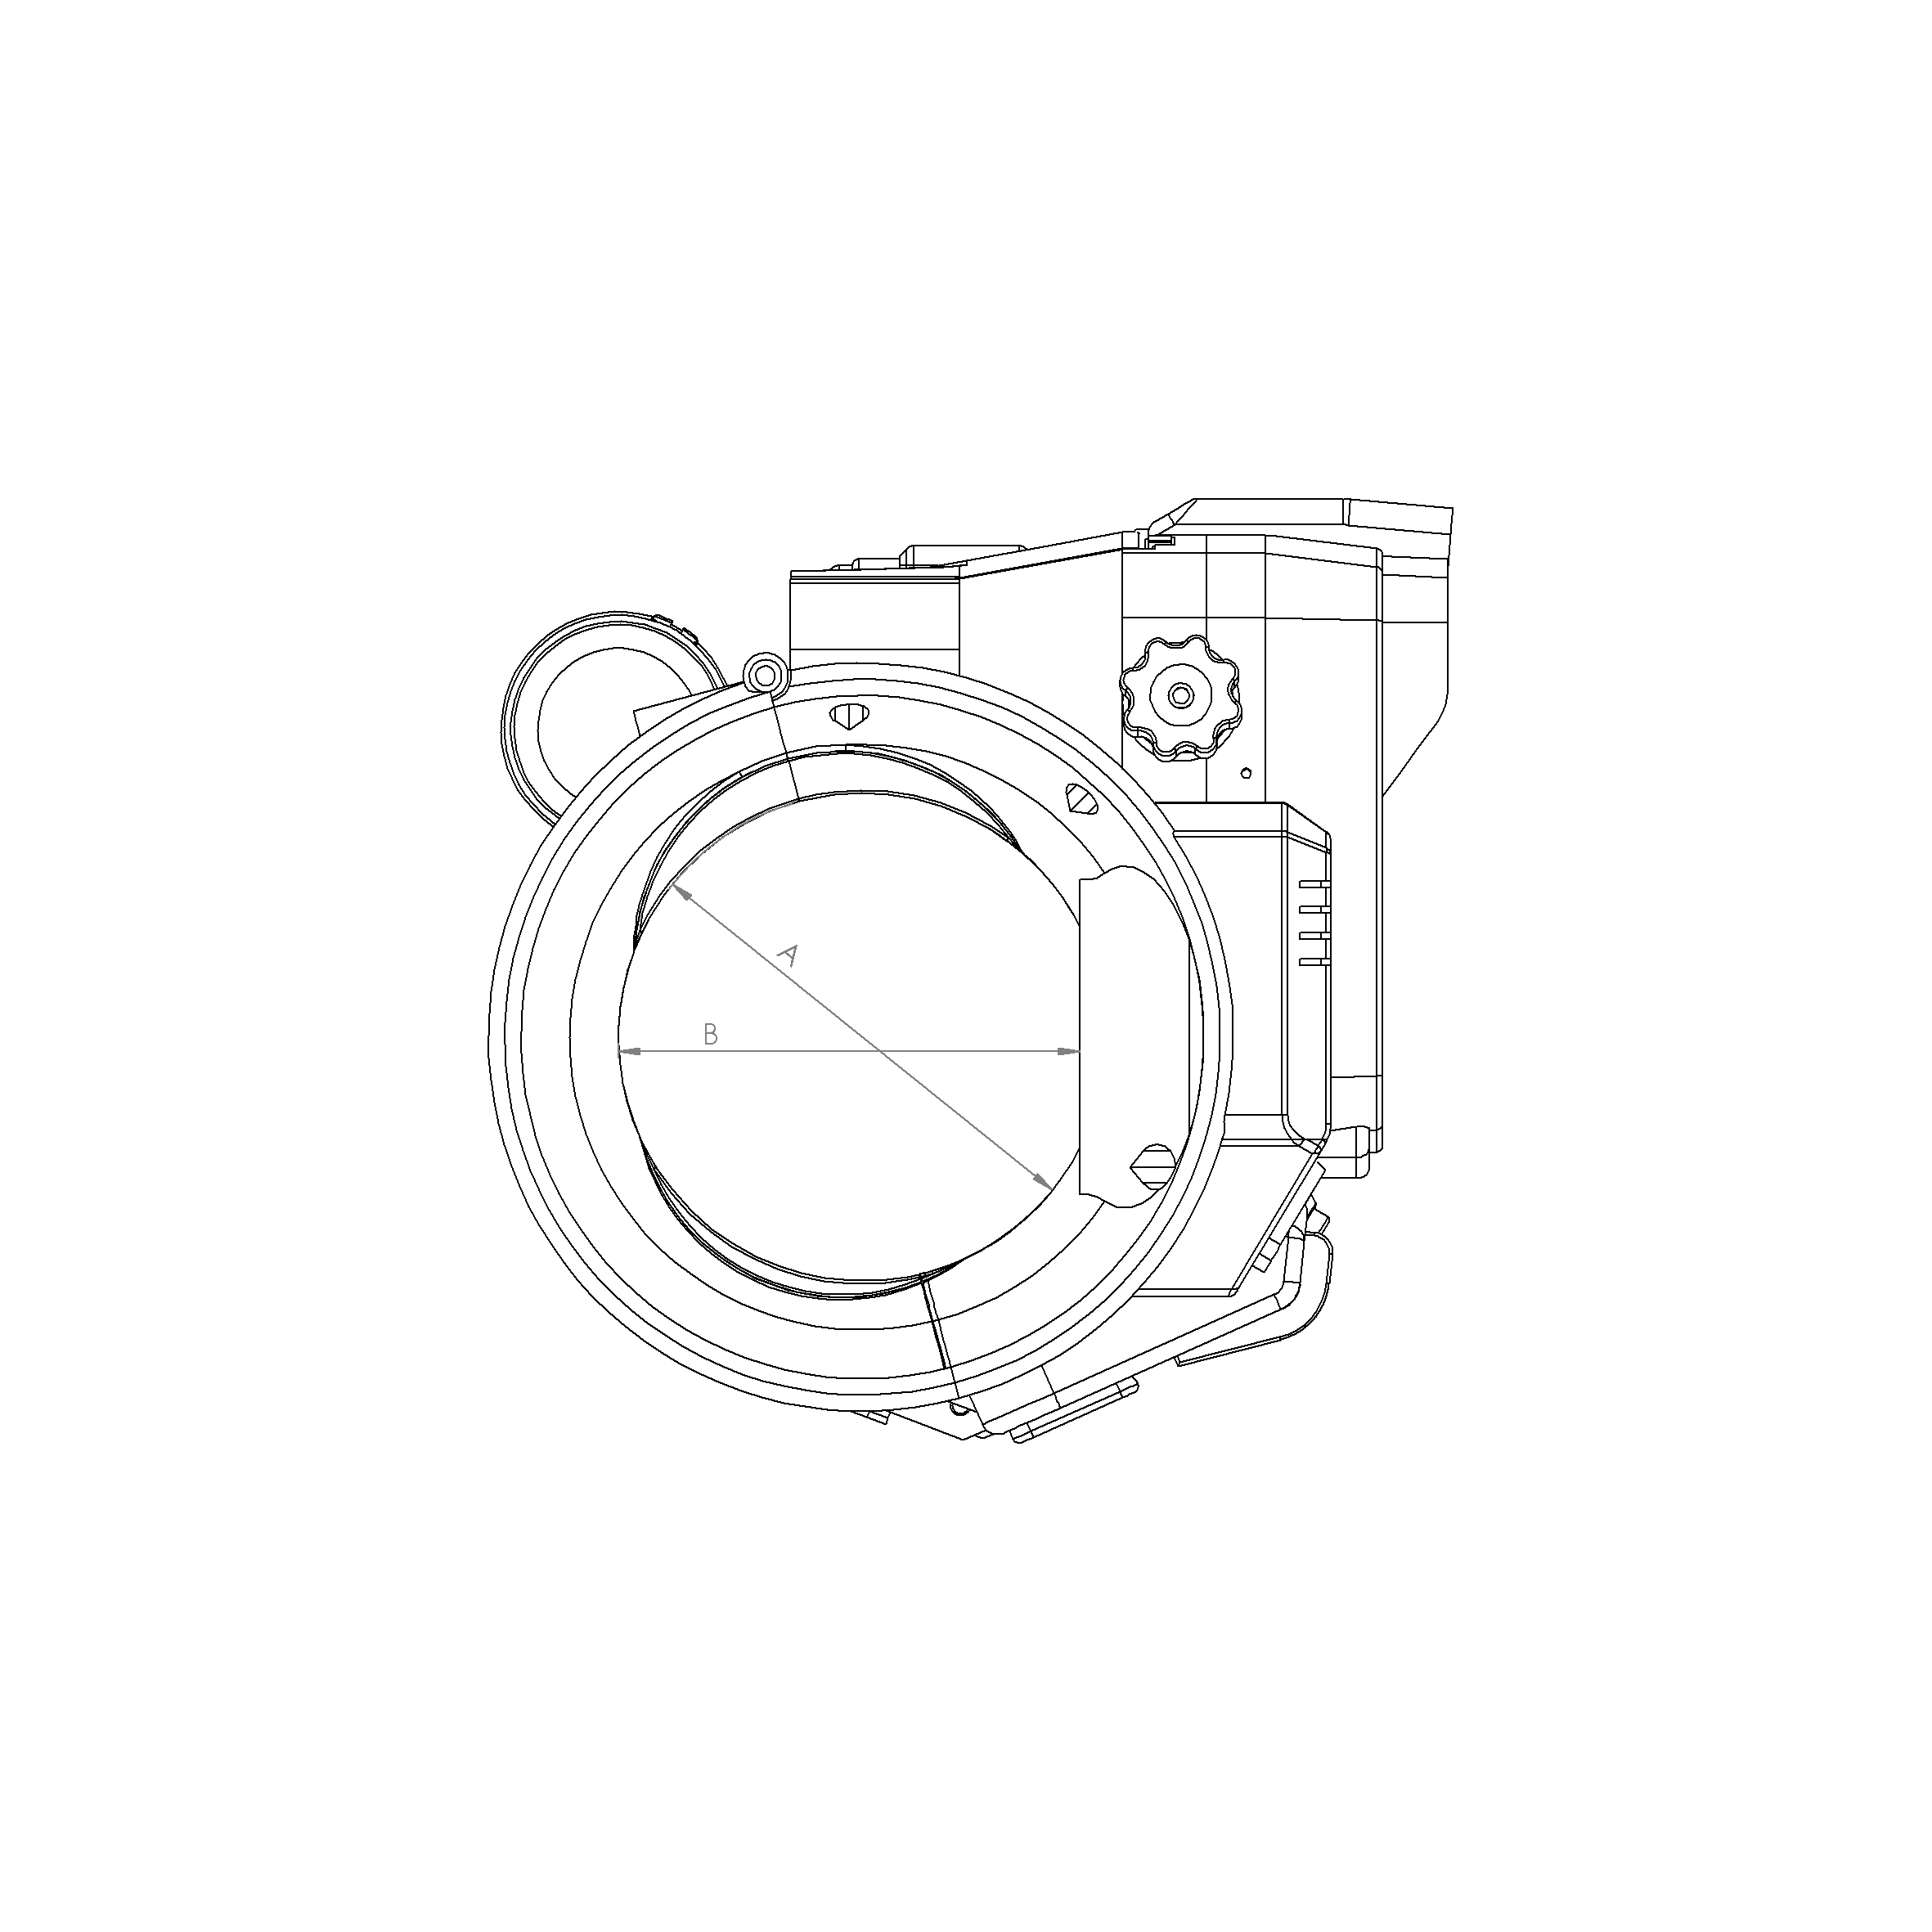
The size is either determined by your wrist size or your phone size. The table below shows the sizes in millimeters. A is the rough diameter of the middle of your wrist. If your wrist is smaller than A at the middle, the Pip-Boy should fit. F and G are the height and width of your phone (sideways). If your phone is smaller than these values, your phone will fit. Don’t worry too much about thickness, that should not be an issue.

Download files
Phone version


Accurate version (Postponed until further notice)


If you downloaded the files from this site and liked it, please consider going to the Donations page. This will help the development of more free designs and plans.
Community designs:
A better version of the Holotape (108% only) – By Chris Ensell: Download Files
Reel for the back of the Pip-Boy (All sizes) – By Oddoutput: Download Files
For the phone version you will need a few items (some of the screws do not have quantities, but there are less then 10 of each):
- ABS filament (500g);
- clear plastic (PLA) filament (10g);
- M3 nut (12x);
- M3 screw 6mm (4x);
- M3 screw 8mm (5x);
- M3 screw 12mm (1x);
- M3 screw 16mm (12x);
- M3 grub screw 5mm (6x);
- M3 grub screw 10mm (2x);
- M3 grub screw 16mm (1x);
- M4 nut (3x)
- M4 screw 12mm (1x)
- M4 hexagonal bolt 30mm (1x)
- M4 threaded rod (45mm);
- 1mm steel wire (to make the spring, 10cm)
- tiny decorative screws (6x)
- 4mm black pneumatic hose (10cm);
- Rubber band or wire;
- Glue;
- Sandpaper;
- Acetone;
- Primer;
- Paint (brownish green, black, silver, white, yellow);
- Paper;
- Orange led (2x);
- 2025 battery (+ holder);
- Wire;
- Switch;
Tools:
- 3D printer;
- Sandpaper;
- Files;
- Paper color printer;
- Soldering Iron;
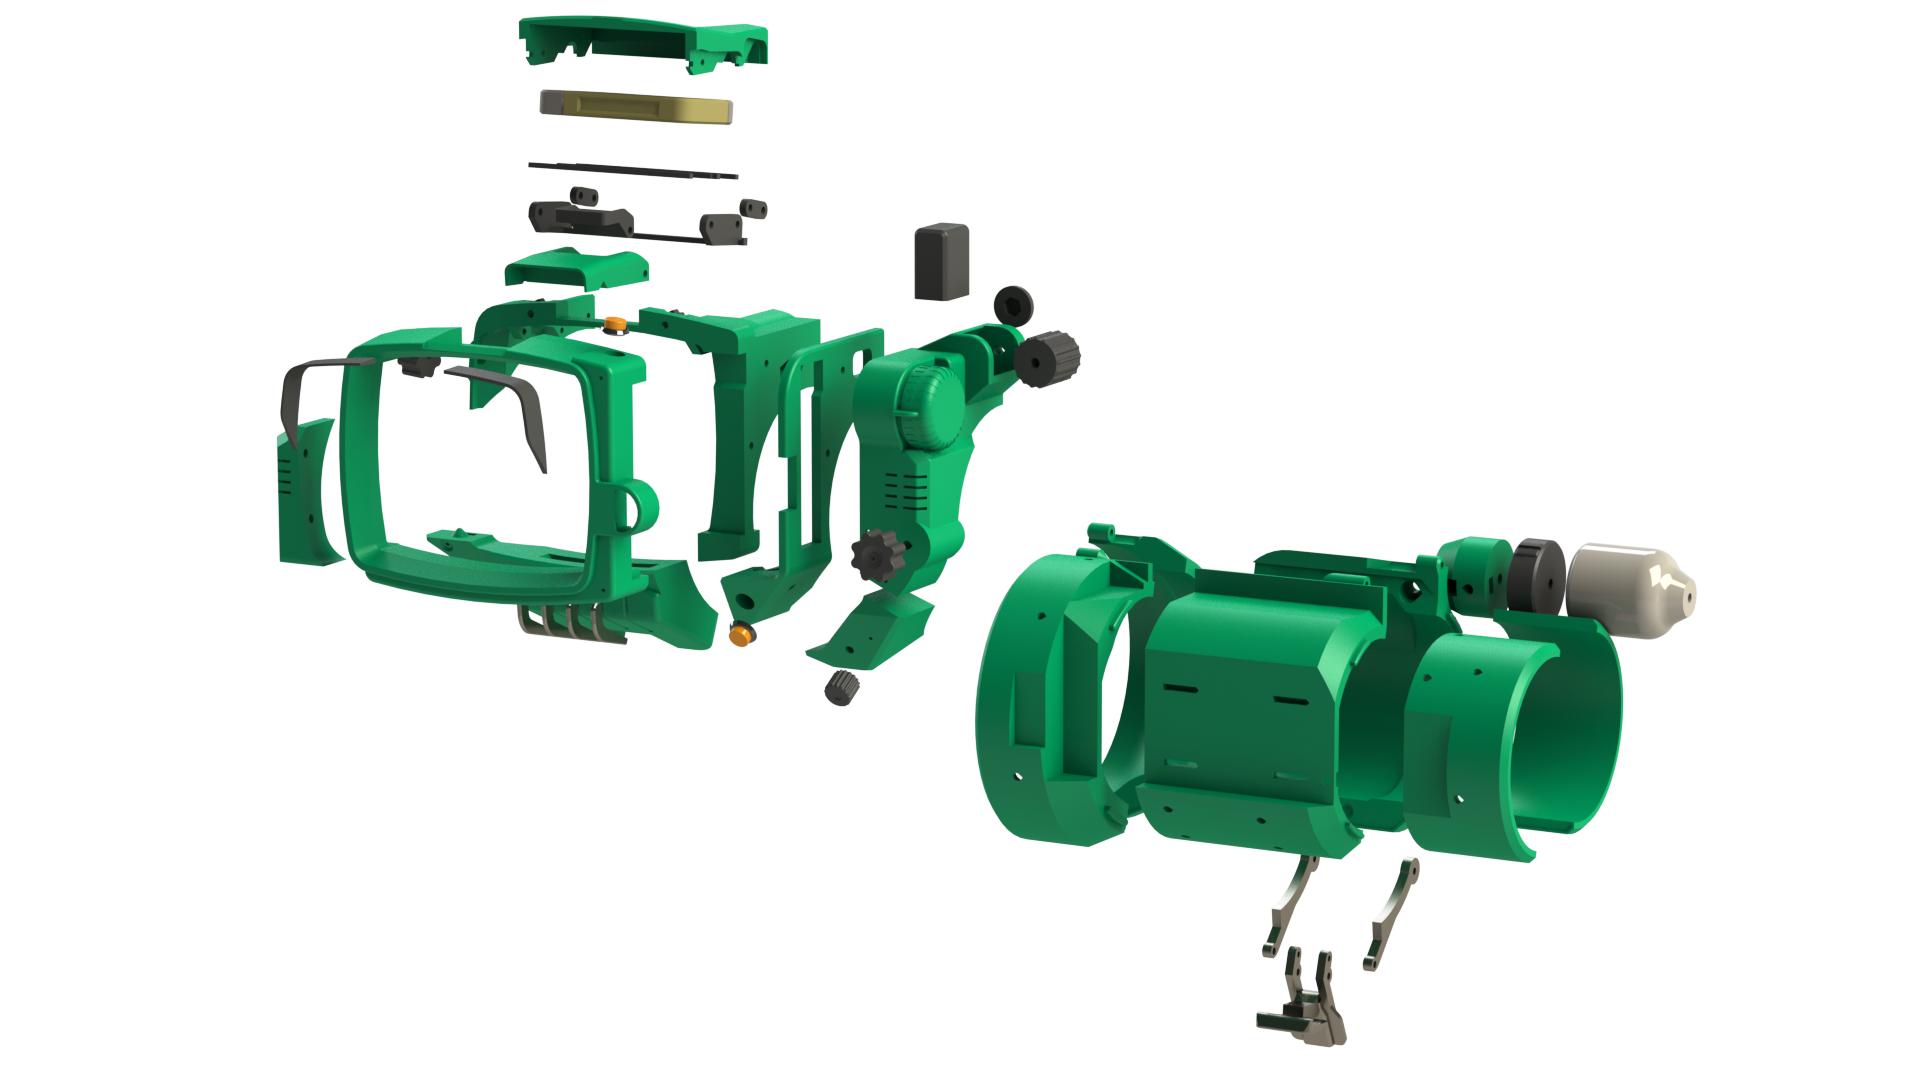
3D printing really depends on the printer being used, but my version was printed on an UP! Plus 1, in ABS, at 0.25mm layer thickness, normal speed and 30% infill . I tried to make the design as easy to print as possible. Parts are optimized for supportless printing and where support is still necessary, the support is at 90 degrees. Usually I do not use ABS to print anything, but the Pip-Boy is an exception. The parts are relatively small, and ABS gives a smoother and easier to work with surface. Minimum printer size required is 140mmx140mmx100mm for the 100% version. Some parts will no longer be printable on an UP! plus if they are scaled up. The 2 small light covers are printed in a clear plastic, in my case clear PLA. The quantity of parts you will need is mentioned in the name of each 3D printable part. The parts that require more than one have a suffix (nx), that tells how often it needs to be printed.


Some of the parts need to be glued together. Be aware that some screws and nuts need to be placed within the glued part. Look at the photos to see where these pieces need to be. To glue the pieces together, you can use a variety of glues, but as long as the glue is capable of gluing plastic, it should be fine.


Painting on raw 3D printed parts will show all flaws in the print. Some people like this, other do not. I generally get rid of about 80% of the lines, because the remaining 20% is incredibly hard to remove. Because I printed this in ABS, I can use Acetone to smooth the parts. First I gave all parts a quick sanding to get the worst lines out, then I used acetone (in a well ventilated room) to get rid of the printing lines and any imperfections.
First a light layer primer was applied to all parts. The base coat for this design is a brownish green. All parts that had at least some of the base color on them were painted with a spray can. The smaller parts are either a dark metallic color or black. These colors were applied with a paintbrush. The tapes are faded yellow and white. Officially I would need to paint them cream and orange, but because I did not have those colors, I went with white and yellow. The tube on the back of the Pip-Boy already had the right color from printing, so no paint was applied to that.
For the decals I wanted to try waterslide decals. I knew they were for light colored surfaces, but I reckoned they could also cover darker colors. I was wrong. The yellow text was completely overshadowed by the dark green. The silver was still sufficiently covered by the waterslide decal, so the latch does have the yellow grid on it. There is for now no text next to some of the buttons. The gauges were simply printed on a piece of paper, cut out and put behind the recesses of the geiger counter gauge and the tune gauge. I had intend to also light these gauges, but I simply could not find the room to fit the lights.


There are no complicated electronics in this design. There are simply 2 orange leds, one under each light cover. A concealed switch was mounted in a small hole I drilled on the left side (the thick part of the tube) this switch is connected to a small CR2025 battery and to the both leds. The led on the removable side of the Pip-Boy has a connector so it can be disconnected.
I am not going to write an app, but I do still want some of the Pip-Boy’s images to show on the screen of the Pip-Boy. For this I used screencaps from the E3 unveiling, modified to be on the left side of a smartphone screen. I even added my internet name in the Status tab (only for me, you all have to be called Howard). The screencaps are added to the phone version of all downloads. They are 1920×1080 and can be shown as photo’s on any smartphone.


For assembly, simply follow the pictures. There is not much more to be said.


License

The project described on this page is licensed under the Creative commons – Attribution – ShareAlike license.
I scaled up the settings from 100% to 117% after calculating that to be a good size to fit the Galaxy Note 20 Ultra. I then printed the phone 1, 2, and 3 parts to test fit and it’s still too small. Any advice?
The phone parts for the base of the model I found to be small too, I later found out that isn’t where the phone actually goes, it sits on top of that and the electronics sit in that pocket that looks big enough for a phone
hello,
i want to make a pip boy with electronics in it. but for that I need a good model. I work with Fusion 360.
Does anyone know if there is a model of the Pip Boy 3000 Mark IV that I can use in Fusion?
There are STEP files available, which can at least be modified in Fusion. The original model is in Solidworks, but that one I cannot really share anymore.
STEP files are here: https://ytec3d.com/downloads/
Are the CAD files available somewhere? Would love to try and remix so it will fit Iphone 12 Pro Max
See the reply above, downloads page has STEP files: https://ytec3d.com/downloads/
Dove posso tovare i file da spatmpare su carta?
Sooo, is there anything we can do to persuade you to create the “acurate” files? 🙂 As alot of us would love to see that one avail….. [begging – please]
I’ma make the accurate one and you can hold me to that. I’ll post stls and instructions on my myminifactory account hea80214. It might take me a while, but I PROMISE that I will make it.
Oh and I will also make an even more accurate version that will be hard-programmed just for playing Fallout 4 (I mean, you would still have to buy the game, but once you do it will automatically only play that game) And the first version will still have conversions for controls for fallout and will be fallout themed (you would have to use the scripts I make to convert it)
Hey,
Just curious are you working on it already? I’m interested in building an accurate one!
I’m still trying to figure out how everything will fit without being too big yet cost-effective. I would love some help though! Or you can do it. I have a lot going on so it would take me a long time.
hi i have a moto g1, what version i need to download
(dimentions 129.9 x 65.9 x 11.6 mm )
Dear dragonator I was in able to find the decal for the gauges could you assist me in finding these decals for my 3D printed pip boy also your files are amazing thanks for releasing these files to the public
Greetings
Sjaakie
The PDF in the downloads is for the gauges.
im 3D printing this in 115 size but i wont fit my iphone 7+ help?
Hello, I was wondering if the accurate version of the pipboy will come out (If at all) since this project seemed like the best one I was wondering if I should find another.
Accurate version has and will never be made. The phone version is the best version that will be available from me. Best of luck in your search.
Was wondering where you got your hardware. If it was a website I would love to know!
Could this version fit a raspberry pi zero with a small lcd?
I do not see why not. The biggest challenge is getting an LCD of the right size. If a phone fits, a pi and a screen should too.
Another question, what are “tiny decorative screws”? Have you perhaps got a link?
Those were screws I had in stock from disassembling old appliances. I do not have a link for those.
USING 115% WHICH COMES TO 3.1 X 6.37 INCHES ON F AND G AND MY PHONE DOESNT COME CLOSE TO FITTING AND THOSE MESSUREMENTS SHOULD HAVE NO ISSUE FITTING MY PHONE.
NEVERMIND, IM DUMB 🙂
ANY CHANCE THAT A YOUTUBE VIDEO EXIST OF THE BUILD PROCESS?
I used this vid when building mine https://www.youtube.com/watch?v=CLPeIldYTNs&t=235s
Howdy! I printed the front portion of the Pipboy at 108% for my Pixel 3 according the dimensions and it’s not fitting into the MK4 front pieces (1-3 printed). Was I supposed to scale the sizes in the files at all? Or is the groove in these 3 pieces supposed to be smaller than the phone?
Hello, The files are pre-scaled, you should not be doing any scaling. The outer dimensions of your phone should be less than 152.3mm x 75.6mm. If this is correct it should fit.
The width of the front part should match. The height is not visible in the front pieces. The depth (how thick you phone is) is not given, but this should fit any normal thickness phone.
If this was not clear, can you tell me exactly what you are worried about? If you want to send pictures you can message me through the contact form and I will reply with my mail address.
Hi, did anybody find models for a stand for the Pip-Boy?
thanks
I used this free print with great success https://www.thingiverse.com/thing:3532004 I did have to shave down one of the arms a bit to level it out but other than that no tweaking was necessary. I printed the 108% pipboy for reference
hey so am I supposed to glue on the screen part?
I am a bit rusty since I made this years ago, but if it needs to be fixed to the part, and there are no mounting holes, it is reasonable that it needs to be glued in place.
This is the most amazing thing I’ve ever seen in my entire life. You are a god. Thank you for all of your service.
Hey, so where exactly do I mount/place my phone? I have this all printed and assembled, but I have zero clues on where I actually put my phone.
The part called phone button closed should be accessible behind the tape deck. These are the screws for the front. If you take these you (which should be possible by hand) the front comes off. Here you will see the pocket where your phone should fit.
wwhere can i find the file to print the paper gauges?
found them
where did you find them?
Awesome job!
I’d like to start creating an Accurate version but downloading isn’t available :((
Accurate version was never made 🙁
will it be made?
Sadly, no.
Incredibly well made. I can’t believe how much time you spent, not only on the model, but on the tutorial as well. Insta donnation 🙂
Does anyone know which version can fit a raspberry pi 3
Hello! Thanks for designing the amazing model!
I was wondering what I am supposed to use to connect the front screen (Mk4 phone screen body 1) to the support piece (Mk4 phone screen body 2)?
I cant seem to work it out from the photos, it looks like some kind of bolt but I can’t be sure
Thanks again! 🙂
Fantastic model – Printed great, easy to assemble, and so very accurate;) As an added bonus I’m now living my “boyhood” dream of owning and wearing my very own PipBoy3000, Thank you!!!!
Incredible model, I cant wait until I’m finished printing, thank you so much for just making this available for the community. I have all the arm pieces done. I’m printing out the 115% as we speak, because it will fit my Iphone 7+. Due to the size increase of 15%, my writs and forearms are way to small to fit properly inside the model, I can slip it up to my bicep and its still too loose lol. Dose anyone have any tips or videos about how to pad/upholster the wrist and forearm rests in an aesthetic way? I am a maker noob to the max, but even if it involves sewing, gluing, witchcraft, I don’t care, I just want to produce the best piece I can make. I would be willing to learn any tips or methods to get this beautiful print looking as perfect as possible.
Hey, I have the same problem, though I had the 100%. What you should try to use is some towels then trim them.
-make a sleeve of your forearm a bit logner that the pipboy’s length
-cut the sleeve on its length (the same way the pipboy opens up)
-attach the wrist end of the sleeve to the pipboy
-stuff pieces of cloth in between the sleeve and the pipboy to fill in the gaps
-test the fitting with your forearm and pipboy, adjust to desired confort
-attach the “elbow” end of the sleeve to the pipboy
Cut strips of squishy foam and wrap in black cloth, like a gift using hot-glue to keep it all together. Then Hot glue the strips to the pipboy. Looks quite authentic if done with some patience and a little OCD;)
Hi,
Really nice work there man! Unfortunatelly, my Xperia Xa1 Ultra (165*79) seems a tiny bit too big for the 115% phone size (162.2×80.5). Do you think I can make room for the ~3mm space missing by any means possible?
thanks
scale it up
I can’t scale it, I don’t have a 3d printer.
I was asking if I could make more space for my phone sculpting away some material.
I have no idea how to work out what phone one I need…. g…f what??
if your phone is smaller than 70*141 mm, get the 100% version. if its over 70*141 mm but smaller than 75,6*152,3 mm get 108%. if its bigger than 75,6*152,3 mm but smaller than 80,5 * 162,2 mm get the 115% one. if its bigger than 80,5 * 162,2 mm it wont fit in any of them.
Thank you.
Is there a way to buy a mounted version? I am so bad with this stuff, mounting and painting and all that, plus I have no way to print it. Shops with 3D printers seems are very rich ’cause them ignore potential customers. Thanks
(It will be the 115% version I think as I have a Galaxy Note 3)
u can find pip boys on etsy.com
I’m a bit confused on the wrist measurements – if I measure right near my hand, my wrist diameter is only about 45. If I go further up my arm (the middle of my forearm) it’s still only about 60. I’m a 4’11” female – should I just expect this to be huge and need a lot of padding? Thank you!
I’m building one myself, and I’m about 5’2″ with skinny arms. You’re absolutely going to need some padding on the inside.
I’ve been working on mine for a while now, and it’s a fun challenge! Thanks so much for putting these files online and making them available for free.
I’ve got one question: What black magic did you use to get the latch screwed on to the base? I can’t find a right angle screwdriver that’s small enough to fit in that space. And I imagine the second screw would be even harder!
Most allen key wrenches have a round head on one side. While not much, it should be enough to get the screw in. If all else fails, you can grip the screw with pliers. You don’t need much force to turn screws in plastic.
Oh, those are SOCKET screws. That makes so much more sense than what I was thinking. Thank you for the speedy reply!
Thank you Yvo for existing. knowing I can 3d print my own pip boy is amazing! Sir, without you in this world, it would be a little less awesome. A lot less.
THIS IS SO COOL I’M SO HAPPY YOU DID THIS!
Heya, first of all thank you for your amazing work.
I’m looking to get one of these printed soon as I wish to fit it with a raspberry pi. However I was wondering if there is any progress with the accurate version? Or should I just go for the phone version and bend it to my will?
Thanks
Hello! As it turns out, I managed to make a guide AND version for a pipboy to work with a raspberry pi!
It can be found here:
https://ytec3d.com/forum/viewtopic.php?f=12&p=1429#p1429
Best of luck!
So what happens if you need the 108% for the wrist but the 100% for your phone? That’s the part of the table that confuses me.
Add stuffing around your wrist. The size is made to resemble the shape of the Pip-Boy as close as possible. Making a certain screen size fit a different wrist size would make the Pip-Boy look very weird.
what program did you use to design this?
Hi, my pieces to house the phone came out to be 112 mm. at the 100% for the phone when it should be 141 mm. Can you tell me the problem?
The 141mm is for the entire phone. Not the whole screen is visible in the Pip-Boy. Either something has scaled between downloading and printing or you are measuring something else.
Dude, thank you for putting this online. I’ve been wanting to make a pipboy for a while now, and thanks to you I can! With a few minor edits, I think I can mount a raspberry pi in here mounted on top of a touch screen. Here’s hoping I can reprogram raspbian it to be a “pipboy OS”.
Share it if you are successful. I am curious to see what you will do with the pip-boy. If you need source files they are available in the downloads page, under info.
Is it possible to use it as a smartwatch-type device? I don’t want to have to risk buying a defective bluetooth edition.
That’s what I’m planning to do with my raspberry pi. However, the 5 inch touch screen I bought isn’t working properly (Driver is barely usable) so as it stands now, it can only be a clock. I’m still waiting on parts to print (I don’t want to pay half of my life savings to print this thing), but this is what I’m planning to use
– Raspberry pi 3
– 5 inch touch screen (Must mount on GPIO pins)
– Power Bank (For phones)
The software I developed should work an any device, and can be found here: https://github.com/Theblastback/PipOS
Sup I got some grafic and music files for accurate version if u want I can send u just ask me
Thanks, this is great! You put a lot of effort in it *____* !
What would an iphone 3 size be?
Hello for xperia z3 what need?
From what I can see 108%
Anyone having trouble printing the “Phone body buttons” piece? Every time I print it the printer jams and stops extruding for the rest of the print. Every other part has come out perfect..
*Update* Got it to print by increasing the support angles.
Hey! I am probably getting an Anet A8 3D Printer for christmas, and wanted to know if 210 x 210 x240 mm print area is enough for 108%. Also, is 108% enough for a galaxy S6?
I have the same one and it works
The printer should be big enough. The 100% is just slightly too small, so the 108% it is.
Anyone know an affordable printer hub close to akron?
im confused on this comment but i nkow where to buy really cheap 3d printers if thats what your asking – go on gearbest.com and look up prusa i3 there should be one for $150 if that helps
iPhone 6 would be the 100% correct? By the way, where did you get the electronics for the LEDs and also what spray paint did you use for the base color. Thanks!
What size for a raspberry Pi with a TFT display?
I am going to need a bit more information if you want me to help you.
did you ever finish making the raspberry pi version in all 3 sizes?
Sadly, no.
Is there a way you could convert the .stl-files into CMB-files. I’m afraid to make mistakes when converting it on my own. I would need it for the 100% phone-edition. Btw love the passion you put into this.
Greetings Tarek
I cannot convert into that format. Any mistakes you could make would be really obvious when you start printing.
What size do i print it to fit a galaxy s 4?
Hi There,
I have printed the 115% size, yet there seems to be big gaps and such in it. like 10mm spacing in between pieces. The screw holes are aligned and i just cant see why the spaces are there.
Is anyone else having this issue?
Thanks
I don’t know if you will have an answer for this but do you think it would be possible to hollow out this model and put in drain holes so this model could be printed on a printer that uses stereolithography (I own a form 2) I’m not asking you to do this I just wanted to know if you think the model would still print correctly if I did this. I know that as is the model would print solid on my form 2 and use up an extreme amount of material (liquid resin) and also be super heavy.
I can understand why hollowing it out would have benefits for SLA printers, but hollowing out a finished model will take quite some time. If you are good in solidworks, it is doable with the source files, but I myself do not have the time for it.
“Postponed until further notice” means what? Was hoping to get one started for my son pretty soon here.
The accurate version was planned to be as accurate as possible, but I have neither the time nor the motivation for it. Most people will not see the difference between a phone version and an ‘accurate’ version.
What size for a Samsung Galaxy s6
Does anyone know
You own the phone and can measure it. I have to look it up and compare it to the table above.
108%
I wish you had a picture of all the nuts and bolts you used because I’m having a hard time figuring out if they are they right ones
I will try to do that on my future projects
Which screws do I use for PB3k phone screen body body 2, PB3k MK4 phone body buttons 1, PB3k Mk4 phone button right, PB3k Mk4 phone body button 2. All you say is m3 screw but which length?
M4 threaded rod (45mm); cannot be found anywhere online they have m6-m10 in 45 mm and m4 in 40mm or less. can I use a 40mm long threaded rod or do I have to figure out a way to use 2 22mm threaded rods? or should I drill the holes big enough to place an M6 40mm threaded rod?
or is it a 4.5mm rod like the pictures say kind of hard to get the right size when I don’t know which one is right hahahahaha
M4 threaded rod is usually bought in lengths of a meter and cut to size. What you are looking at is probably normal bolts.
cool thanks I might actually find it now lol
had this printed in abs and so far I have found at least 5 spots that instead of m3 it takes m2 grub screws I have busted the latch wide open trying to put a M3 grub screw in like the instructions say.
so my suggestion is everywhere it says m3 think m2 and everywhere (with one exception) it says m4 think m3 and order them online there is not a home depot or radio shack within miles that carries these things in the size I need rofl
I can say with absolute certainty that where I say M3 I meant M3 and where I say M4 i meant M4. In a lot of places the screws are meant to tap into the plastic. In the few rare places where the holes are through, either the right size will fit or it can be reamed with little effort.
The lack of metric in the US is not something I can help with.
Is it possible to get model of it assembled? I mean whole thing not particular parts.
hi could you please tell me what I can view this on, thank you
what is the accurate version?
This may seem like a dumb question, but how do I get my phone in? Is the screen body not glued to the main assembly? And if so, wouldn’t it fall off and make your phone fall out?
The phone is sort of sandwiched between the screen and body. There are two screws that hold the screen in
Hey man, thanks for the killer build. A friend printed it and I built and wore it to a Con, for a ton of great responses.
Did add a feature you may like…
https://youtu.be/vYmWurCxei0
I’ve added a few new slots and holes, but nothing that the original couldn’t have. With 4 6V yellow LEDs, 2 CR2032 holders, and a flashlight switch, the results are transformati e!
Does anyone know if the hardware easily/accurately converts to US standards?
Or if not, a good place to find all the hardware?
Home depot I fount 90% of the hardware, grub screws and the electrical stuff your gonna have to find elsewhere as I am currently adapting my model and working around other means but some of that hardware like the 45mm rod, you will have to fabricate some of these pieces your self. Buy a long hex bolt and cut the head, that simple.
Can you please include where you found the orange LEDs and that particular switch?
I just got some red LEDs (close enough for me) at Radio Shack for about a dollar each. I also got the switch there for like 2 or 3. I don’t know if it’s the same exact one, but it is just a simple micro toggle switch.
what kind of glue should i use? super glue or the ABS cement glue that i have?
never mind just realized that the whole point of the acetone was to remove the super glue if you make a mistake.
I’m just looking at some of these parts in my 3d print software and some of them don’t look like they’d be able to successfully build. Some pieces have sharp 90 degree bends with no material underneath them. For example the “PB3K Mk4 Phone back 2”. I’m just wondering if there’s a way to make these able to print or otherwise get around this issue. Thank you.
They print easily enough, provided you print them vertically and enable support material. I also recommend a raft just to stop an 8+ hour print lifting. I can vouch for their “printability” – I’m partway through a build, but have gotten all parts to print successfully.
Which software are you using?
Thank you very much! I am very new to 3D printing (<2 weeks) so I am still trying to figure a lot of things out.
My software is what came with my printer; "XYZware".
So I haven't experimented with supports yet. Does it just add material underneath? Then you cut it off later?
And I honestly don't even know what a raft is. I guess I have some more reading up to do.
Any help anyone can give is much appreciated! Thank you.
Okay, I got my terminology mixed up a little. I use Slic3r, which has the option to add extra features to a print. Two that I have as standard for most prints are brims and support.
A brim is an extra 3-5mm (1/8 – 1/4 inch) worth of plastic added as a border to the first layer of prints. It sticks out flat, like the brim of a hat. Its job is to help the print stick to the bed, and lessens the chances that the print will lift at a corner, or detach entirely.
I found a manual for xyzware – it looks as though it uses rafts in place of a brim (section 6.5)
http://holland3dprint.com/.cm4all/iproc.php/XYZware%20Manual_EN.pdf?cdp=a
I’m happy to help out – I’ll keep stopping back every couple days.
Where can I find the paper gauges or are they just some you found and adapted? Building this for my son and am about 95% assembled…printed totally in PLA on a Robo 3D R1+…came out very nice…will get some pics as soon as I finalize the build 🙂 oh is that reel available to add by Oddoutput available anywhere yet? You are an awesome maker by the way!
I’m actually quite flattered that someone’s asking for it.
I’m currently assembling my own and I’ll try modifying the part to the other sizes when I’ve got the time. Unless you’re building the 108%, then I can already upload it somewhere.
Also, the reel is build in on the the back part, but I think I had made a lose part too to glue it on if you need that.
https://www.mediafire.com/?4z0x9bm388th5n8
Actually, I made some time to get them all right so here are the three sizes with the reel fixed on it and with a glue on reel for people who have already printed the whole thing and still want to add it!
THANKS! I’m getting my friend in Texas to print up the 115% glue on piece for me. Its gonna look much better With the reel!
cool…thanx so much…already printed the one without the reel and it’s all together (except for the pesky tape deck hinge thingy lol)…
Thanks for doing this, but does anyone know the aproxx. size the glue on should be? I am doing the 100 percent one via a 3dhub and they said even after scaling it by 10 percent it only comes out to a size of 7.22 by 8.77 mm.
I’m having a hard time finding a M4 45mm threaded rod, grub screw, set screw, or 100 other things it seems to be named online. Has anyone found a good source in the U.S.? Thanks in advance!
Can’t help you with the threaded rod, but these guys are very reasonable on screws, you could always covert to the closest US standard size, or cut the head off a screw. Cut a slot and you have a grub screw.
http://www.trimcraftaviationrc.com/
i went to a store called fastenal here in canada they had every screw and nut needed including the rod, bad thing is you need to own a company to buy stuff there.
Will the accurate version be able to fit a raspberry pi? / what size screen will fit in the window for the accurate versions?
What are the 100%, 108% and 115% columns?
What version would be used for a DROID MAXX?
Can’t find that one
108%
I don’t understand the sizes. My wrist is 17.5 mm and my friend’s wrist is 18 mm, what size would we need to fit both sizes?
My friend has a Nexus 5 and I have an iPhone 5c.
Thank you.
Those wrist sizes seem a bit odd to me. Both phones are 100%
ok i already commented on this on the other page but i really really need an answer. if you can, can you tell me why the top of my white iPhone 6 shows at the left side of the screen body part it doesn’t look very good but the one on your video looks perfect. i know you used a black samsung, but the screen was centred. and i put the same samsung phone in it and the top of it still showed. so i need to know why this is like this and if there is anything i can do to fix this
by the way i am using the 100%
Please note that I live in the Netherlands and you sent 4 comments expecting answers while I was asleep. Good morning.
The simple answer is I didn’t. In the video it might seem that the phone screen completely covered the screen area, but it didn’t. Long live movie magic. It wasn’t centered (at all) and the top and bottom had gaps. Some people have made black borders around the screen with plastic or paper to hide the gaps and the phone. Centering the screen is impossible with the shape of the Pip-Boy, this is why the App can be oriented around the screen.
(P.S. it was a Nexus 5, not a samsung)
thank you for your time dragonator. the project is moving ahead full speed now.
What parts would you suggest support on?
That really depends on what your printer is capable of. This is usually decided by the person printing it. I cannot give a satisfying answer here.
I am not very good, what is the difference between a 100 and a 200 micron resolution? Which is the best for this project?
This is the layer thickness of the printer. 100 micron will give a smoother look, but requires about twice as long as 200 micron.
I’m thinking of not including the LED part with the lights, is that fine or is that part required?
It will leave a gap in the pip-boy. Other than that you can just leave it out.
What kind of switch should I or can I use?
Any electrical switch. Nothing is specified in the design
Hi, I am having a little trouble figuring this out. I measured my iPhone 6 Plus and it falls slighly under what the G phone edition. How do I make sure that I download the right one? Let me know if you can help. Thanks!
115%
Well the iphone 6/6s plus dont actually fit the 115% model. the screens on them aren’t centered. so either modify the pip boy slightly to center your phone screen, or buy a used phone to have the app on that is more centered.
Even with the Bethesda version the screen is almost never centered. The App already knows this and allows you to scale and place the effective area relative to the phone. There is no way you can fit a phone with a big enough screen and still have it centered.
Do you know how? The reason I ask is cause it wont let me do so on my iPhone 6s plus. There’s no available option on the application.
answering how you adjust the screen when the pipboy launches you have a gear icon in the upper left tap iot and go into display mode then you can adjust from there to center the screen
what model would I use I have a Kyocera Hydro Life my phone dimensions are 5.19″ x 2.57″ x 0.43″ (132 x 65 x 10.9 mm)
115% version
nah man you can handle the 100%, but reminder that the 100% is pretty small
What size would be for an iPhone 6?
115% version
Ah man it’s too bad that the accurate version is postponed, but i’ve really got to thank you for putting the STEP files for download too.
I’ve added the reel on the back myself now and I’ll see how it comes out in the end!
I know, but I simply cannot find the motivation for it and this is still supposed to be my hobby. Maybe in the future, maybe someone else will pick up on it.
Yeah no worries about it, I perfectly understand it.
As I said, I’m just really glad you shared the STEP files, because I can myself hardly see any difference between your model and the in-game model except for the reel on the back, which I’ve created as a glue on piece in inventor now. So that’s just perfect. Succes on your other stuff!
(Also, dutch, eyyy)
http://i354.photobucket.com/albums/r435/mempol/4A6BAF1DAB7B2174F1837A08C00847D82556BFDCA5510DA35Cpimgpsh_fullsize_distr_zpsgqyfpm6x.jpg
Might as well share, it might still not be 100% accurate, but it’s there and it printed quite well if I say so myself
Would you like to share this design (anywhere)? I think plenty of people would love to use this add-on to their Pip-Boy. I will even link to it on Ytec3D.
Sure, I’ll try uploading it somewhere later.
Oh the only problem though would be that it’s only for the 108% version.
Your software can’t scale models? Else it can be scaled in most stl handling software. 100% = 92.59%. 115% = 106.48%
No no that’s possible, i would just guess that it would be a problem with the holes?
Depends on the software you used. I designed the Pip-Boy in Solidworks. When I got to scaling, I modified the hole sizes to compensate for the difference in scale. If you use something a bit less history based I can see your problem. The 100% will be doable, but the 115% might give some issues.
Hello I can’t find what the B,C and D base values mean, I really appreciate your work in finding all this and want to use it as a prop in movies, and for having a freaking PIPboy I am a fan of the Fallout series. If you could inform me i would appreciate it very much.
Above the table you see 3 schematic drawings with dimensions. These are A to G.
how big is the screen “hole” on the biggest phone version? (the 115%)
Hello, I was wondering how much would it weigh approx so that i know how much it would cost
^
(i was wondering if after all these years you’d like to meet)
It depends on the settings, but it should be in the neighborhood of 500g.
Hey dragonator,
So I really appreciate this project and have really enjoyed working on it! I had everything printed at my local library and it all came to $33! I’m about 90% complete and am now a little stumped. Which screws are used for attaching the screen to the body? (The screws that use the two “phone button close” gears) This is the only part I can’t seem to figure out. Is there a pic missing in the instructions? Hope to get a reply soon, thanks!
It is not technically missing, but I can see how a photo of that would be helpful. The 2 tiny knurled circles with a hex in the middle are the “gears”. They hold M3 bolts. In the screen are also M3 nuts. These engage to hold the screen in place.
What length would those m3 bolts be?
For the 100% they need to be between 20mm and 24mm. I will update the page when time allows it, this needs to be added.
Hello. Is there any chance these files can be put into a format compatible with SolidWorks? They have 3d printers at my school but they use SolidWorks files. Thanks.
In the downloads (http://ytec3d.com/downloads/) there are STEP files. They load into Solidworks without any problem. If you tried that and it does not work for some reason contact me through the contact form, and I will send them to you (The files are a bit big).
where can i print for under $50
I don’t think you can unless you already have a printer, but any commercial service and most hobbyists are out of the question. Maybe Fablabs and some specific people on 3DHubs.
go to a 3D printing hobbyist page on facebook, you migth be able to get someone to print it for you.
dragonator u dragon
Y u no respond
Because I also have more things to do than answering a torrent of similar questions. I answer once every week or so. The tape mechanism works with a rubber band and a lever. That is about as much as I can say about it.
Would a Galaxy S4 fit in the 100% model?
it will be tight, but yes
what size would work for a iphone 5
100%
does anyone know why it wont open in 3-d builder for me all it says is it dosent know what error it is or something
How large would a Galaxy S5 be? And what is the best/cheapest service to get this printed at because I don’t have a 3d printer and don’t want to spend a large amount getting one.
Another thing, how to I put multiple files into 1 order?
108% and can’t help with it
What’s the best option for Galaxy S6 ?
108%
what size would a galaxy s3 be?
100% will be tight (0.6mm too small). 108% will fit easily
When will the accurate version be available to download?
Accurate is postponed indefinitely, the page will update shortly.
how do you get the cassette mechanism to work?
i love this idea and have someone who could print this but my problem is that i have a larger phone width wise than the 150% can’t hold. The only size that fits my arm would be the 150% too. I have a samsung galaxy note edge that i think would work great but it is, i think a few mm larger in width.
my bad, meant the 115%
Could anyone recommend an affordable 3D printing service? I’m aware that it’s a fairly new technology, but I’m not looking to spend $1500+ to get it printed when I could buy my own printer for that price range (not that I have that kind of money).
You could use Shapeways.com, iMaterialize, or Sculpteo. They are all good. Or go through 3DHubs. You can find local individuals with printers that can assist. As a small studio owner myself, I am on 3DHubs and do a lot of printing for people, a lot cheaper than Shapeways, etc.
out of curiosity how much would you charge for one?
Hey this is really cool, what would be a good size for a Moto E 2nd gen.
100%
Hey, Im building one right now for my Moto E 2nd Gen. I’ll let ya know how it turns out. I am having problems finding a supplier of metric machine screws in the states. Digikey carries the panhead screws, no grub or set screws though.
any luck finding a source for those grub screws…? I could use an assist. Cheers!
G.
What if my phone is for 115% version and my wrist is more like to 100%?
Line the inside with some sort of foam padding
My phone is 2.4 mm too wide for the biggest version (I have a Nexus 6.) Would I be able to use a file or something to modify it in order to make it fit? Also, I don’t have a 3D printer. Is there any place I can send these parts to to get printed and shipped?
Hi Emma,
Try Shapeways.com, iMaterialize, or Sculpteo – 3DHubs is also great.
I just got all my printed parts today! Can’t wait to start painting and assembling!
I Have A ZTE Zmax What Size Should I Use
Hi I own a Samsung Galaxy S4, but if I do the phone version will I still be able to wear it? This maybe a dumb question but it’s late at night for me and I’m a bit confused.
Do you have iphone 4 model?
theiphone 4 model is the 100%, i own a 4S and a 6S+ and i got the 108%
Did you use the 108% with your 4S ? If not what size did you use ? (sorry if my English is not correct I’m french)
What would you recommend instead of sandpaper? (im not that good with sandpaper).
P.S. I think this thing you’ve created is amazing
sandpaper (or files). There really is no good substitute.
Do you have an idea how long till the accurate version will be ready to go? I really like this model and I’m interested in using it in a project.
Also what reasonably priced printer would you recommend to print this?
Accurate version is postponed until further notice, I cannot gather the motivation to start working on it. I will update the page in a day.
I can’t wait to get started on making one of these for myself. I’ve been using the Pipboy app every time I play Fallout and wearing this with my phone in it while using the app would be awesome.
Hey just a quick question that I didn’t see anyone ask yet, but what’s the mechanism used to make the holotape deck pop open? i saw some string in the pics but no explanation. thanks in advance!
The string you see is actually elastic string. When you close the door it puts tension on it so it will pop open when released.
Hi! I was planning on printing this out as a side project for my school, but I was hoping to wear it. I have a rather thick forearm, about 3 inches wide and 2 inches deep. Is there anyway to find a proper size? Or can you tell me which is good enough?
All dimensions I do have are in the images. They should give enough information to get an estimated size.
HTC Desire 620G = 108%
Galaxy Note 4 = 115%
Samsung Galaxy Avant = 100%
samsung s3 mini = 100%
Lumia 640 XL = too big, even for 115%
i was wondering will a nokia lumia 925 fit in any of them and where would be the cheapest place for a 3d print in england if you know.
Hi, I have a Lumia 640 XL and I want to know if the 115% version would fit
Hi I was wondering how you got that latch in the frame of the pip boy? I’m having a bit of trouble assembling it…
Thanks
What seems to be the problem.
I have a Samsung Galaxy Avant 132.842mm by 66.04mm which would this fit in best? I assume the 100%?
When compared to the official prop that Bethesda released, is the 100% the same size? A friend of mine got the Pip-Boy edition and my phone fit perfectly inside of it, so I was just trying to figure out which size to go with for making my own.
100% is compared to the game itself to my best estimate. It is in no way related or based on the Pip-Boy edition Pip-Boy. I don’t make props of props.
Hello, I have HTC Desire 620G, which one should I take?
hi. I have the lg g4. wich one should I take ?
108%
Which size would be best for an iphone 5?
The 100% is already big enough.
Once you primed all the parts and spraypainted the base color how would you go about painting it so it looks weathered? Do you simply dab it with a paintbrush?
If you print on black plastic you can just scrape it up on something and the paint will look scratched up because it is.
What would be the easiest way to scale this up so I could use it with a Galaxy Tab 3 (110mm x 186mm)? trying to go for a supermutant size pipboy…
Do the parts that need support have the supports included in the STL files? I am new to 3D printing and am not sure how the supports work. The 3D printer we have at work is incredibly expensive, and it prints soluble plastic as support that we rinse away in a chemical bath. My printer doesn’t do that obviously, so I was hoping you could explain how the supports work and if they are printed with the stl and I have to break them off, or if its something I have to do on my own. If I have to make the supports on my own, could you explain the process? Again, sorry if these are stupid questions. The printer I ordered is the da vinci pro if that helps. Thanks for the help!
Support is calculated by the printer software. Some printers are better at support than others, so I cannot say whether you printer will be able, but most printers do a decent job.
Thanks a lot for the help!
How forgiving are the requirements for phone size?
I know that the 100% version has the phone size requirement at: 70mm x 140mm. Though my phone measures at: 70.1mm x 142.1mm. Might I able to use my phone with the 100% version? Or should I use the 108% version instead?
Not really that forgiving. I think the 142.1mm will be a problem. Maybe it is sandable, maybe it isn’t. I would use the 108% if I were you.
Thanks for your insight, I really appreciate it!
Ok so I’ve noticed that the phone body left has 2 holes in it as does the phone screen body where they should fit together. When you say glue them together, is anything suppose to go in those holes or did you just glue together?? I feel like a couple of small studs should go in there so the 2 pieces fit more snug and go together better.
Quick reply please. Can I print it in PLA or must it be ABS
This is my experience, and my experience only: I printed both screen body parts in PLA, and I felt the quality wasn’t as good. No, that’s in part due to the printer I was using for those two parts and not the material (the TAZ I used printed terrible support, completely filling a nut slot, and I had issues with the print quality in some places, but I don’t know what’s at fault there) and it was also partly due to the specific filament used. The PLA that was hooked up the TAZ at my local Fab Lab was semi-transparent, and I don’t really like how transparent plastic turns out… trouble is, I forgot that before I actually printed, and was too lazy to change the filament.
That said, PLA is harder to smooth. Simply rubbing 100% acetone nail polish remover on my ABS parts gave it a smoother, shinier quality, and I hear vapor smoothing (which I was afraid and, again, too lazy to try) is supposed to be really excellent. There are supposedly smoothing options for PLA, but they’re less widely backed and done with material that’s harder to get from a local store. Smoothing is nice because flaws in the part will start to stand out once you’ve tried to throw paint on it and make it look more “realistic”. Of course, real metal sometimes has a texture to it, so you can get away with just sanding, or nothing at all, depending on taste. It just might be a bitch to work with.
Hi there, I noticed the minimum size was marked as 140mmx140mmx100mm, but I have access to a 2013 Cubify Cube that is 5.5in (139.7mm each way). Is that recommendation set in stone or able to change in small amounts?
Hello again!
I can see that both “Button Close” look like they go in front of the tape cover, behind the screen body, but I don’t know exactly how they attach. It looks like there’s a place or screw holes there. What size would you recommend? Are the parts purely cosmetic (so if I leave them off by accident, am I hosed)?
All screws are mentioned as far as I know. The button hinges on M3 grub screws, but the big part is glued to the visor itself. All is in the photo’s.
All parts of the Pip-boy are technically cosmetic, but the button close is indeed used.
Hi,
Are you going to considered updating your files once the Pip-Boy is out in the wild so you can adjust according to that one?
Could putting a raspberry pi and a display instead of a phone work with this Pip-Boy model? What are your thoughts on that?
Thank you for your time, the whole Pip-Boy looks fantastic. I would love to try to make one myself.
He has another version that is labeled “accurate”. It says that its coming soon, so I think that awnsers the first question. As for the pi, yes, it would work. Even if all the electronics dont fit, I have seen that most people just make a case for the electronics that is strapped to the belt. For the screen, if it fits, it works. If you want buttons and knobs, you should be able to cut/drill out some holes (if you think of doing this, print thick walls)
Keen observers here will note that it has been saying “coming soon” since the phone version came out, and is now saying “delayed”. I had planned to make an accurate version right after the phone version. I am now waiting until I have the game before I start working on it.
Whether a Pi will fit into it, I dunno. I will open it up as much as possible, and make switches possible, but I will not modify the exterior simply to fit a Pi (it is the accurate version after all).
Hey, I plan to make a fully working pipboy, and I want to use your model.
I literally just ordered a 3D-Printer today just to be able to make this.
I was wondering the current dimensions for the phone version at 115%, for the inside, like behind the screen.
I want to use a Jetson TK1 because it natively supports Android, which I’d like it to run on, but the Raspberry Pi doesn’t. (Even though people have been able to run it on the Pi, but it doesn’t have hardware acceleration for some reason so it runs at like 10 fps).
so I was wondering if the Length * Height behind the screen is 5″ both ways, because that’s the dimensions of the Jetson (I think I would need 2-3″ for thickness in between the opening of the screen and part front 2)
So I was wondering if you could take measurements for me, that is if you have an 115% model already printed.
If it can’t fit a Jetson do you think I could modify the 3D model to make room for it?
Nevermind the Jetson, I found something smaller the size of a Pi, that actually runs android by default(finally took me 5 days of researching to find it) the ODROID-XU4, anyway it is 85 x 56mm, half an inch thick. so I would still like the dimensions of the internal space if possible please 😀
I can’t remember where I saw it, but there was someone that put a PI into a GameBoy color case. They desoldered and removed most of the ports to do it, but they were still able to make it fit. I would assume if you did the same thing and used a touch screen you would be able to do this as well.
Are Button Left and Button Tune identical? I can’t figure out which is which on my prints.
They are mostly identical and it should not give any problems if you swap them.
I’ve looked up small decorative screws and there are a wealth of size choices. Is there some specific type that you would recommend?
I’ve got an Ultimaker 2 and the “visor centre 108%” part has failed 3 times on me. any ideas of getting that one to print better?
Hi! What size do I have to choose to fit raspberry pi Model B and 3.5-inch display?
hey guys, thanks for the help. I was able to fix the problem with a simple phone call and i’m well on my way to finishing the pip boy.
What kind of glue do you recommend for gluing parts together? Hot Glue, Superglue, etc?
Hot glue is mostly for prototyping and is not adviced for something like this. Superglue should work but on 3D printed plastic you will need an activator to make it set.
I myself use glue for hard plastic. It sets in minutes and is plenty strong. Since I am in the Netherlands, I cannot give you a specific brand.
Testors works well
What printing resolution would you recommend? High or ultra would be smoothest, but it seems like most of these parts can be smoothed out with your mentioned method or they are so tiny that a low resolution would be negligible to detail.
There is no real answer to that question. It depends on how much time you have, the type of printer you have and what post processing steps you want to take. If you are going to smooth and paint, you can get away with a slightly worse result. If you are directly painting it, it’d be better to print a higher quality. Better save than sorry.
hey, i’m trying to make this(I commented earlier) and im new to this. i tried to open the files into auto desk 123D design but it kept telling me that i need permission to do so. so may i have your permission and how do i upload?
You shouldn’t need the file creator’s permission to open a file on your own system. If that were the case, you’d be running into a password prompt to unlock the folder.
Who’s computer are you using to open the files? If it’s your own computer, then… well I have no idea why it would be giving a message about permissions. If it’s a school computer, then the network admins have probably set up programs on the network to prevent students from opening unauthorized or unrecognized files (Such as pipboy schematics downloaded from a .com website).
Or some other thing that dragonator can help with :I
I’m using a school computer that is connected to the classes 3D printer
At this point my ability to support ends. I have never had any problems opening STL files, nor does anyone else have it. I use Slic3r to open and convert my files. You can also use Netfab. If you want to actually modify the parts there are a massive amount of programs that can edit them, though I never directly edit .stl files myself.
Ok, so I measured out my phone in mm and it has a length of about 129.04 mm and a width of about 59.31 mm. (It’s a Samsung Galaxy S 4 mini) I thought that meant I should use the 100%, but then I saw Mark’s comment about a 5.5″ phone and your response was that he would need a 108% size.
I converted the inches to millimeters, and that’s about 139.7 mm. Isn’t that within the acceptable parameters of 100%?
The 5.5″ refers to the screen diagonal size. It is not measurement for the actual size of the phone. The actual outside dimensions of the LG G3 are 146.3mm x 74.6mm. With your phone you can use the 100%
Thank you for getting back to me so quickly.
I’m having a hard time figuring out what size model I’ll need to make.
I would love an actual version, but since those are not available I shall go for the phone used ones.
I have an I Phone 5
My arm is quite small, around 7 inch around mid.
What percentage should I use?
I hope to hear from someone soon!
Iphone 5 is actually pretty small. It will fit in the 100% with room to spare.
I have an LG G3 phone that’s about 5.5″, i’m making one of these for a class project (you will be credited) but i have absolutely no idea what percent i should use. so for a 5.5″ phone which would it be
100%
108%
115%
please help
You would need the 108%
Hey Dragonator http://imgur.com/gallery/YpoDx/
Could you please make a video for assembling the printed parts? Thank you.
I was wondering if there is a blue print copy of all the parts because I’m planing to make this out of foam cause 3d printers aren’t accessible where I live.
Sadly, I have nothing available here. You could use the STEP files in most CAD software so you can have the measurements, but there are no decent blueprints.
Thank you anyways.
What size will a raspberry pi b+ and a touch screen can fit inside it?
thanks in advance
Hey, I was wondering if you could do an updated screw parts list, the list you made seems to contradict with what’s in your pics. I’m going to be building mine tomorrow and need to know what screws to get.
Also out of curiosity, you you intend to put these parts on shapeways?
No I do not. These parts are optimized for FDM, not SLS. Printing these on SLS would make them ridiculously expensive.
Is there a particular reason the mode switch/knob is printed as a part of the chassis, and is there any plans on future revisions where it’s a separate part? Also is the accurate model going to be designed with the intent that it all of the knobs and buttons being usable?
Also is there a particular reason the tube mask is in separate parts (And doesn’t follow around the entire screen like in game models?)
Lastly do you have any advice on if the main chassis were to be metal printed?
The reason why the mode switch is printed as a part of the chassis is that the phone is also there. Else there was not enough space for most phones. In the accurate version I plan on making all switches functional (including the mode switch) but I haven’t gotten time to make the accurate version yet.
I think by the tube mask you mean the 2 small pieces on either side of the top of the screen. They are separated for 3D printing optimization. There is a rim around all of the screen, but the 2 pieces are the raised area that is also in the game model.
I have no particular advice, 3D printers vary too much.
Thank you kindly, and I eagerly await the accurate version whenever you do get to that.
Please disregard my request… I see now that the tape was included in the file downloaded. Thank you!
Thanks for this!
I’m considering making one of these. Do you need to worry about the size of your forearm, or just the wrist?
Thank you for making this available. In the process of printing all the parts. Clear (lamp) parts done, now printing the rest. Will use black and silver ABS filament for those parts that require it, to avoid painting them. The rest will have to be painted.
Question: Can the files for the cassettes be made available?
Thank you again for doing this!!! My son can’t wait until I get these parts printed.
Has anyone printed and assembled a 108% version? I’m in the process of printing the parts out, and I was wondering if the screws and nuts listed are also the same ones needed for the 108%.
Go to this link and ask to buy the parts for the Pip-Boy, he sold em to me for a good price.
https://www.etsy.com/listing/227056452/affordable-3d-printing-services-by?ga_order=most_relevant&ga_search_type=all&ga_view_type=gallery&ga_search_query=cinnaprints&ref=sr_gallery_1
Well, how much is a good price?
Can you release an STL where both large halves are one piece. My printer can print them in one shot and would come out to be a better looking job.
Does anyone know the pitches for the screws and nuts?
Hi,
Thanks for the superb plans!
I am in the middle of printing this, but find that the sizes of the nuts and bolts in the list do not tie in with the sizes mentioned in the photos. Are you able to clarify which is correct please?
E.G. list mentions 6mm Grub Screw, whereas picture mentions 5mm Grub Screw. There are a few examples of this.
I’ll be sure to donate once I have been able to finish printing and correctly assemble it!
Thanks again!
Photo’s are leading, but I will fix it when I have the time.
So, just to clarify. The pictures list the correct size nuts, screw, and bolts or the list is correct? I am mostly done printing the parts and am getting ready to go to the hardware store in the next day or so.
Does anyone have a link with a person who is selling these?
If you dont have an own printer i woud recomend waiting and hoping Bethesda sell these at some point.
IF i were to sell these i woud probaly take around 250~300€ for the raw printed parts and ~400€ for the assembled one with my shitty paintjob.
If you really wantthe PipBoy there is allways Shapeways.com, where you can upload stls and get them printet. They are even pricier than my Imaginary Shop, but they deliver A+ Quality.
do i print this in mm, cm, or in?
As a reply to all questions I could find.
Specs on the internet say Galaxy S4 is 136.6mm by 69.8mm, so that should fit in the 141mm (G) by 70mm (F) of the 100% version.
Wrist size is diameter, no circumference. Also, D is the length sideways of the Pip-Boy. A is the diameter of the pip-boy (in millimeters) that needs to fit around your wrist. There is a set of drawings that say what letter is what length.
you print it in millimeters, but quite honestly, this should not be a question. 95% of all stl files are in millimeters, but even if you loaded them as inch, the parts being 25x too big would be noticeable. the parts would be 8′ big (2.4 meters) if you loaded them as inch.
Please do not spam your comments when you have not received and answer within an hour. This is not a busy site and I also am not here a lot of the time (job and everything).
im confused, my wrist size is 6 4/8 inches witch should be D on 100% but you dont get the option to pick D 100%
what will a Samsung s4 fit in? all of these measurements are confusing me/bump
would it be the 100 version? plz respond
It would be very close. By very close I mean by .2mm. If it doesn’t fit, some sanding should make it fit. It’ll be a close call without any sanding though.
The 108% would be a faster option.
what will a Samsung s5 fit in? all of these measurements are confusing me/bump
You will need the 108% version to fit the Samsung S5 or S6
what about a 4s, i got my phone wrong :/
*s4
hi
I print 108% version,assembly complete,now fighting only with adjusting cassette opening hatch,,not working smoothly due to many paint layer,,Printing all parts take 44 hours and less than 20 usd material,
what will a Samsung s5 fit in? all of these measurements are confusing me
not going to sell finished ones but I’m more than willing to make the parts and send them off, email me at grievence.workshop@gmail.com for anyone interested and we’ll work something out.
AWESOME!!! Cant wait to print this out, Yeah I must say I’m a bit disappointed in Bethesda. This is so EPIC though, and the cool thing too is you can have MULTIPLE PIP-BOY’S, not just one if you ordered it from Bethesda.
Is it possible to put a usb slot in the cartridge holder? So maybe I could put something on the cartridges that have some music files or videos?
Hey, I have a HTC m8, which size should I get.
Sorry HTC one m8
Would the 100% work for an iPhone 6, or do I need to use a larger version?
So 115% for Phone would work on an Iphone 6+?
Hi,
Great work out there XD
Looking forward to print and assemble that!
Is it compatible with the iphone 5/5s mensurations?
Print the 100% version and it should be fine.
Hey you know what the measures for the iPhone 4 are?
Do you have a link for a website, with a person who is selling these like on etsy.com or anything else
I’m about to start selling it on Etsy I just need to get some comic con orders done first.
If and when you do, please let me know!
Yes like, if you could let me know when you will be selling it, please email me at alexnewyork505@gmail.com
I am looking for a 6+ version thank you for your time. If you can email me I was just looking around and just wasnt sure what I needed if I download the files.
– randomshagz@gmail.com
Hey, if you could email me too, that’d be great.
totalyarealguy@gmail.com
I have an unfortunate email.
I’d be very interested to see it available on Etsy. Would you be able to send us a link when you start selling it? My email is mikebrown2828@yahoo.com
allex.donaldson2@gmail.com let me know when it goes up
Sorry, alex.donaldson2@gmail.com
Please email me as well when you start selling them. Thanks
drewb247@gmail.com
Acmurphy99@yahoo.com Could you let me know when it is up? And how much would it go for?
could you could email me as well when you start selling it ?
stephen111825@gmail.com
I think what your doing is great and i will contact you soon i have a project im working on for the release of the game soon
When you say Printer size, do you mean what it will print up too? The 3D printer I am thinking of getting will print up too 140mmx140mmx135mm