(EDIT: The Fallout 4 version of the Pip-Boy is now also available for 3D printing. Go to: https://ytec3d.com/pip-boy-3000-mark-iv/ to see it. If you want the Fallout 3 / Fallout NV version of the Pip-Boy, keep scrolling)
RobCo Industries’ Pip-Boy 3000 is one of the most recognizable items from Fallout 3 and Fallout New Vegas. In the game it acts as a menu, showing inventory, health, maps, radio and a whole lot of other things. It is an essential piece in any Fallout collection or cosplay and while it is incredibly recognizable, it is also hard to come by in real life.
Because I am a huge fan of Fallout, I decided to change that by making a 3D printable version that everyone with (or with access to) a 3D printer can make. Comparing to some of my other project it is a fairly simple print that doesn’t require weeks of 3D printing time.
Before I could start 3D printing I needed the 3D files. I started with a bunch of reference images to start designing from. There is one other Pip-Boy available, a casting made of a Pip-Boy clock that was added to an ultimate version of the Pip-Boy. One of the first things I noticed was that the Model from the game and that clock don’t match. There are some small differences in the shape. I chose the model used in the game, got some reference image and started drawing from there. From those images I made a full shape model that has all features I can 3D print on the model.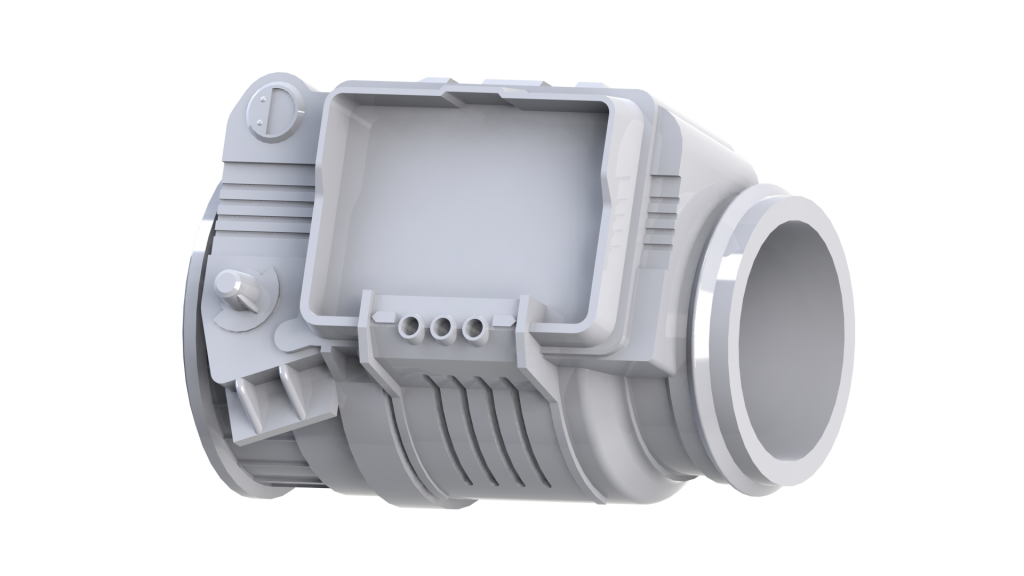
This model got cut up into 3D printable pieces and orientation ridges were added to the design.
Now 40 hours in, it is finally time to start 3D printing. I used an UP! Plus 3D printer from PP3DP. I has a smaller print surface than most 3D printers, but it is incredibly accurate, fast and it handles support material like a dream.
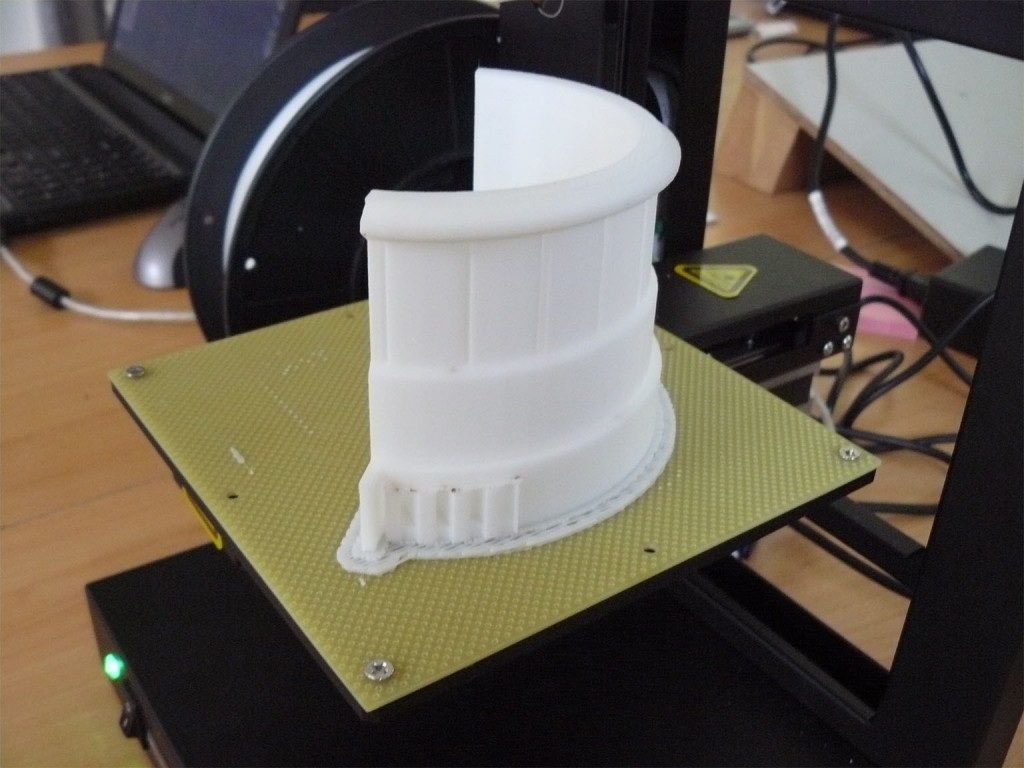
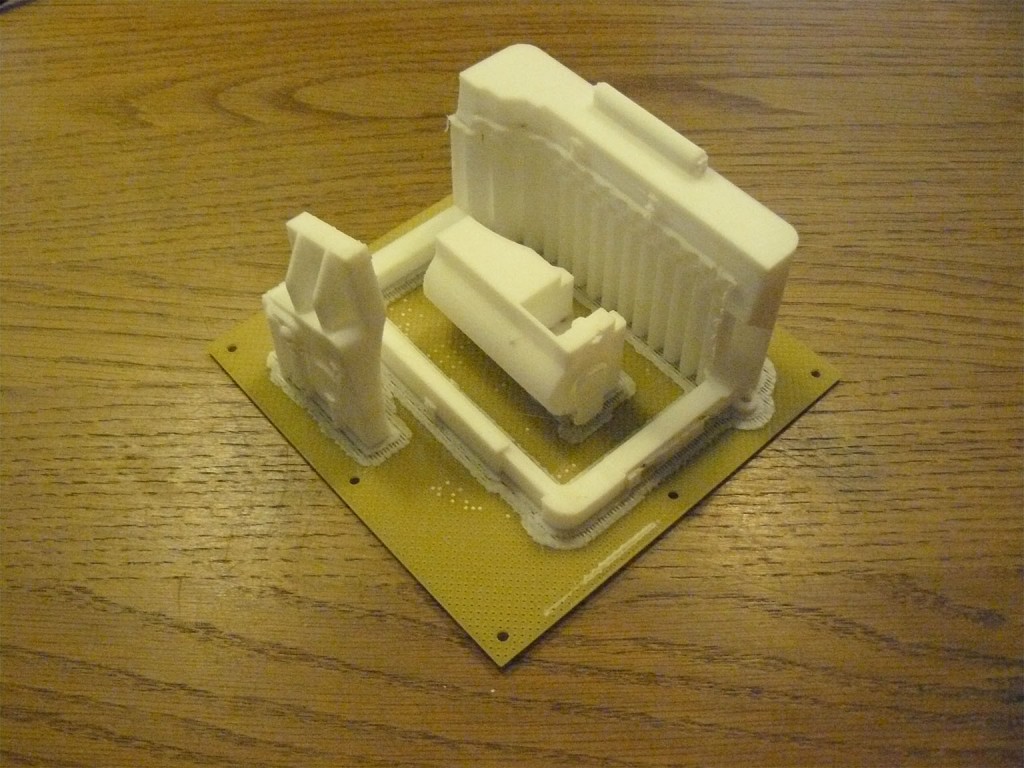
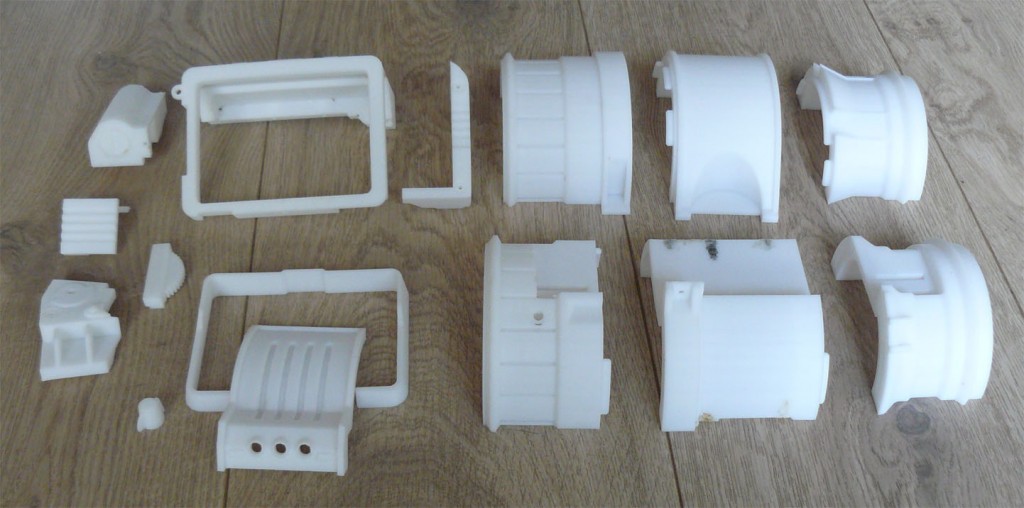
After 3D printing I was left with around 15 3D printed parts. 3D printing took around 25 hours. I printed the parts on the most accurate settings, so I needed very little sanding.
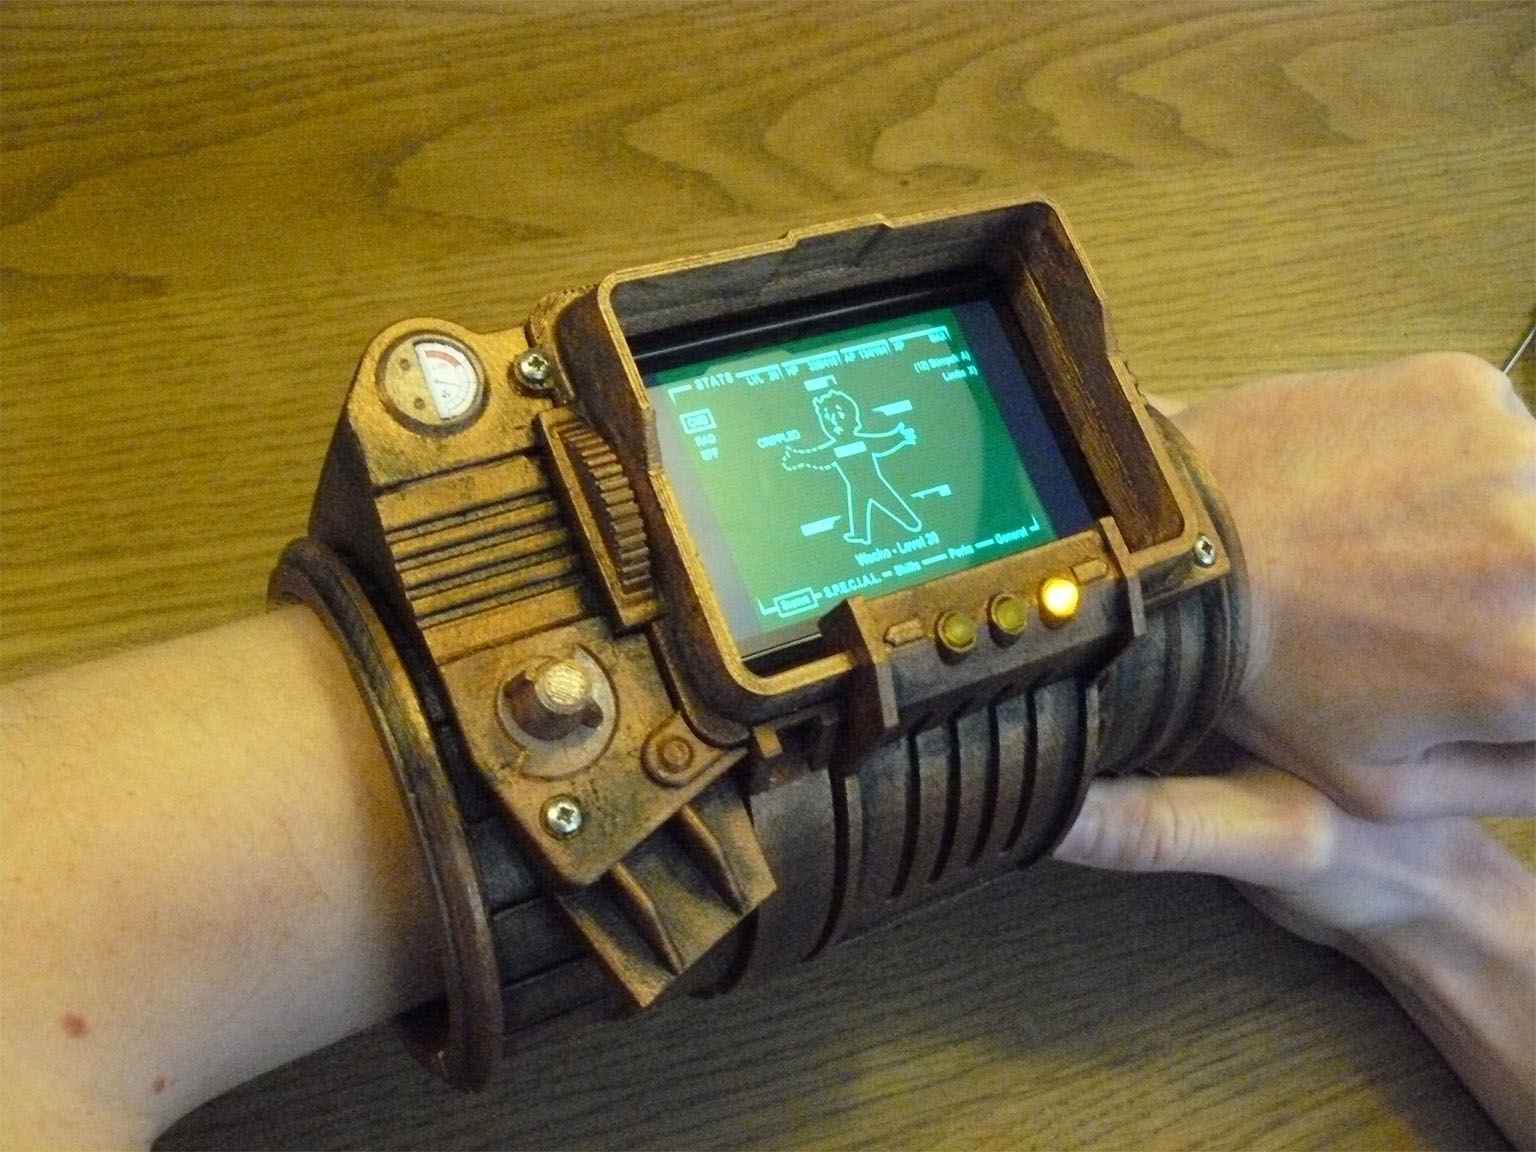
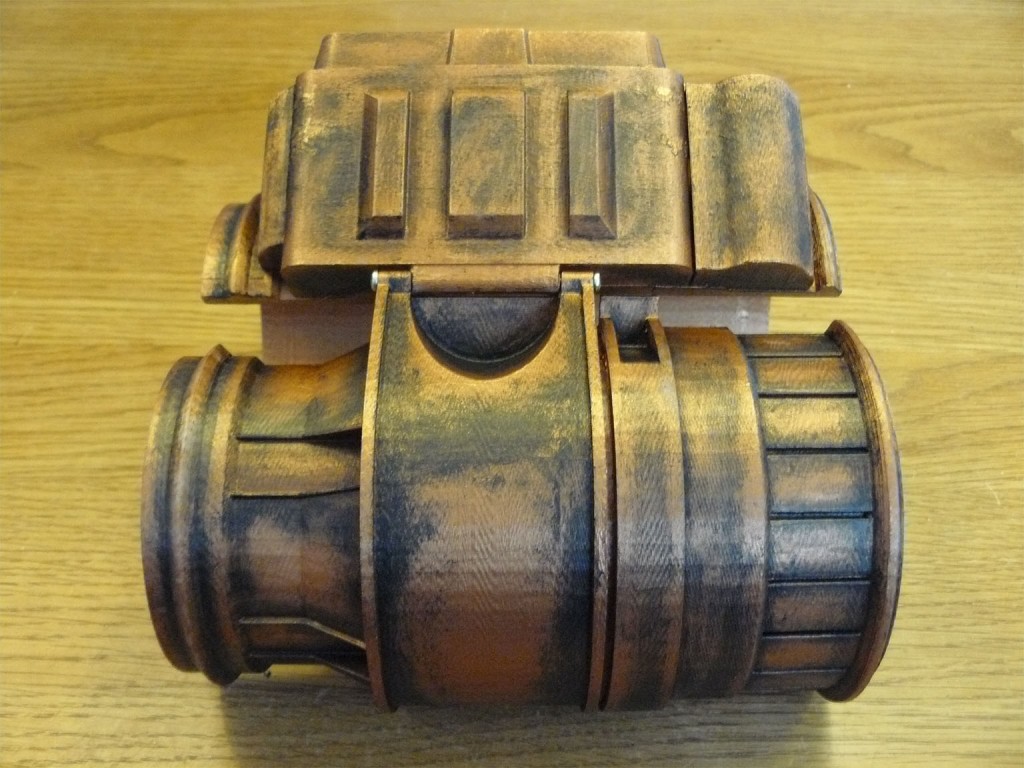
All pieces were glued into 5 big blocks. 2 magnets were added to keep the Pip-Boy closed. After gluing it was time to paint. Before anyone starts complaining, yes, I know that I painted it the wrong color. Painting is split up into 2 parts, base colors and weathering. The base color: bronze.
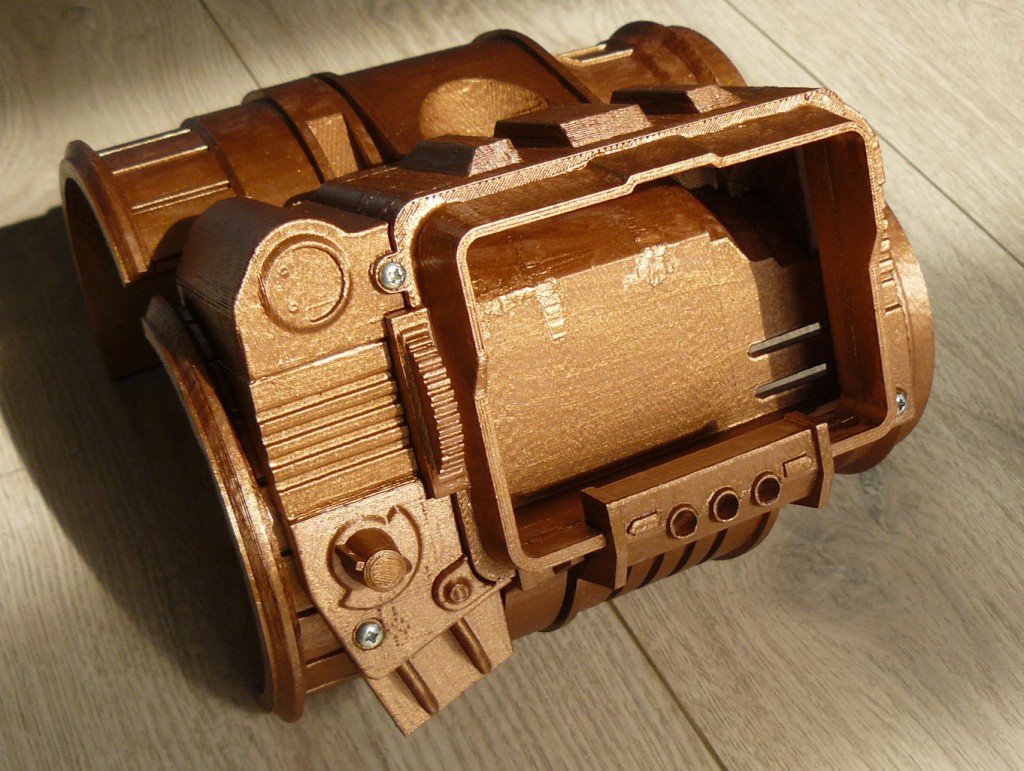
Weathering was done with black paint and a brush. It is a slow process where with a small paintbrush you dab the model very lightly with black paint. It gives the model a dirty, tainted look, just what every Fallout prop needs. The Geiger counter was added as a Laser printed piece of paper glued in the recess.

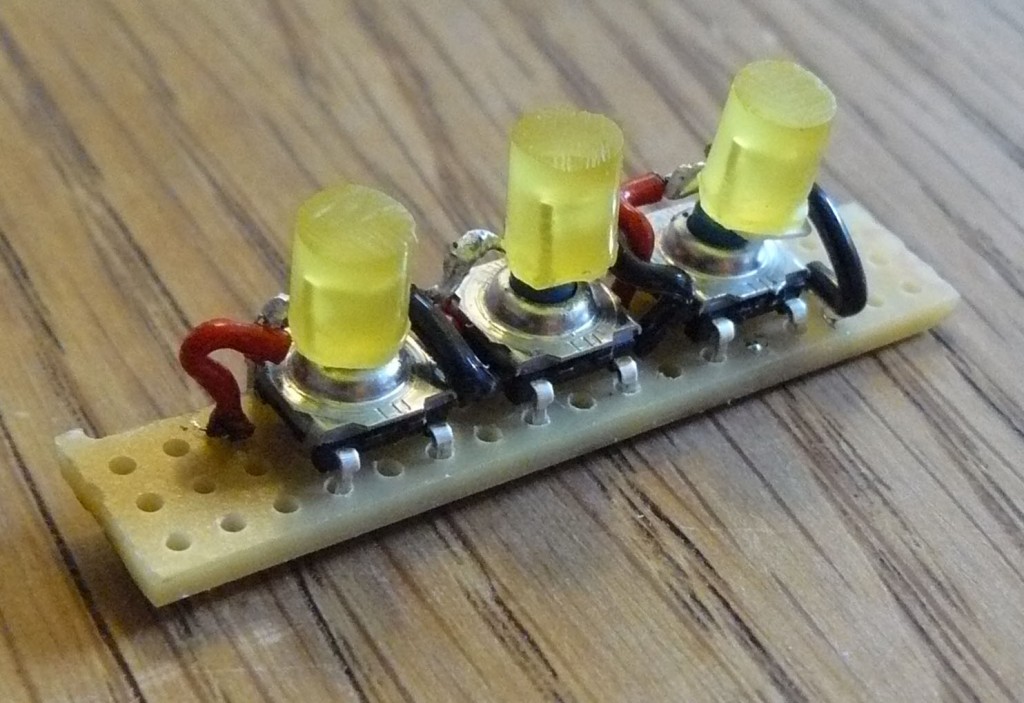
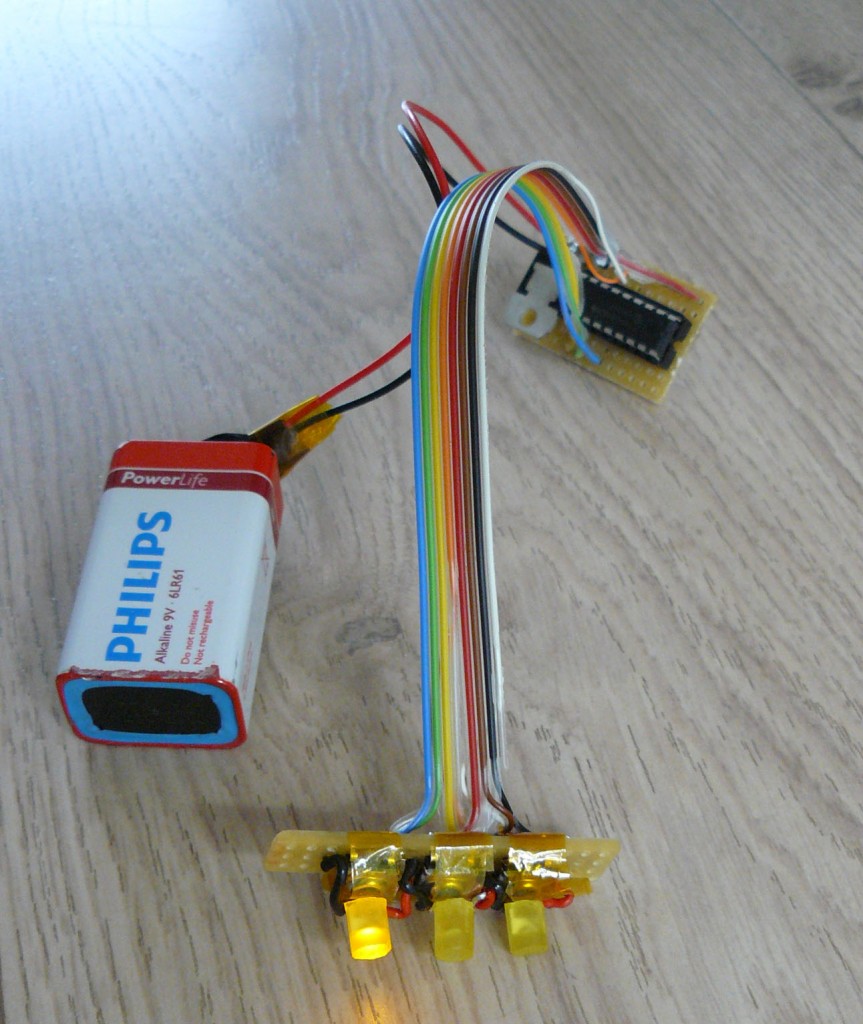
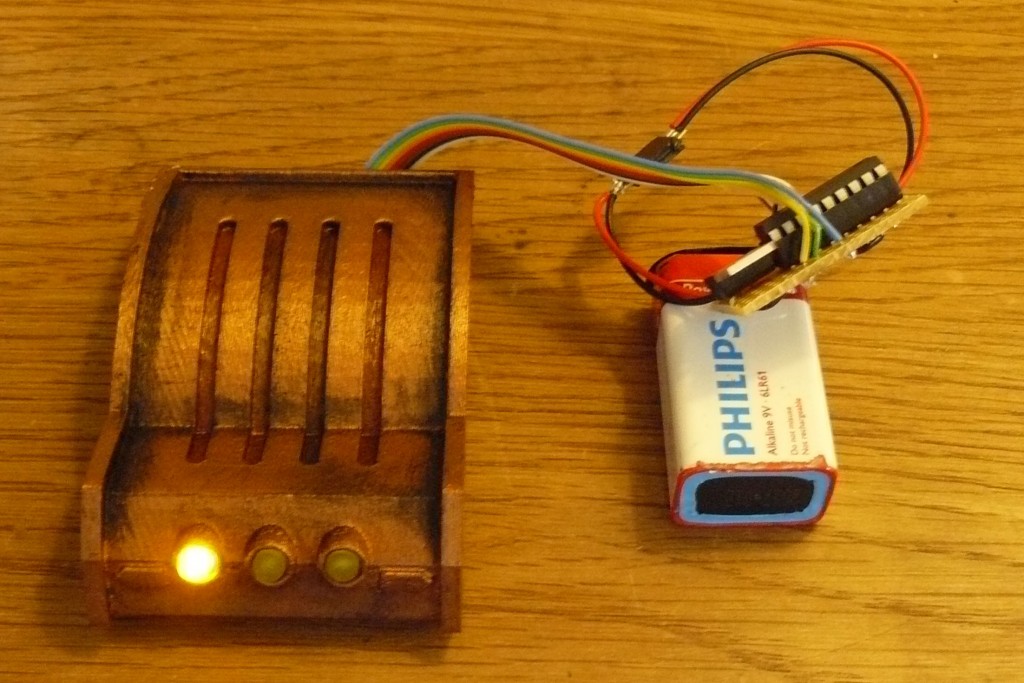
The last thing that was left to do was add the electronics that control the buttons. The buttons themselves were made from ground down 5mm yellow leds. There are switches underneath the leds so when you press a button it presses a switch. The electronics were made using a pic16f628 microcontroller that reads the switch input and turns on that led and turns off all others. The circuit runs from a 9V battery.
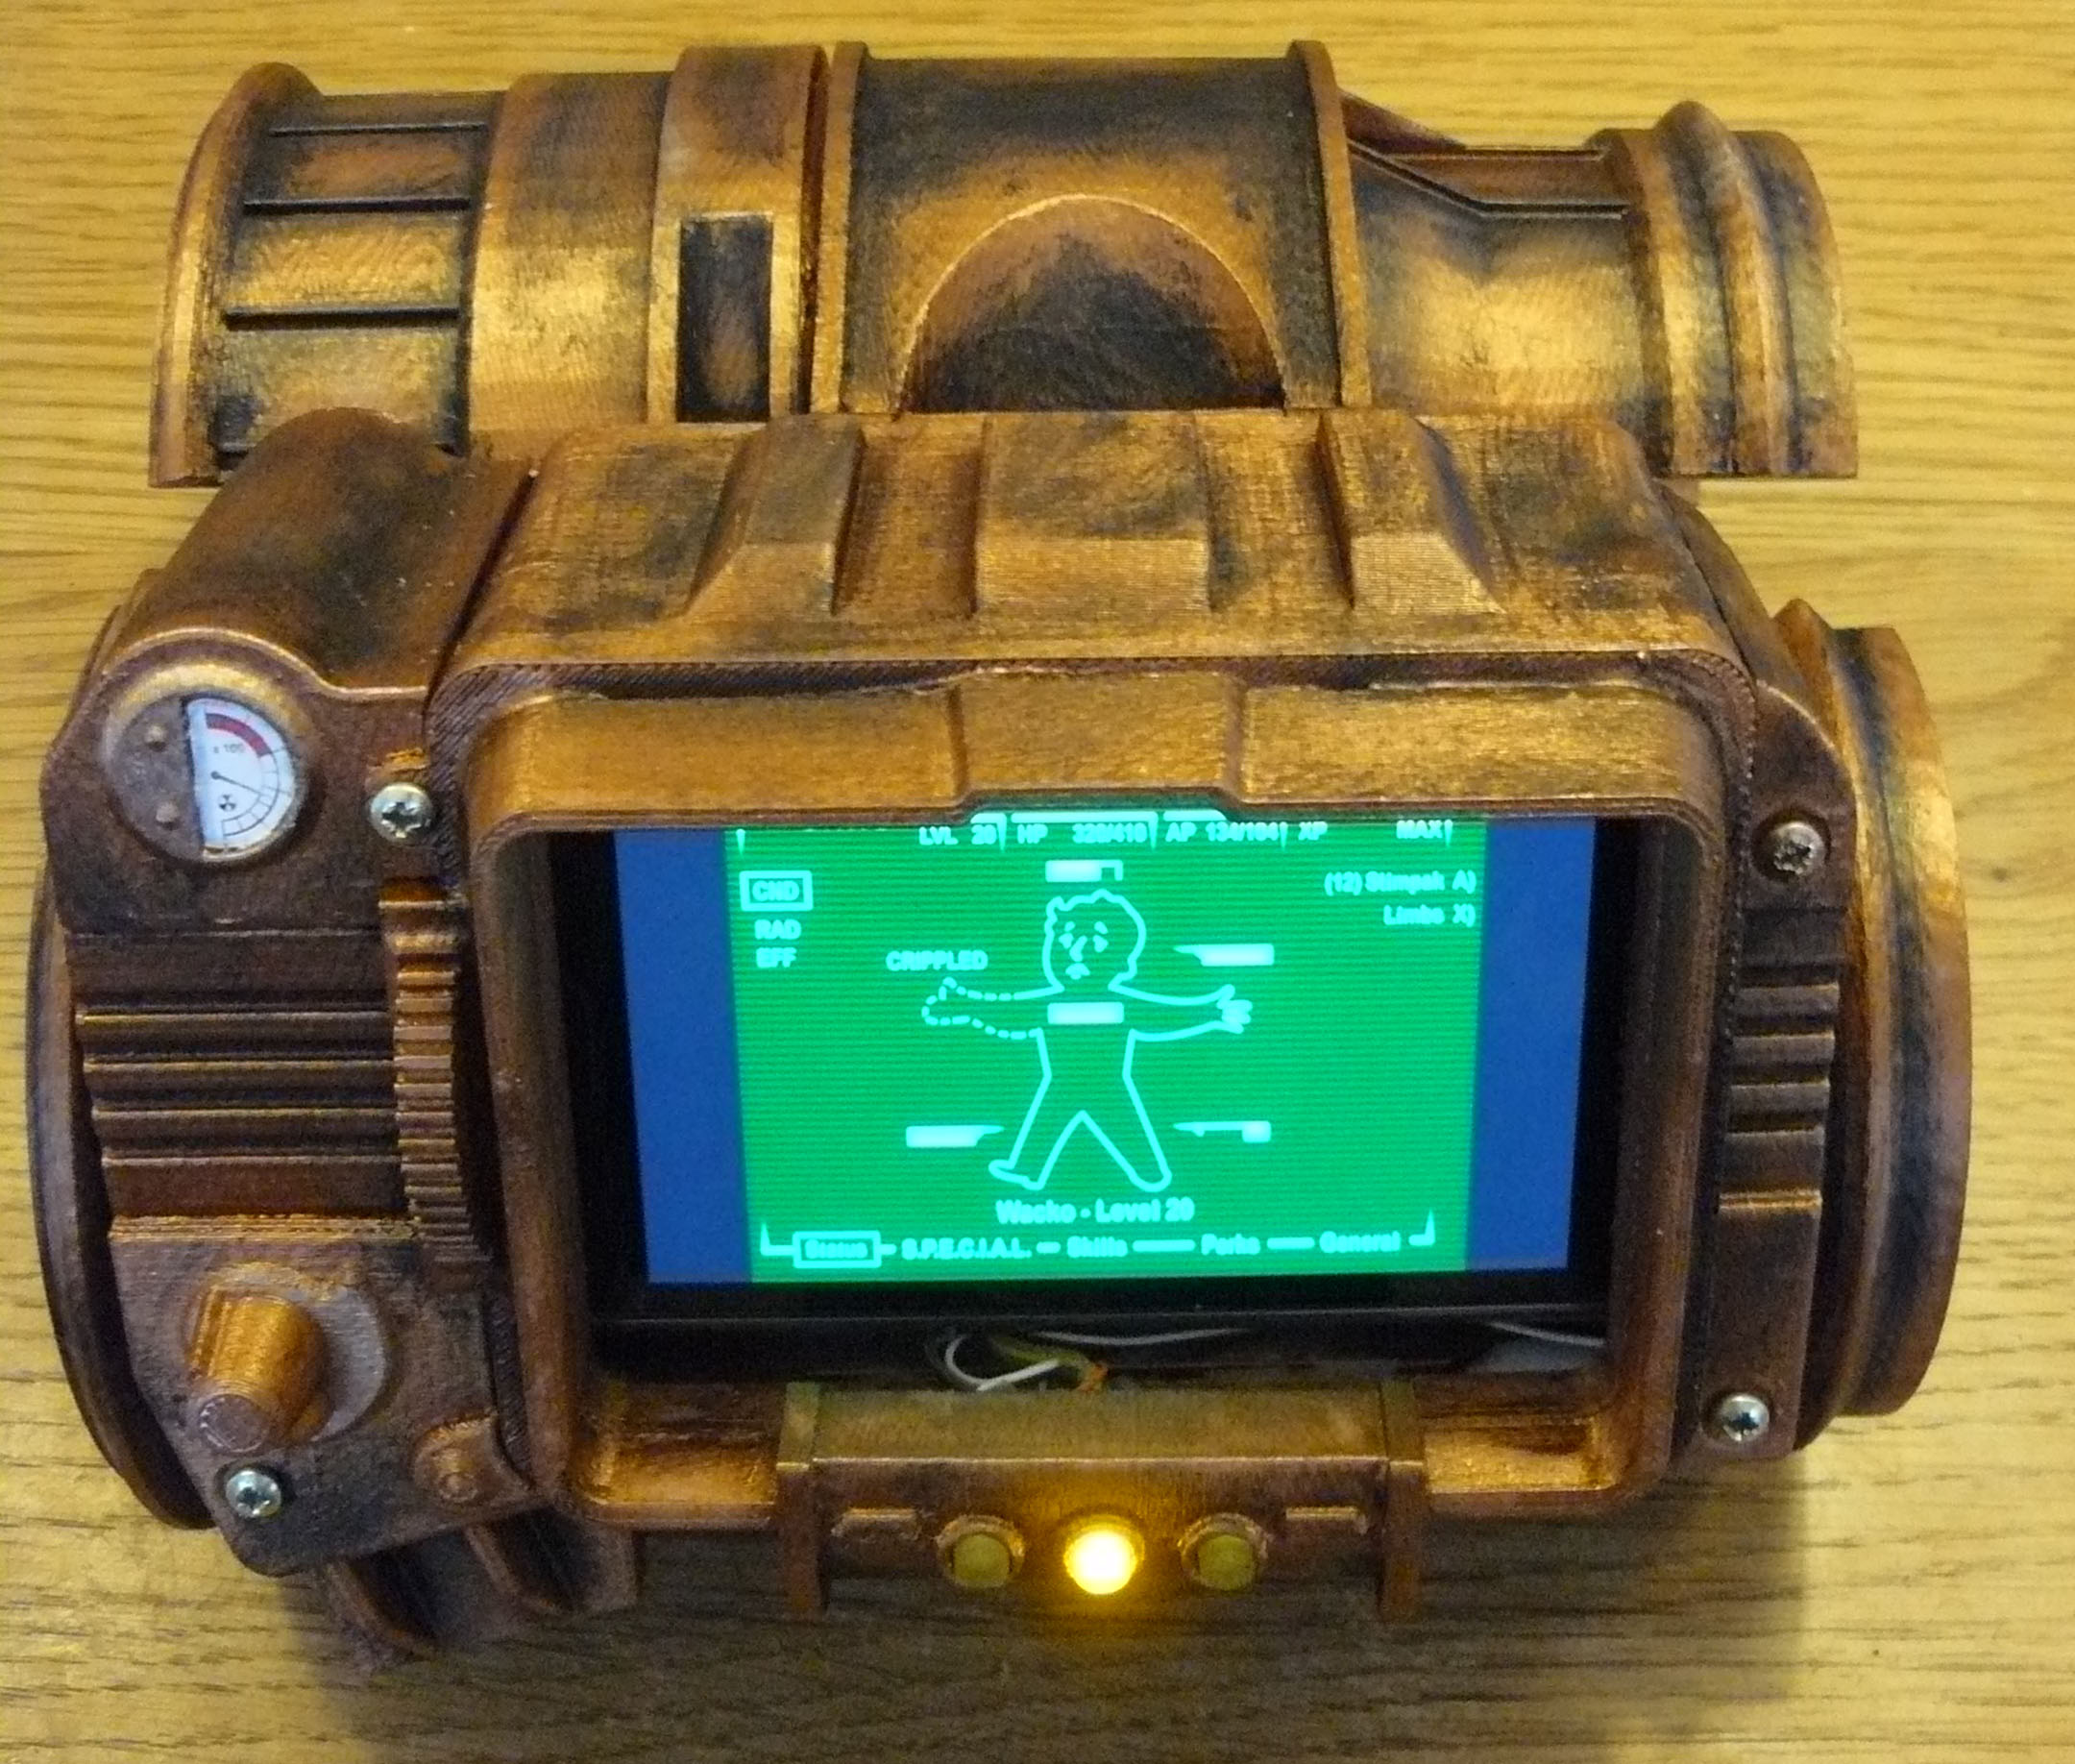
I am quite pleased with the final result. It is wearable and it looks just like the real thing. I managed to fit a Samsung Galaxy (the first one) in the Pip-Boy. It does have to be assembled around the Phone, but once it is in, it looks pretty neat.
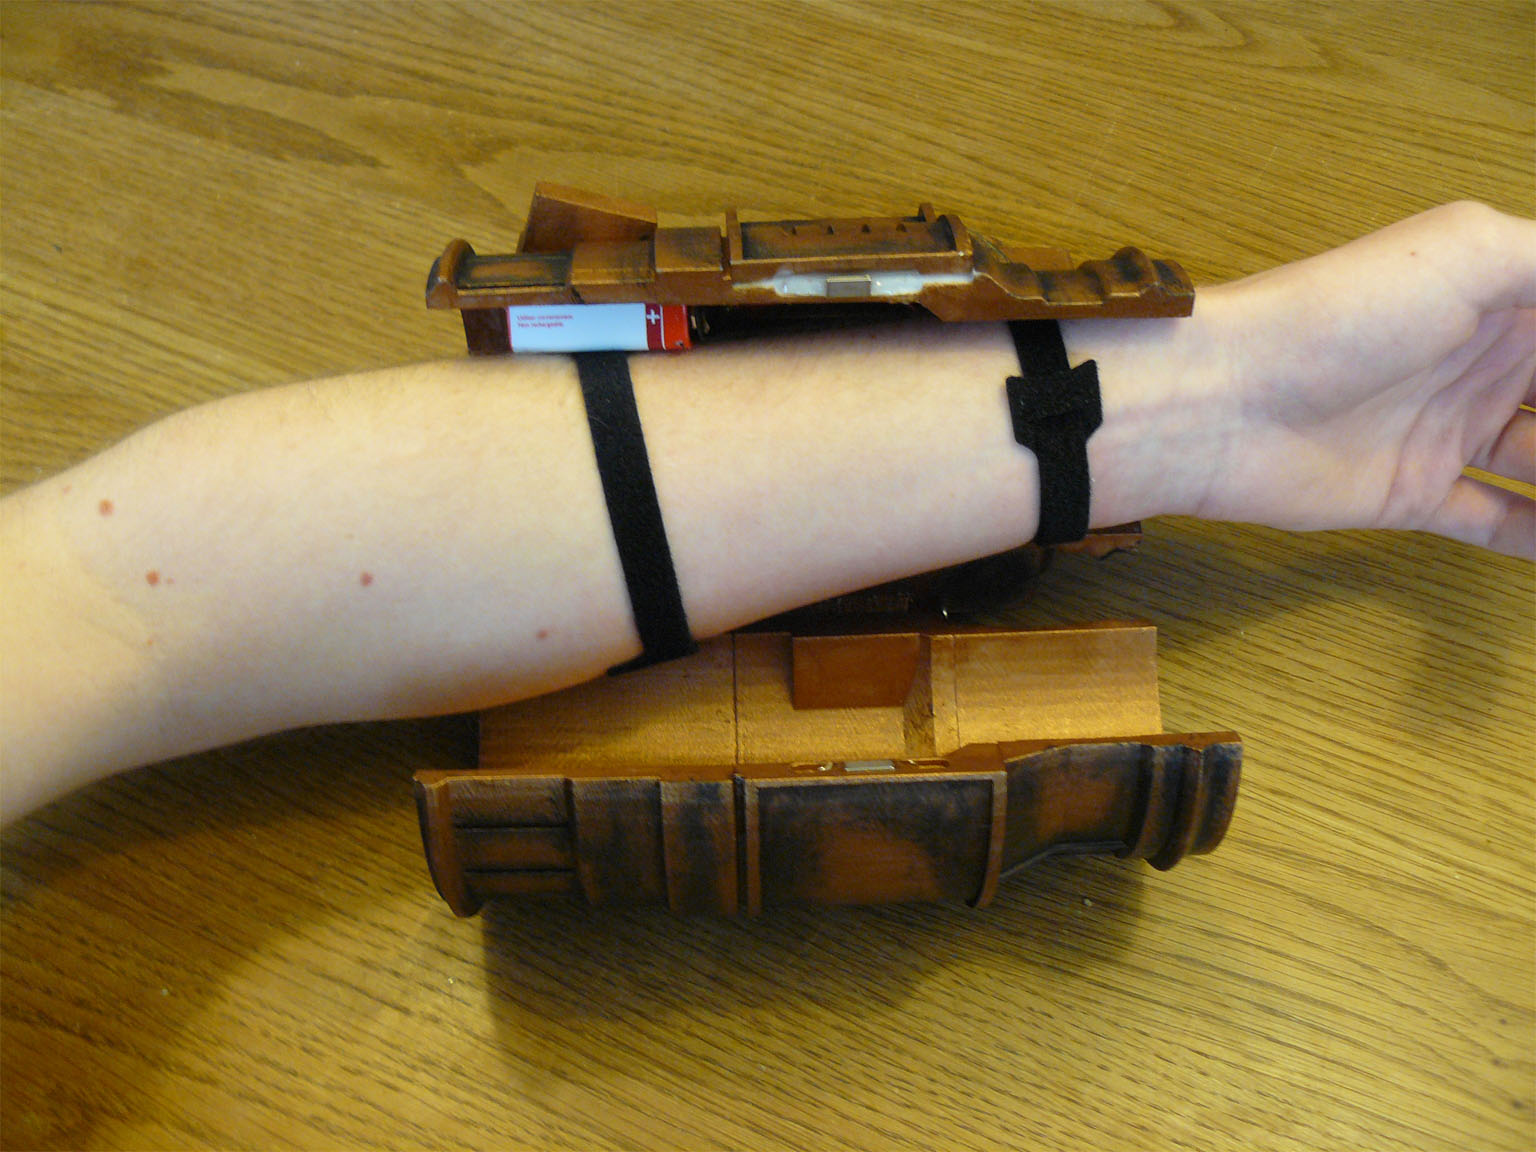
It is not that easy to get on. There is no space for the battery in the Pip-Boy, so it is in the space where my arm is also supposed to be. I have fairly skinny arms, but this was quite a tight fit.The Pip-Boy is attached to my arm with some Velcro straps. The magnets are visible in the slots in the to and the bottom of the picture. While it might be a bit hard to get on, it does fit quite nicely.
The Pip-Boy was one of my first 3D printing prop projects and while I think it came out great, there are some flaws with it. For starters the color is wrong. When I failed to get the color I wanted, I picked a color I saw and liked from a previous prop. It also only holds a smartphone, while a full Raspberry Pi computer shouldn’t be impossible. Because it is a fairly small print, I might redo it in the future, giving it the right color and adding a computer to it.
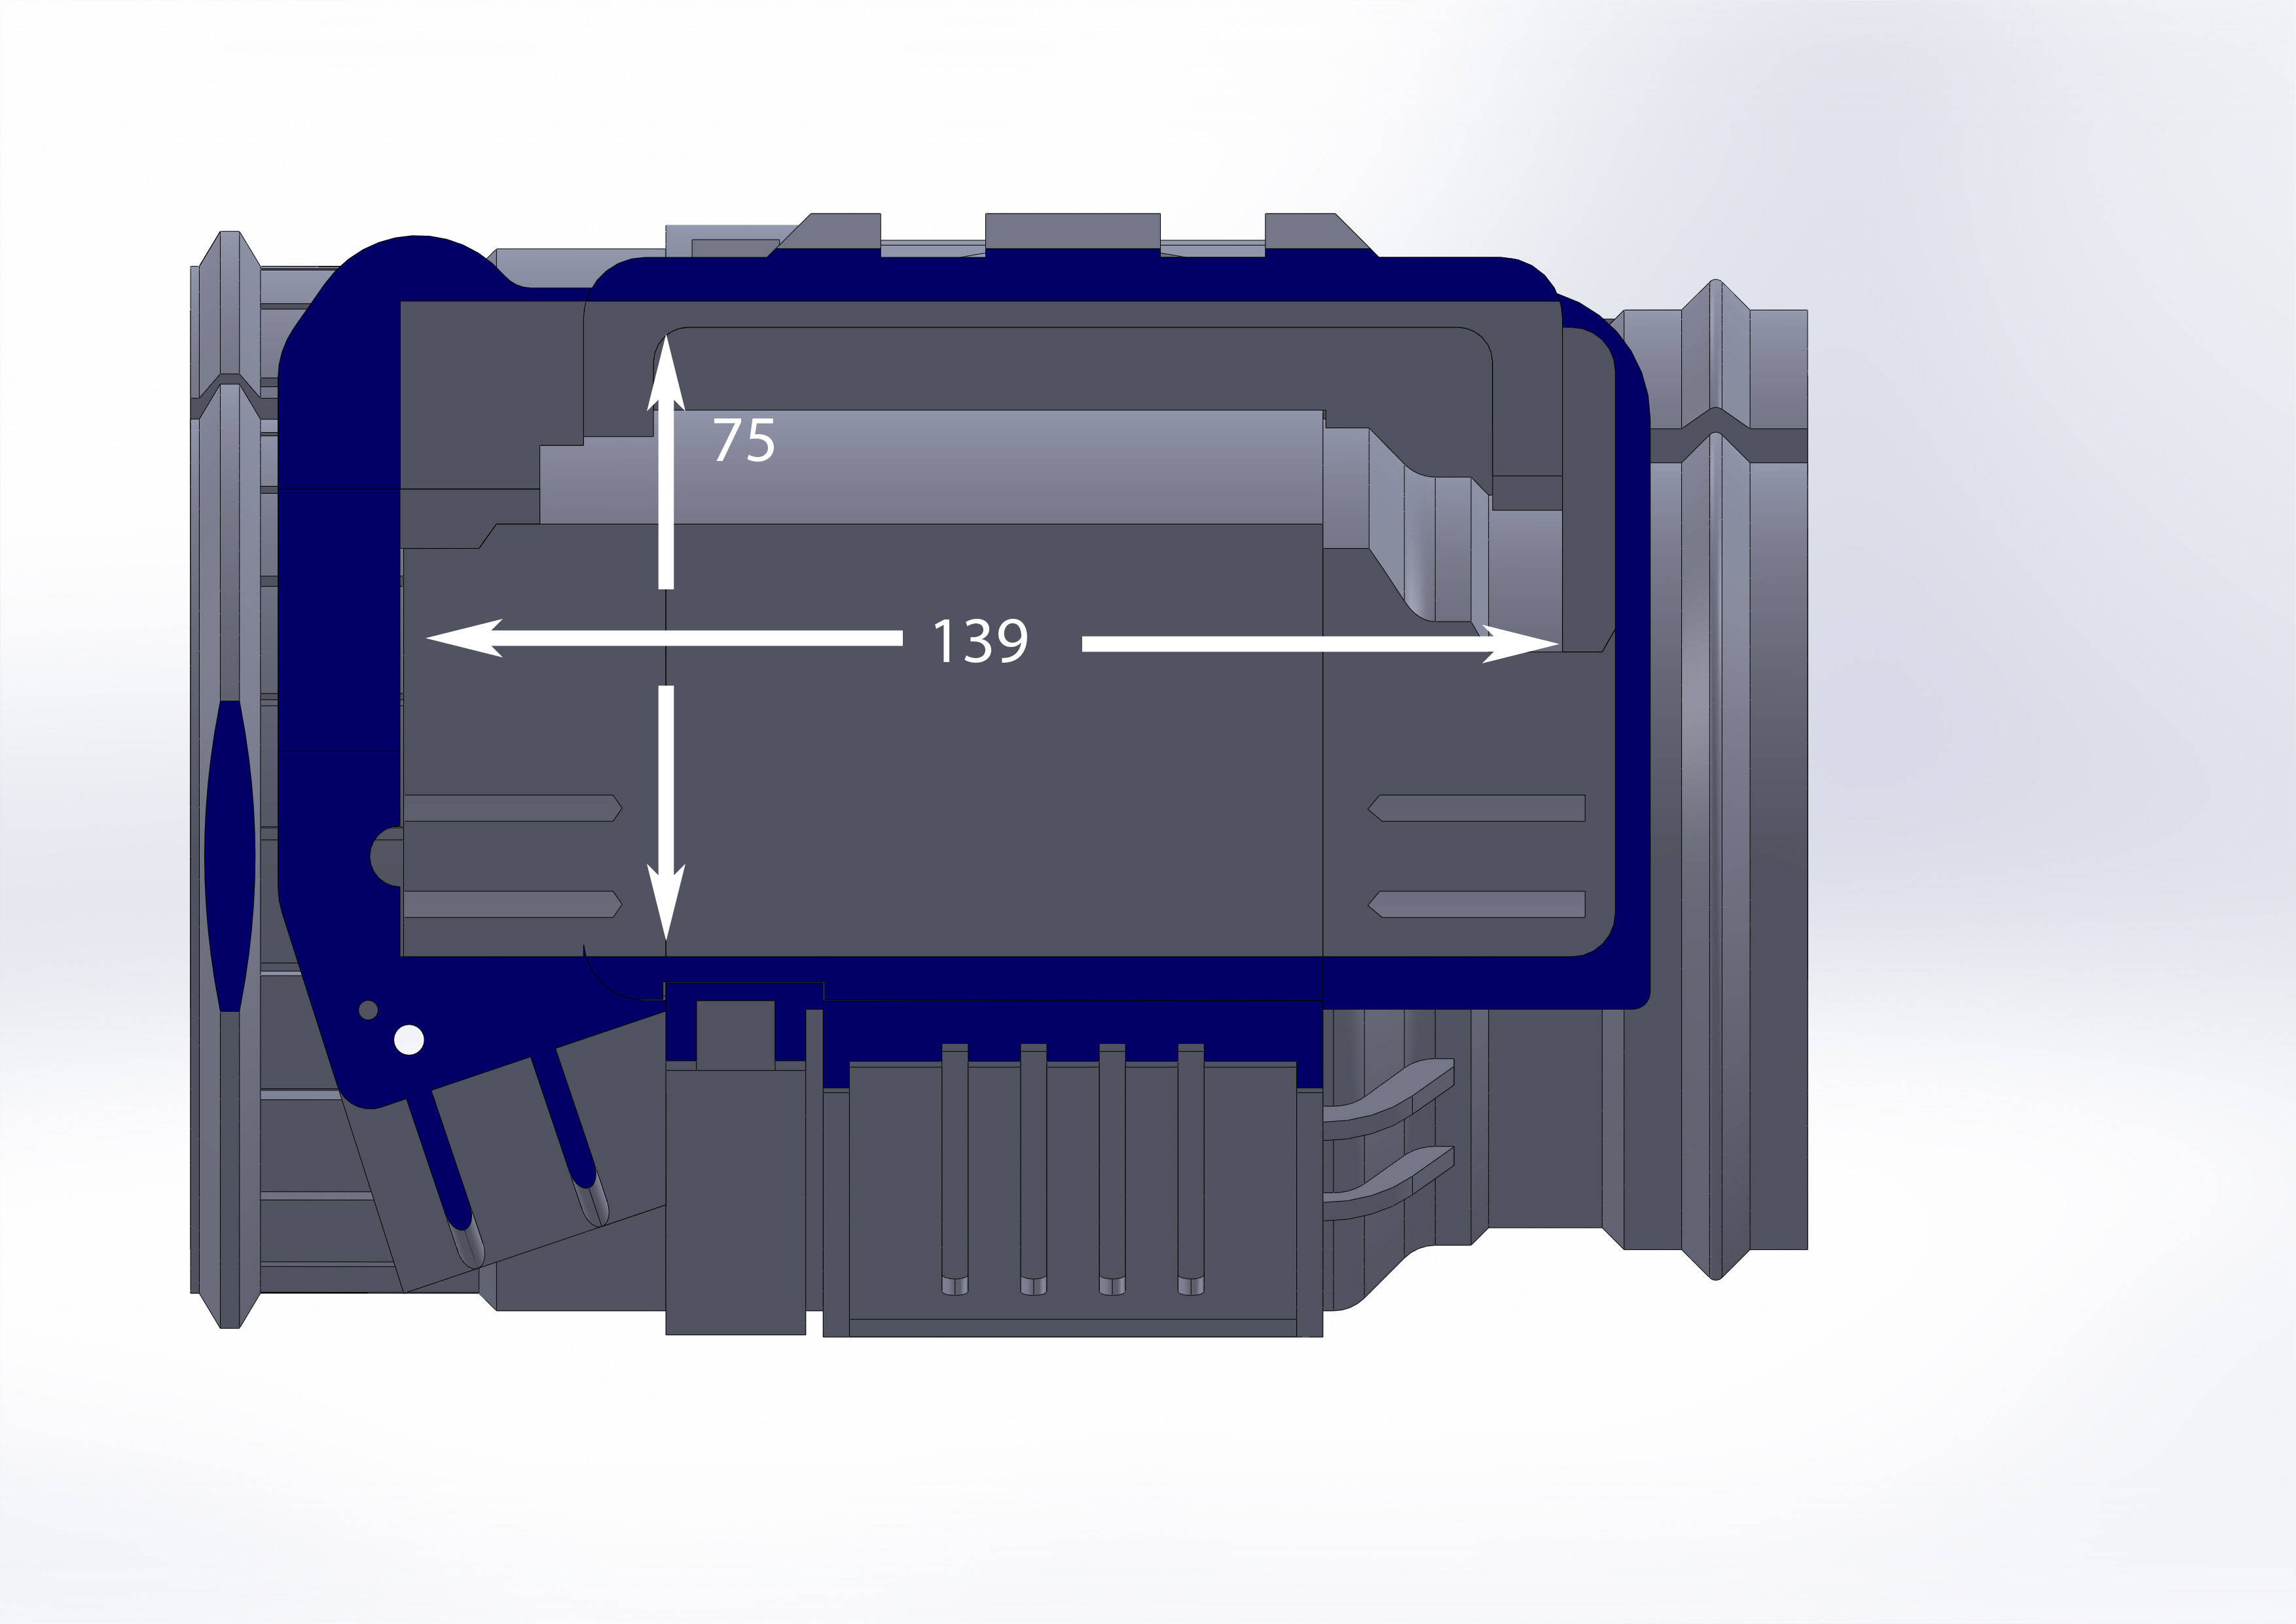
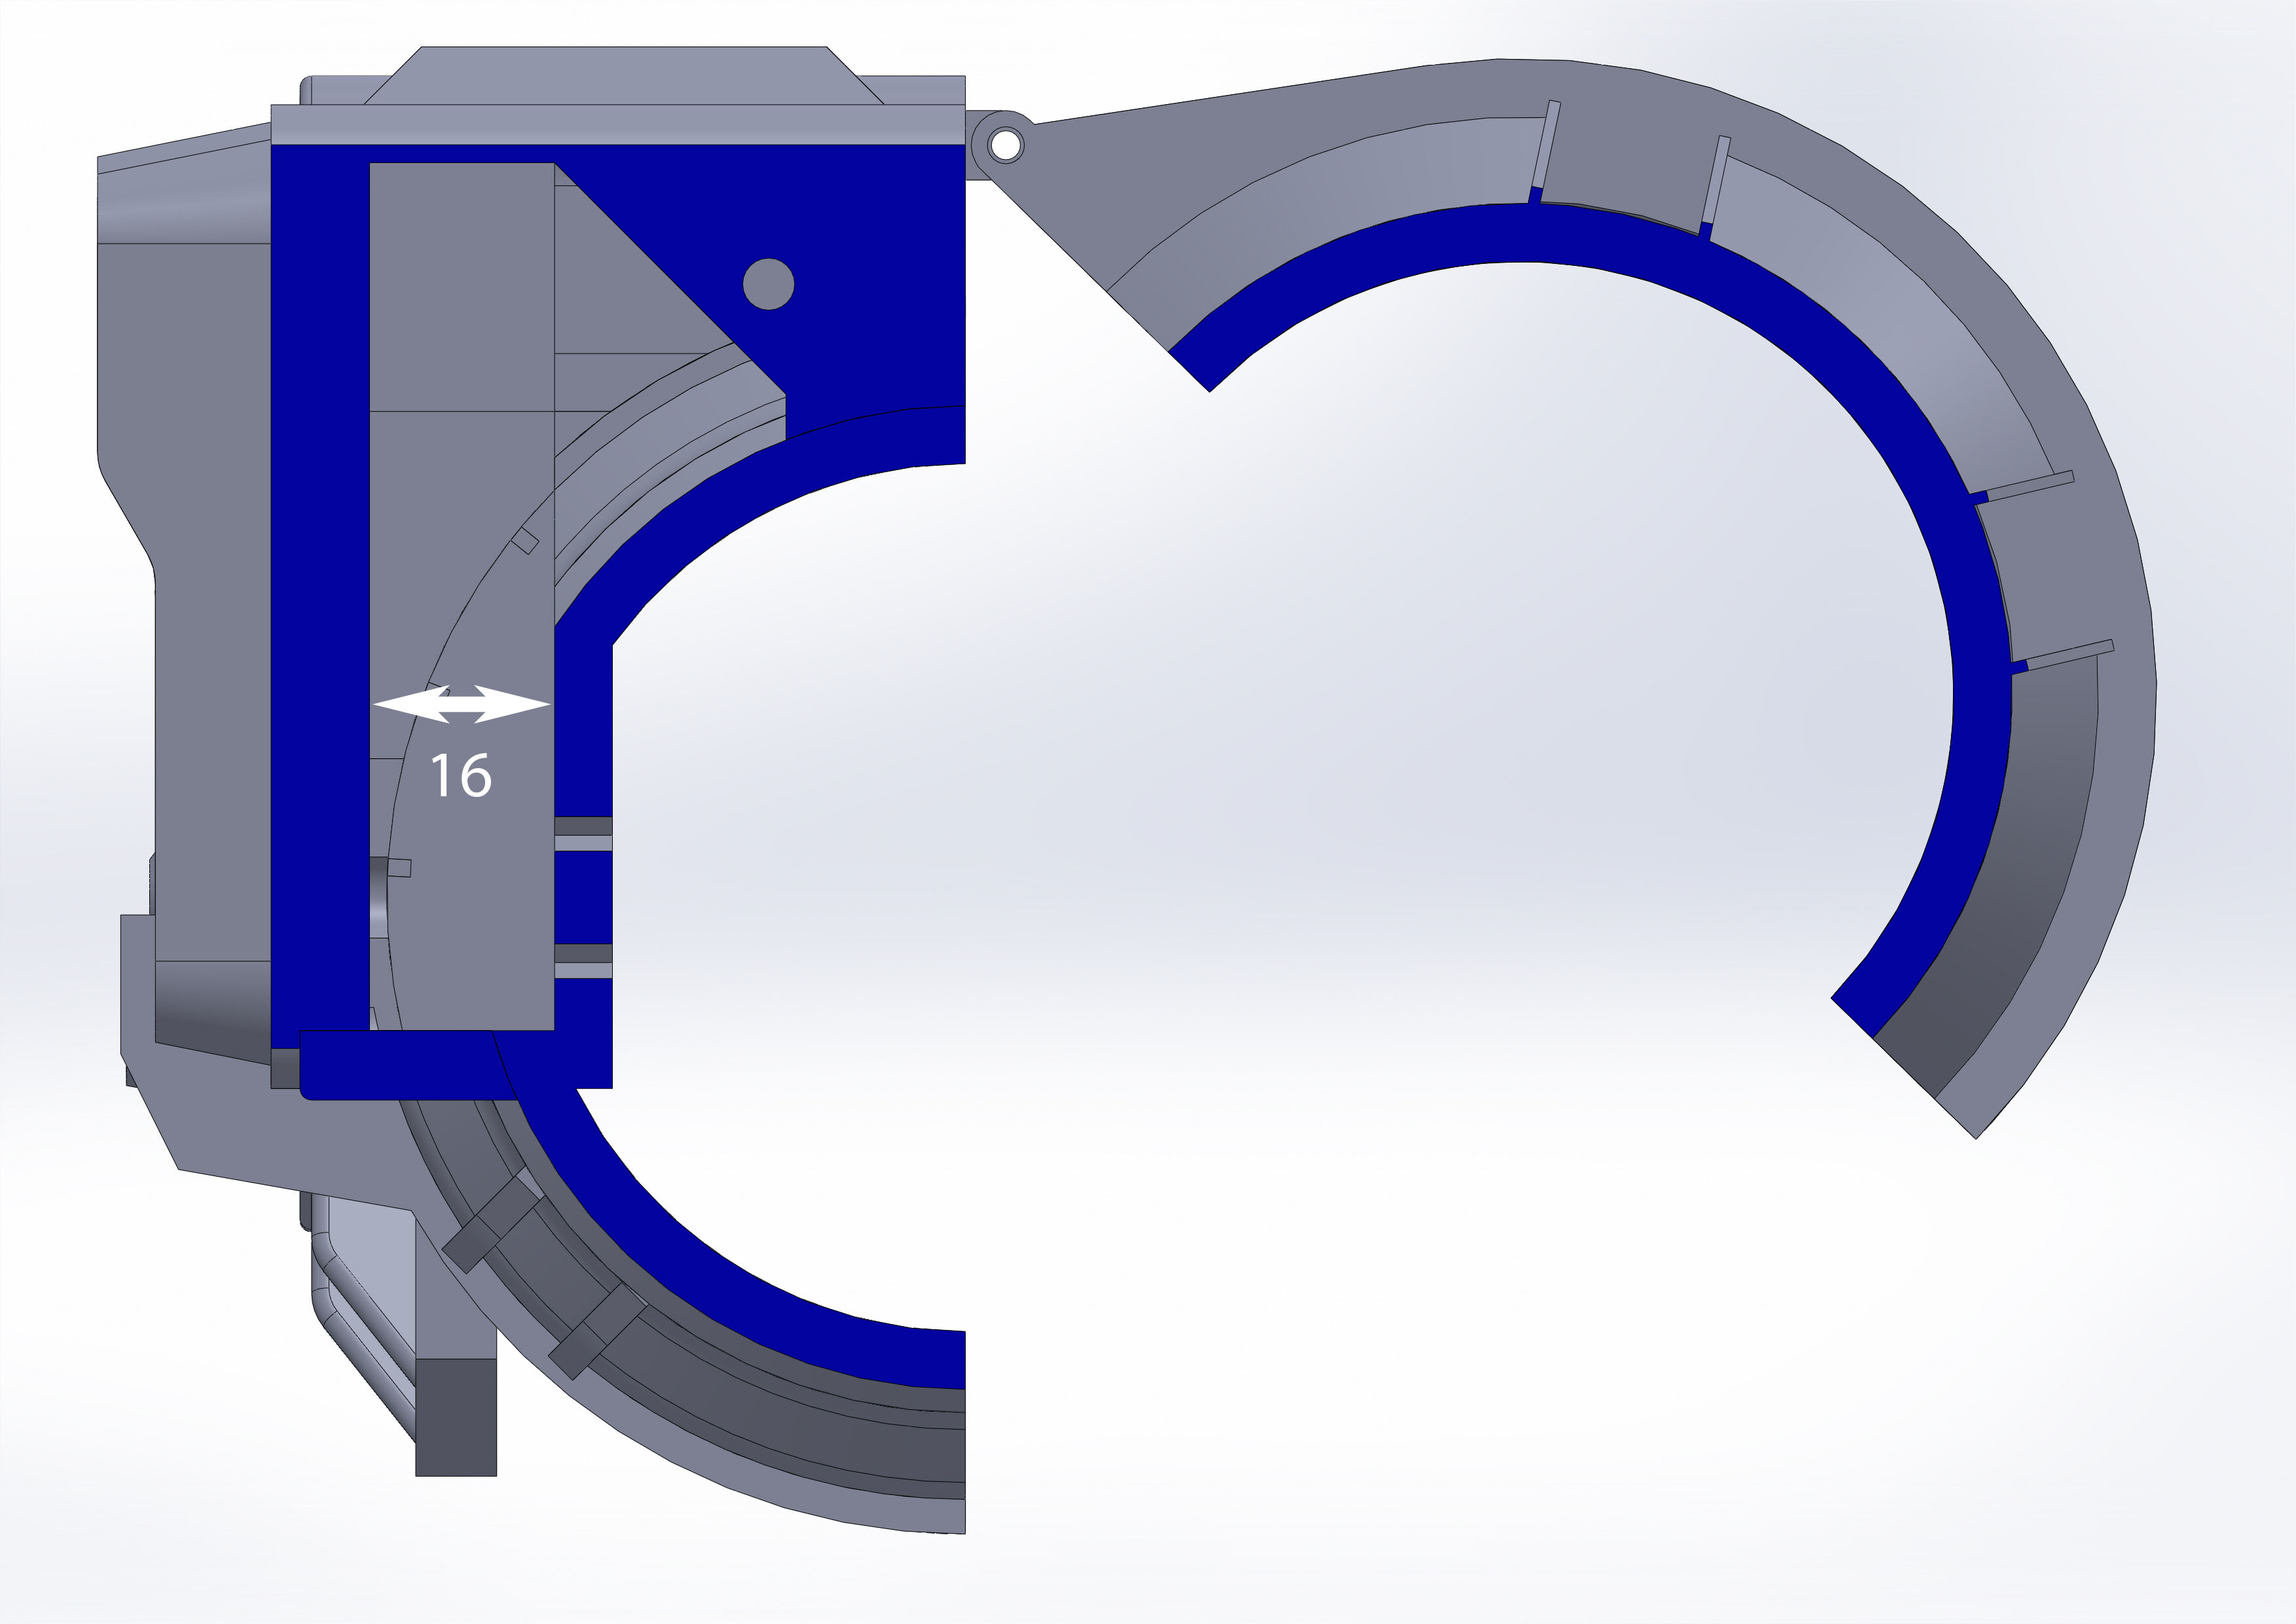
(Edit June 2015, on the list of things I should have done a long time ago, add the internal size of the Pip-Boy 3000. This is the most asked question, and for some reason, I never added it. Now, with fallout 4 the stream of questions is flowing again, so here it is. The sizes of the pip-boy: 139x75x16mm. If your smartphone is smaller than this, it will fit, if it is larger, it will not. Simple as that.
Make it yourself
I added all the files needed to 3D print a Pip-Boy yourself below. All the stl files plus the PDF with the Geiger counter, all bundled up in one neat package. So go download it and print it yourself. I even added the Pip-Boy glove.
Made one? go to the forum and share your pictures with everyone: https://ytec3d.com/forum/viewtopic.php?f=12&t=6

If you downloaded the files from this site and liked it, please consider going to the Donations page. This will help the development of more free designs and plans.
What else you need:
- 500g of filament (PLA or ABS)
- Glue
- Electronics of your choice
- 5 M4 cylindrical screws and 2 M3 cylindrical screws.
- 6 gold colored small screws for the front panel and the back hinges
- Paint
- Magnets
- Velcro straps
License

The project described on this page is licensed under the Creative commons – Attribution – ShareAlike license.
Was wondering if someone might help me program the lights to work. I’ve recently started playing with code and an arduino board so I can test before I do it but not 100% sure where to start.
Considering upgrading to note 20 ultra which would fit note 9 for now as well (164.8 x 77.2 x 8.1 mm) I know the step files for 100%+ is needed but it does not show the dimensions can you post the old table here or on the step site?
could i just enlarge the size to fit my phone? (its an iphone 10 xr)
Some of the screws might not fit properly anymore, but it is mostly 3D prints, so it might work out fine.
What is the diameter of the wrist pieces when assembled? because I’d hate go through all the work for this to not even fit.
The Pip-boy is 185mm long. Size at the back is 90mm x 75.5mm and at the front (closest to the hand) is 75mm x 68mm. The reason it is not a simple diameter is that the screen portion encroaches into the wrist section.
I hope you still check this page, & are able to answer this. Do you think it would be possible to resize it, to be able to get a Samsung S7 in the screen compartment?
I do still check the page and answer. In principle it would be possible to resize it, but I will not. I really lack the time to alter older projects. I am aware that phones have kept increasing in size while the pip-boys are still as small as they were. 2012 phones fit snugly, 2020 phones do not.
If you do have the 3D skill you can download the STEP files and alter those. It is not ideal, but it is doable: https://ytec3d.com/downloads/
The links to the download files are broken. Can you check please? Thanks!
It should be fixed now. The original link did not use https. If it is still broken let me know.
Nice! I think this is fantastic, and Very attractive 3D drawing skills.
Hey, I was looking at different options for making myself a PipBoy and I found this Etsy store doing 3D-printed DIY kits.
https://www.etsy.com/listing/252827437/
Didn’t see any attribution/credit and it looks an awful lot like they’re using EXACTLY your model, just with the LEDs missing.
It is my design. Scroll down and you will see attribution. I do see rare examples of my files being shared without any, but since it does not cost anything more, most of the times people do it just fine.
I don’t have a 3d printer. I was planning on making the pip Boy out of plastic from a mold, and I got really exited when I found the dimensions of the screen in I’m, although I can’t figure out how to find the radius of the wrist. This would be very helpful, and I also need to know the width of the wrist area. I already made a computer 3d model of the phone area and only need the radius and width to complete my project. Thank you. (Please send me an email if you can)
Yoou actually make it appear so easy with your presentation however
I in finding this topic to be actually one thing that I think I’d by no means understand.
It sort of feels too complicated and extrremely broad for me.
I am taking a look ahead to your subsequent submit, I’ll
try tto get the dangle of it!
Could you please electronic mail me some brokers you’re aware of that specialize
in leather-based goods (jewelry boxes).
I’m looking into buying a 3D printer, what size/brand would you recommend so I can print this pip boy?
Ok I found the file must have got deleted form my zip. no help needed.
Hi I hopping someone can help me, I unable to find a part in downloaded zip. so I am unable to complete the pip-boy 3000 with out this file, any help greatly appreciated.
I think there is part or stl file missing in the download zip, I have downloaded it twice now, and I am unable to find the little stl part with groves that is left to next to wheel stl and left top . I can see it in the picture on this site that shows all the white parts here http://ytec3d.com/wp-content/uploads/2014/02/Pip-boy-parts-overview-1024×508.jpg and its the 2nd one on the top left.
Love the design. I use Creo for work and I completely understand how much work you put into this. Awesome job.
Questions ….
What settings did you use … ie. layer height, fill density, supports and any other useful info. I know each printer is different, but your settings will help me judge what settings I should use.
I have never been able to effectively use stl files for any mods I want to do. Any chance you can send me a single file to see if I can import it and modify it.
Hi i want make for me one pip boy 3000 but my cellphone have 140 ..its a problem ??? Just 1 mm
Looks great. I’m looking into building a raspberry pi version- do you think there’s enough room inside for something like that? It looks like the screen opening might be close enough for a 7″ screen, do you think one would fit? Thanks for the schematics and all the hard work!
Hard to say if a 7″ screen would fit. Seems a bit on the large side, but things like this are hard to call. Best way is opening the files in software that allows you to measure. Another alternative is printing the screen part and see if it fits.
Hi, I just love that you took you time to do this – it’s one of the things that made me buy a 3 printer in the first place. my only problem is that Im not too good with 3d programs yet at my printer is to small to fit your design. is it possible to “cut” the pieces in a way so it’s still printable? (I´ll just have to use more glue to get the pieces fit together i guess).
My printer’s dimensions (Micro3d):
Print height: 116mm (4.6″)
Base Print Area: 109mm x 113mm
Print Area Above 74mm: 91mm x 84mm
Removable Print Bed Size: 128x128mm
Printer Dimensions: It’s a cube, 7.3 in (185 mm) per side.
If you could help me out I would greatly appreciate it! And since the Micro is such a hit, I’m probably not the only one who would like this to happen! 😀
I will have to disappoint here. I design my props already for printers not too large, so the files have already been cut up into smaller pieces. I however cannot keep every single printer in mind while designing, and so the Micro is excluded from this list. It is simply too small. I already have people who think these models are in too tiny pieces. Simply cutting up costs time and will make it difficult to reassemble. Cutting up for assembly costs even more time and I am not going to do it for a years old project.
There is not much I can do for you, sorry.
I’ve just 3D printed one of these for a costume!…however, I’m wondering if you might be able to be a bit more specific as to the additional parts, so I might be able to order from somewhere like Amazon? I visited a Home Depot and a Radio Shack here locally, and they didn’t seem to know much about what I was looking for, unfortunately.
Sorry if this has already been recommended, but in game the Pipboy seems to extend to the glove, like here: https://static.squarespace.com/static/51b3dc8ee4b051b96ceb10de/51ce6099e4b0d911b4489b79/51ce61a9e4b0d911b449be0f/1361901200333/1000w/Fallout3_Pipboy3000_Full_1.jpg
So, would it be possible to add such an addition to your pipboy to house that battery? If so it could prevent discomfort when wearing it around. The inside of the pipboy brace could then be padded with something else to make for a secure and comfortable fit.
Not to be that guy, but the pip-boy glove is already included in the download files. I do not know if they are included in the source, but there is one in the stl files.
That’s good, I haven’t downloaded the files so I don’t know what exactly is in there. I’m not asking for the glove though, I’m talking about housing that battery somewhere other than right against the forearm. I can’t imagine that being comfortable especially for people with larger arms. So if the battery was stored in a compartment on the back of the glove with the wires concealed under the glove it could be more convenient and comfortable for long term wear.
I’m sure it can be done, but I’m not experienced enough to believe I know the best way to do it and there may be details in the design that I’m not aware of such as the battery not actually fitting in that spot or maybe hiding the wires would be more difficult than I imagine.
any chance of instruction for wiring the pic/leds or some better pictures of the board?
The pices will not slide togeather what should i do?
I fixed it i had to cut away some extra plastic
You know nothing
hey jon I have a friend of a friend who has a 3d printer and long story short is willing to make it if I pay for the filament and 5 bucks an hour can you tell me about how long the printer will take and about how much filament will be used?
Is the PDF file for you to see how to make the Geiger counter or what? I don’t know how 3D printers work yet.
The PDF is what you print on paper so you can glue it to the 3D printed part afterward. 3D printers can already do an amazing deal, but they cannot do that yet.
thanks for clearing that up
Hey I was wondering if you could make a file that has the same length but a circumference of 37cm around the forearm and 21.5cm around the wrist?
Once this is assembled, how does one go about putting in and taking out the phone??? I made one but am totally stumped on how i put any electronics into it.
Does anyone know what hardware i should use I financed to give my pip boy the functionality of An android phone without the phone?
Also is it possible to have the led indicator be a plasma disk to let you know if you have notifications or need to charge up the device?
I’m sure you already saw this, but one of the most impressive real-life pip-boys I’ve seen to date was made at a NASA incubator innovation program using your designs: https://2014.spaceappschallenge.org/project/pip-boy-3000/ .
Hey Dragonator, I am trying to use Shapeways to print out my own copy of your Pip-Boy 3000, but I have very little experience with 3D modeling and printing. I was wondering if you had the scale for the pieces, and in what measurements did you number everything (inches, centimeters, etc.). Your design is the best I’ve seen out there.
I do not think shapeways is the best way to print this design. It is optimized for FDM printers. Printing it on SLS printers (shapeways way) is very expensive. To my knowledge, there is also a design on shapeways that is actually optimized for SLS printing.
Units are in millimeters.
I don’t get how I would be able to eidt the files to fit a Galaxy Note 3? Its 150mm x 80mm and I wanna edit the files to fit that, but I don’t know how to? Would you be able to edit it for me so that when I print, it will fit that in the screen? Maybe go for 151mm x 81mm? Thanks very much and look forward to hearing back form you.
Just simply modifying won’t do. I already opened the design up as much as possible, and just widening it by 10mm would look odd. There is however, a fairly simply solution. This pip-boy is for fairly thin wrists. Quite a few people actually scale up the files before printing, normally 5-10%. If you scale the Pip-Boy up by around 8%, your phone should fit. Some bolt holes will get some clearance, but that can be fixed while assembling.
Forgive me, but which program would I use? I’m sending it to be externally printed, so would I need to request the person to scale it up 8%, or would I need to download a program myself and do it?
Thanks for the reply.
I usually use replicatorG, but that program is already ancient, and not really offers that many options (simple scaling, simple 90 degrees orientation). Other than that, I really don’t know good programs to scale and orient STL files with.
Check out Cura! https://ultimaker.com/en/products/cura-software Its what I use with my Reprap Wilson 🙂 Makes light work of printing and support materials.
.. i’m new to a lot of this stuff, but has worked with pep a little and my husband made a nobel 6 halo armor for dragoncon last year .. do you think these files could be used somehow to make a foam or pepfile? <sorry, again, noob question)
But awesome looking pipboy!!!
Don’t worry about it,
Sadly, there is not practical way to make a foam model with these files. The files are made for 3D printing. It is actually not really that useful for anything else. Maybe you could use the 3D models for reference to make it out of foam, but that would only make things a tiny bit easier.
There is not much help I can offer here. My specialty is 3D printing and CAD, not prop making the normal way.
what kind of smartphones can it hold? can it hold an iphone 6?
Hi, quick question. What did you use as a hinge-pin to join the two halves?
Questions: 1.) Is there an assembly guide? I’m mildly embarrassed to ask because this is such a newbie question, but we all have to start somewhere. 2.) It seems the downloads don’t have “Pipboy” printed on the face as seen in game. Is that something you’d consider amending, or was that a purposeful decision?
Also: Thank you for sharing this Pipboy design! I wish more people shared your open source philosophy. I saw another video listed here: https://www.youtube.com/watch?v=eT6Xu3CP5kA that someone made using your design. I’m brand new to 3D printing and minor electronic and programming work, but I’m so excited to start into this learning opportunity. My foam Pipboy broke down after the last DragonCon, and I’m excited to invest some time and effort into a more durable one.
You rock!
Please don’t feel embarrassed, it’s a perfectly ok question.
1). sadly, no, there is no real assembly guide, but I assure you that when you have all the pieces, it will make sense how it goes together. If at that point you do still have problems, mail me and I will help.
2). that was a purposeful decision. The Pip-boy text is incredibly tiny. normal FDM printers can’t really handle the detail, and so I decided to keep it out, to prevent problems.
can you tell e what you used to slice this with? I have sliced back piece 2 with Slic3er, Cura, and Simplify3D and had various errors. With Slic3er and Cura, the first setback does not print as a solid layer. With Simplify3D it prints fine until the very end, whereupon it tries to drive the hotend down into the print. The final layer is at Z 70.3 according to the gcode, but at that level the hotend is about 3mm below the top of the print. Would it be possible to get your gcode files to compare to mine?
Do you know what length of screws you need? They come in lots of lengths.
I at this point do not know. When I made this, I was a bit less detailed with my posting. I also didn’t have the screws I used in stock, I simply cut the screws to the length when I was making it. They are all not longer than 20mm.
Would this model work with a samsung galaxy young?
For some dark and mysterious reason I never directly mention the dimensions of anything. Cavity size where the phone can sit is 138mm wide, 72-75mm high and 16mm deep. Hope this helps you determine whether it will fit or not.
Is there a type of glue that you recommend on this material?
Could you please upload the Part files for Solidworks if you have them? Yours looks really amazing but I just wanted to make a few, little changes.
Due to the very inefficient design, I can’t upload the Solidworks files (they are 60MB, I don’t have infinite bandwidth here). I have uploaded step files, which can be imported in Solidworks and edited. I hope that it helps and that you will share what you made.
The step files can be found in the downloads:
http://ytec3d.com/downloads/
I think this is fantastic! I would like to make two, one for my girlfriend and one for me 🙂
I’m new to 3D printing, how can I open/modify the files you gave? I wanted to make the switches to rotate.
Thank you!
Gabry295
Depends on your 3D drawing skills. STL files by nature are almost impossible to work with. I have solidworks files and step files, but those will only be useful if you know how to use them. If you can do something with those formats I will add them to the downloads page.
This model is great for cosplayers.
i modified it a bit to put in a raspberry pi, screen and some other electronics.
and this is it https://drive.google.com/file/d/0B-L67geuUOicam1rQ2FMWmJZQlk/view
the software is WIP, but it is good enough to cosplay with it 🙂
That is just awesome to see. I never saw my model fitted with working electronics. A shameless plug for my forum. If you have more progress, please share, either through the comments or through the forum. I’d love seeing more.
Any sort of tutorial you’d be willing to share?
The drive link is broken due to an update, i uploaded it to youtube.
I got notifications people trying to access it
https://www.youtube.com/watch?v=h71LulqUw3o
It should be fixed now. The original link did not use https. If it is still broken let me know.
Hi! i was wondering if i can buy all the 3d pieces that you printed so i can mount my pipboy 🙂
if you are agree please contact me at my e mail and tell me how much will it costs and if you can ship to Italy (yeah i’m italian 😉
Would you be willing to make one for sale? If so, how much?
Sorry for the late reply,
I myself do not make any kits, they cost me too much time. I do have a few people who I know sell pip-boy kits. You can contact me through the contact form if you are interested.
Did you ever get back to this to put a Raspberry Pi in it? I think it would be fun to build one for an upcoming Con; I think it would be cool to put the Con schedule and floor layout on it, plus maybe a third screen with a QR code. 🙂
Still in love with this! I’m going to print it shortly, as I plan to try and make a proper Pip-Boy 3000 (that is, with all the knobs and dials that spin to go through menus and other features). However…since I did the math, and it looks like it would take me at least 5 hours to print any of the parts that wrap around the arm, I do want to ask what the dimension of the arm openings are. Thanks!
The back side (the side facing the elbow) has a diameter of 90mm, the front side has a diameter of 75mm.
Awesome! Thanks!!
Thank You, It is a nice Pip-Boy and looked as if you put alot of time and effort into it. For a more realistic screen, you could also use an EL sheet, Electroluminescent Sheet. Any way, you do a great job and I am a big fan of your work.
Awesome write up and thanks for the 3D files I originally saw this on… Thingiverse… and had to make one, using a Da Vinci 1.0 printer it took ~60hours to print but I’m kinda a big guy so I scaled it up 12% to get a semi-loose fit and I put a display in place of the phone and used an Android tablet to run the screen, I put a PSP joystick in place of the knob to control the mouse feature on my tablet with an Arduino. I still have to work out the LEDs as the arduino was permanently mounted in an inaccessible spot without thinking… maybe I’ll do the glove with a second controller.
I know this is a long shot, but would you be willing to share those upscaled pipboy files. My forearm is too big to fit and I’m not really experienced with that sot of thing. Thanks in advanced.
I was in the same boat. the way I solved it was by setting the scale on each print to “1.1” in Simplify3D. Your slicing software of choice might (and should, really) have a similar feature.
It is a difficult problem for me to fix, because I can’t reproduce it. If scaling it up remedies the problem, and you have fairly thin wrists, I advice trying to scale it up by less. 10% is quite much for some of the parts of the pip-boy. In any case, I will keep scaling it up in the back of my head when this problem rears it head again.
I have a weird problem where the design fits my wrist perfectly but the forearm piece is too small. my forearm has a circumference of 37 cm I was wondering if the design itself could be altered to expand the piece closest to the elbow without altering the wrist piece.